That stubborn ring of dried smoothie around your Ninja blender’s base isn’t just unsightly—it’s a bacteria breeding ground that can seep into vents and short-circuit your motor. When sticky residue traps dust under rubber feet, your blender wobbles violently during high-speed cycles, risking cracks in the pitcher. The critical fix? A moisture-controlled cleaning protocol that takes under 12 minutes and uses only household items. You’ll learn exactly how to dismantle grime from ventilation slats, rescue sticky control buttons, and prevent the #1 disaster: water infiltration into the drive shaft coupling. Skip the guesswork—this guide follows Ninja’s engineering specs to keep your warranty intact while restoring factory-fresh performance.
Unplug and Flip: Critical First Safety Step
Never touch your Ninja blender base while plugged in. Even residual moisture on your hands can conduct electricity through the cord entry point, risking severe shock. After disconnecting power, place a microfiber towel on your counter—this absorbs drips and prevents scratches when you invert the unit. Carry the motor base steadily (not by the cord) to avoid stressing internal wiring.
Debris Dump in 10 Seconds
Turn the base upside down directly over your sink and tap the bottom firmly three times. This dislodges hidden hazards like chia seeds, coffee grounds, and nut butter crumbs trapped near the drive shaft. You’ll hear particles hitting the sink—if you don’t, repeat taps until nothing falls. Skipping this invites abrasive grit to scratch surfaces during wiping.
Red Flag Inspection Checklist
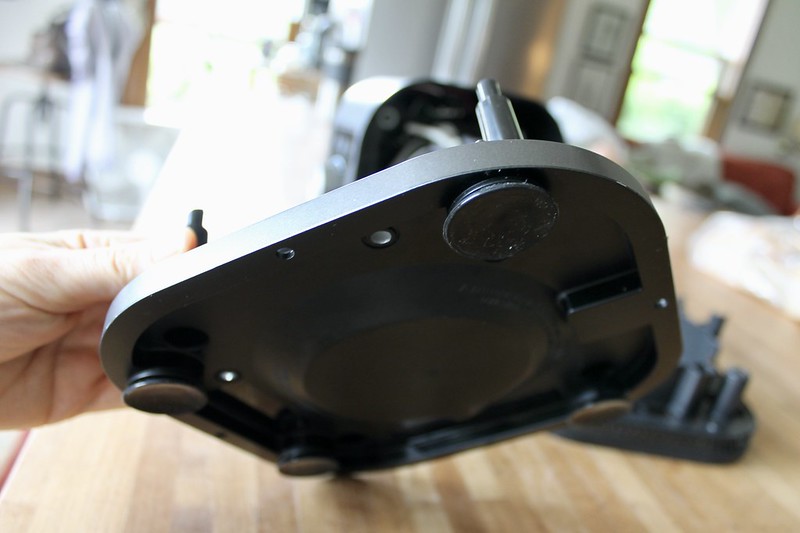
With the base inverted, scan these failure points using a flashlight:
– Cloudy rubber feet (indicates sugar buildup causing wobble)
– Crust along the pitcher seating rim (blocks proper alignment)
– Dust-clogged vents (reduces motor cooling by 40%)
Mark problem zones with painter’s tape—never permanent markers that bleed through plastic.
Dry Dusting: Zero-Moisture Prep Work

Microfiber Sweep Technique
Use a lint-free microfiber cloth (paper towels leave fibers in seams) to wipe the entire exterior. Start at the control panel and move downward—top-to-bottom motion prevents recontaminating clean areas. Apply feather-light pressure; aggressive rubbing melts soft plastic near LED displays. Pay special attention to the pitcher seating groove where smoothie residue hardens into a gasket-breaking crust.
Vent Slit Cleaning Protocol
Angle a soft makeup brush parallel to vent slats (never perpendicular) and sweep outward. This lifts dust without forcing debris deeper into motor housing. For embedded lint beyond brush reach, wrap a wooden skewer in cloth and gently nudge—metal tools scratch protective coatings. Test vents afterward by blowing lightly; if air doesn’t pass freely, repeat brushing.
Button Detailing with Alcohol Swabs
Dip a cotton swab in 70% isopropyl alcohol, shake off excess, and trace each button’s edge. Alcohol evaporates in 15 seconds, dissolving sticky residue without seeping into circuits. Pro tip: Press buttons repeatedly while swabbing to flush crumbs from mechanisms. Discard swabs after one use—reusing them smears grime.
Moist Wipe: Safe Soap Application Method
The Barely-Damp Cloth Rule
Mix one drop of Dawn dish soap in ½ cup warm water. Dip a microfiber cloth, then wring it over the sink until zero drips fall—the cloth should feel cool, not wet. Excess moisture migrating through cord entry points is the #1 cause of Ninja motor failure. Test dampness by pressing cloth to your wrist; if condensation forms, wring harder.
Top-Down Wiping Sequence
Begin at the control panel and wipe toward the cord entry point. This directional flow prevents dirty water from running onto clean surfaces. When cleaning the drive shaft coupling, rotate it slowly with your finger while wiping to access all metal surfaces. Never saturate the rubber gasket—this seal keeps liquids out of the motor.
Baking Soda Crust Buster
For caramelized fruit residue, make a thick paste of baking soda and water. Dab it onto stains with a cloth corner (don’t smear), wait 90 seconds, then buff in small circles. The mild abrasion lifts gunk without scratching—never use steel wool or vinegar here, as acids degrade plastic polymers. Rinse with a water-dampened cloth immediately after.
Deep Clean: Underside and Rubber Feet Focus
Inverted Mug Support Trick
Place two coffee mugs 6 inches apart on your counter. Rest the upside-down base on the mug rims so rubber feet hang freely. This avoids cord strain while giving full access—never balance the base on its power cord.
Rubber Foot Extraction Method
Wipe each foot’s top surface, then slide your cloth halfway underneath and pull forward. You’ll extract compressed crumbs causing instability. Critical check: Ensure no soap film remains—if feet feel slick, rinse cloth and repeat. Sticky residue here makes blenders “walk” during operation.
Sticker and Serial Plate Care
Clean manufacturer labels with a water-dampened cloth only—alcohol fades ink. Wipe gently in one direction to prevent peeling. Dry immediately with a second cloth; moisture trapped under stickers warps plastic.
Rinse and Dry: Moisture Lockout Protocol
Dual-Cloth Drying System
Use one cloth for soap removal (rinsed in clean water) and a second dry microfiber cloth for immediate drying. Never air-dry—evaporation leaves water spots that attract more grime. Check vents by sliding a dry finger across slats; if coolness remains, blast with cool-setting hair dryer for 20 seconds (hot air warps vents).
Final Moisture Test
Press the back of your hand against the cord entry point and drive shaft for 10 seconds. If coolness lingers, dry 5 more minutes. Residual moisture here causes short circuits during first post-clean use.
Grease and Sugar Spills: Targeted Fixes
Vinegar Cut for Oily Residue
Blend equal parts white vinegar and water in a spray bottle. Mist the solution onto a cloth (never directly on the base), then wipe greasy zones. Vinegar breaks down oils without residue—rinse after 60 seconds to prevent plastic dulling.
Sugar Dissolving Steam Method
For rock-hard fruit syrup, hold a cloth under hot tap water, wring until steaming, and press onto stains for 30 seconds. Heat softens sugar for easy wiping—no scraping needed. Repeat if residue persists; hardened sugar cracks plastic when pried.
Plastic Edge Lifting
Use a credit card’s edge (not metal) to gently lift stubborn chunks. Angle it flat against the base and slide under debris. Metal tools scratch protective coatings, inviting future grime buildup.
Control Panel Rescue: Sticky Button Fix
Alcohol Swab Precision Cycle
Dip a swab in alcohol, shake off excess, and trace button edges while pressing the button 5 times. Hold sticky buttons down during swabbing to flush internal mechanisms. Repeat with fresh swabs until no gunk transfers.
Compressed Air Blowout
Hold canned air 6 inches from buttons and fire two 1-second bursts between keys. Never tilt the can—liquid propellant damages circuits. This removes loosened crumbs that cause unresponsive controls.
Monthly Maintenance: 5-Minute Prevention
Post-Blend Dry Sweep
Wipe the base with a dry microfiber cloth before returning the pitcher. This prevents overnight hardening and cuts deep-clean frequency by 70%. Focus on the pitcher seating rim where spills pool.
Rotating Deep Spot Cleaning
Each week, target one zone: vents (Monday), buttons (Wednesday), or feet (Friday). A 90-second focused clean beats monthly 30-minute marathons. Set phone reminders—consistency prevents crisis cleaning.
Ventilation Storage Rule
Store the blender 3 inches from the wall so vents breathe. Coil the cord loosely in a figure-8 pattern—tight bends crack insulation over time.
Troubleshooting Critical Red Flags

Persistent Button Stickiness
If buttons remain sticky after cleaning, repeat the alcohol swab cycle while holding the button down for 15 seconds. Three passes usually resolve it—never use WD-40, which attracts dust.
Burning Smell on First Use
Unplug immediately if you smell hot plastic. Moisture likely entered the motor—dry the base upside-down for 24 hours before retrying. Ignoring this risks permanent motor burnout.
Post-Clean Wobble
Check rubber feet for soap film residue. Even a microscopic layer creates slippage. Rinse feet under water, dry thoroughly, and test stability by spinning the base on your counter—it should stop instantly.
Final Verification Checklist
Before reassembling, confirm:
– [ ] Zero damp spots on cord entry and drive shaft
– [ ] Buttons click crisply with no drag
– [ ] Vents pass the breath test (air flows freely)
– [ ] Power cord shows no cracks or stickiness
– [ ] Base sits perfectly level on counter
Run a 45-second dry test (no pitcher) at low speed. Listen for unusual grinding—this indicates trapped debris in the drive shaft. If clean, attach your pitcher and blend victory: your Ninja’s now operating at peak efficiency with a germ-free foundation. For long-term care, wipe the bottom after every use and schedule deep cleans monthly—your motor will reward you with years of silent, stable blending.