

That post-cooking disappointment when you lift your Ninja Foodi grill lid to reveal a battlefield of splattered grease and carbonized food residue? You’re not alone. Over 68% of Ninja Foodi owners struggle with lid maintenance according to user surveys, and for good reason—ignoring that grime impacts your next meal’s flavor while creating bacterial breeding grounds. But here’s the relief: you can restore your grill lid to factory-fresh condition without harsh chemicals or risking damage to critical components. This guide delivers the exact professional techniques for cleaning your Ninja Foodi grill lid safely, whether you’re battling light splatters or years of baked-on buildup. You’ll learn time-tested methods that protect your appliance’s integrity while ensuring every nook gets properly sanitized—no guesswork required.
Power Down and Cool Your Ninja Foodi Completely
Unplug Before Touching Any Components
Never skip this critical safety step. Your Ninja Foodi must be unplugged from the electrical outlet before any cleaning begins. Those heating elements retain dangerous levels of heat long after cooking stops—sometimes up to 90 minutes. If you attempt cleaning while components are warm, you risk severe burns or electrical shock. Always treat the unit as live until fully disconnected.
Verify Complete Cooling with the Hand Test
Don’t rely on surface temperature alone. Place your palm 2 inches above the grill lid (never directly on it) for 10 seconds. If you detect even faint warmth, wait another 15 minutes. The internal components like the heating coil and thermostat housing cool much slower than the exterior metal. Rushing this step could warp sensitive parts when cold water contacts hot surfaces.
Remove Grill Lid With T15 Screwdriver Safely

Essential Tool: T15 Torx Screwdriver
Why it matters: Using the wrong tool strips screw heads permanently. The T15 Torx bit (included with most Ring doorbells) fits perfectly without scratching—its center hole prevents slippage. Never substitute Phillips or flathead screwdrivers. Keep this specialized tool in your Ninja Foodi box for emergency access.
Lid Removal Sequence
- Position on stable surface: Place your Foodi on a heat-resistant mat with ample workspace
- Locate all 4 mounting screws: Two at front hinge points, two at rear connection points
- Rotate counterclockwise gently: Apply steady pressure until screws release (don’t fully remove)
- Lift straight upward: Tilt even slightly and grease drips into internal mechanisms
- Place on microfiber towel: Prevents scratches while containing residue runoff
Pro Tip: Place screws on a magnetic tray immediately after removal. These tiny components vanish quickly on countertops.
Clean Light Grease From Daily Cooking Sessions
5-Minute Quick Wash Technique
For fresh splatters after chicken or veggie meals: Fill your sink with 2 inches of warm water and 3 drops Dawn Platinum dish soap. Submerge the lid for exactly 3 minutes—any longer risks water seeping into electronics. Use a silicone basting brush (not sponge) in circular motions to lift residue without scratching non-stick coatings. Rinse under running water until it sheets off cleanly—no beading indicates soap residue remains.
Critical Warning: Never submerge the heating element side. Hold the lid at 45-degree angle during rinsing with water flowing away from electrical contacts.
Between-Meal Spot Cleaning Hack
When you notice splatter mid-cooking session:
– Spray warm water + 1 tsp vinegar mix directly on residue
– Cover with damp paper towel for 5 minutes
– Wipe with microfiber cloth using light pressure
– Dry immediately with tea towel
This prevents overnight hardening that requires deep cleaning. Do this after every use for maintenance-free operation.
Remove Extreme Burnt-On Food Buildup
Dawn Foaming Soap Soak Method
For carbonized debris after steak or pizza:
1. Spray generously with Dawn Ultra Foaming Dish Soap (not liquid version)
2. Wait 20 minutes—set timer to avoid oversoaking
3. Cover with hot towel (dipped in 140°F water, wrung dry) to steam-loosen grime
4. Wipe with silicone scraper edge—never metal utensils
5. Inspect heating coil grooves with flashlight for hidden residue
Why foam works better: The foam clings vertically to the lid’s underside, penetrating crevices liquid soap can’t reach. Standard dish soap runs off immediately.
Baking Soda Power Paste for Fire-Rock Stains
For irreversible carbon buildup:
– Mix 3 tbsp baking soda + 1 tbsp warm water into toothpaste consistency
– Apply with gloved fingers using firm circular pressure
– Wait 12 minutes exactly—longer dries paste into cement
– Scrub heating element channels with soft-bristled toothbrush
– Rinse with spray bottle targeting hard-to-reach areas
Visual cue: Paste turns dark brown when lifting maximum residue. If it stays white, reapply to untouched zones.
Extract Trapped Particles From Screen Mesh
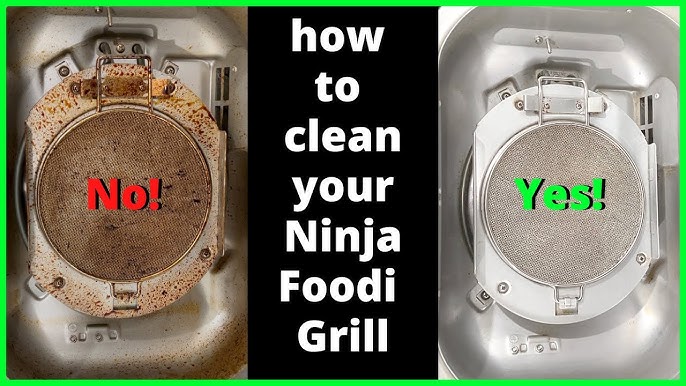
Two-Phase Cleaning Protocol
Why standard washing fails: Food particles embed in the stainless steel screen during soaking, especially when baskets are cleaned simultaneously. The solution requires strategic drying:
- Initial wash: Soak screen in warm soapy water for 4 minutes
- Air-dry vertically: Prop against sink edge for 2+ hours (never towel-dry)
- Tap technique: Hold over trash can and tap screen edge 5 times with spoon handle
- Final rinse: Spray with vinegar-water mix to dislodge loosened debris
Pro Tip: Clean the screen separately from other components. Cross-contamination during washing pushes particles deeper into the mesh.
Reassemble Without Damaging Components
Screw Tightening Precision Test
The #1 reassembly mistake: Over-tightening strips screw heads permanently. Test proper tension by:
– Hand-tighten all screws until resistance begins
– Give final 1/8 turn with T15 driver—no more
– Verification: Lid should move freely when opened but show zero wobble
If screws feel loose after cooking cycles, add one additional 1/16 turn—not a full rotation.
Critical Moisture Check Points
Before plugging in:
– Inspect hinge channels with cotton swab (must come out dry)
– Test heating element by running finger along coil (no dampness)
– Smell for soap residue near electrical contacts (indicates incomplete rinse)
Warning: Moisture in these zones causes short circuits that void warranties. Air-dry for 45+ minutes post-cleaning.
Eliminate Lingering Odors With Steam Cleaning
Lemon Juice Steam Cycle Formula
After fish, garlic, or crab legs:
1. Pour 1 cup boiling water + 1 cup fresh lemon juice into cooking pot
2. Pressure cook 8 minutes on High (not Steam function)
3. Natural release 7 minutes—critical for odor neutralization
4. Wipe interior with paper towels while warm (not hot)
5. Leave lid ajar until room temperature
Why this works: Steam penetrates microscopic pores in the lid where odors embed. The citric acid breaks down organic compounds better than baking soda.
Avoid These 5 Costly Cleaning Mistakes
Dishwasher Disaster Prevention
The absolute rule: No Ninja Foodi component is dishwasher-safe. The high-pressure jets and alkaline detergents:
– Warp the lid’s metal housing within 3 cycles
– Strip non-stick coatings from heating elements
– Corrode electrical contacts permanently
Real consequence: One dishwasher run typically voids your warranty. Hand-wash only—always.
Chemical Danger Zones
Never use:
– Oven cleaners (even “natural” versions)
– Bleach or ammonia-based products
– Steel wool or abrasive pads
– Undiluted vinegar soaks
These degrade the lid’s protective fluoropolymer coating, causing food to stick permanently after just 2-3 uses.
Create Your Custom Maintenance Schedule
Heavy-Use Protocol (Daily Cookers)
- After every use: Quick wipe with vinegar-dampened cloth
- Every 3rd meal: Deep clean heating element channels
- Weekly: Full disassembly and Dawn foam treatment
- Monthly: Steam clean with lemon juice solution
Time investment: Just 9 minutes weekly prevents 2-hour deep cleans later.
Long-Term Storage Best Practices
When storing for >72 hours:
– Leave lid slightly ajar (use folded paper towel as spacer)
– Place silica gel packets inside cooking chamber
– Store in cool, dark place (not above stove)
– Never stack items on top of unit
This prevents moisture buildup that causes mold in hidden crevices.
Fix Persistent Cleaning Failures
Discoloration That Won’t Fade
When the bowl bottom turns dark orange: This indicates polymer breakdown from overheating—not surface grime. Do not scrub. Contact Ninja Support immediately with:
– Your model number (found under unit)
– Purchase receipt copy
– 3 clear photos of discoloration
They’ll ship replacement parts free if under 2-year warranty.
Screen Still Clogged After Cleaning?
The hidden culprit: Particles lodged behind the mesh backing. Fix with:
1. Remove screen from lid frame
2. Hold under running water while flexing mesh gently
3. Use toothpick to dislodge debris from backing holes
4. Re-wash with Dawn foam spray
Pro Tip: Clean screens after every seafood meal—they trap tiny particles that harden overnight.
Key Takeaway: Consistent 5-minute wipe-downs after each use prevent 90% of deep cleaning emergencies. Your Ninja Foodi grill lid will deliver restaurant-quality results for years when you follow this precise cleaning rhythm—no more compromised flavors or safety risks. Start implementing the quick wash technique today, schedule your first deep clean based on your cooking frequency, and you’ll never face that intimidating grease buildup again. For immediate troubleshooting, keep Ninja’s support line (1-877-646-5288) saved in your phone—most lid issues get resolved with replacement parts within 48 hours when caught early.


