
That slow cooker button on your Ninja Foodi isn’t just decoration—it’s your secret weapon for fall-off-the-bone ribs, creamy chilis, and stress-free weeknight dinners while you conquer your to-do list. Forget the limitations of old Crock-Pots; your Foodi’s slow cook function delivers precision control across all models (5-quart, 6.5-quart, and 8-quart) with customizable timing and foolproof safety features. Whether you’re reheating leftovers or tackling a Sunday pot roast, this guide transforms vague button-pushing into culinary confidence. You’ll discover exactly how to leverage this underrated function to cook smarter, not harder, with techniques that outperform traditional slow cookers every time.
Essential Pre-Use Setup for Flawless Results

Clean Before First Cook
Skip this step and risk off-flavors haunting your meals. Before using the slow cook function, disassemble all components: place the silicone ring, cooking basket, rack, and inner pot on your dishwasher’s top rack. Hand-wash the pressure lid and Foodi base with warm soapy water—never submerge the electrical base. Pay special attention to the silver anti-clog cap inside the pressure lid; scrub it with a toothbrush to remove manufacturing residue. This tiny part traps debris during cooking, and a clean start prevents clogs that could disrupt steam flow. Finally, position the condensation tray under the pressure lid to catch drips—empty it after every use to avoid mold growth.
Valve Safety Check
Your pressure lid’s black valve should wiggle loosely when set to “Seal”—this isn’t a defect but a critical safety mechanism. When you twist it to “Vent,” you’ll feel it click into place with a slight upward lift. The red button beside it stays depressed during cooking and only pops up when internal pressure builds, physically locking the lid shut. Before slow cooking, verify the valve moves smoothly between positions with no resistance. If it sticks, clean it immediately with warm water and a soft brush. This simple check prevents frustrating “lid error” messages and ensures your slow cook cycle starts reliably.
Slow Cook Mode Basics You Need to Know
Temperature Settings Explained
The HIGH setting mimics traditional slow cookers’ aggressive heat, ideal for fatty cuts like pork shoulder or beef chuck that need extended fat rendering. LOW provides gentle, even warmth perfect for lean meats (chicken breasts, turkey) or all-day vegetable stews. Unlike basic slow cookers, both settings deliver tender results—HIGH just reaches them faster. For a 3-pound pot roast, HIGH takes 6 hours versus LOW’s 8 hours, but both yield fork-tender meat. Never use the crisping lid for slow cooking; the pressure lid must be locked in place with the valve set to VENT.
Time Range Flexibility
Ditch the “4 or 8 hours only” limitations of old slow cookers. Your Foodi lets you set precise cooking times from 30 minutes to 12 hours in 1-minute increments using the control panel arrows. Need dinner ready at 6:15 PM? Set it exactly. This precision matters for delicate dishes like custards (set to 2 hours 45 minutes) or overnight oatmeal (10 hours). Unlike pressure cooking, you can safely lift the lid during slow cooking to stir or check doneness without resetting timers—just minimize openings to avoid extending cooking time by 15-20 minutes per peek.
Step-by-Step Operating Guide Made Simple
Quick Start Instructions
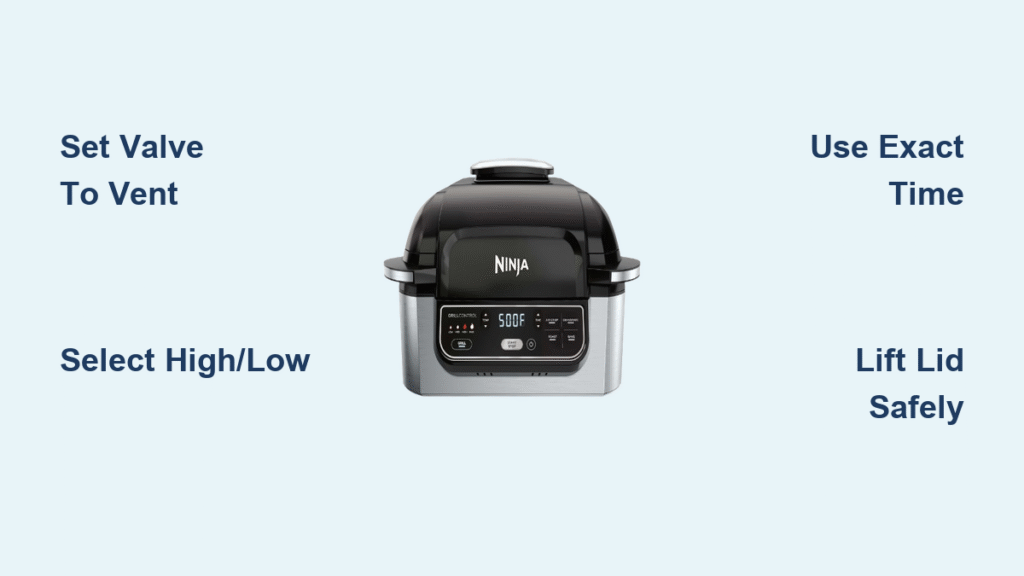
- Load ingredients into the inner pot, adding 1-2 cups liquid for gravies (meats release juices as they cook)
- Lock the pressure lid firmly until it clicks into place
- Twist black valve to VENT—this is mandatory for slow cooking mode
- Tap SLOW COOK on the control panel
- Select HIGH/LOW using arrow keys
- Set exact time (e.g., 7 hours 20 minutes for pulled pork)
- Press START and walk away—no monitoring needed
- Check progress anytime by lifting the lid; the timer pauses automatically
Liquid Guidelines That Actually Work
Thick liquids like cream, tomato sauce, or condensed soup will scorch during long cooks unless thinned with broth or water. For a 6-pound pork shoulder, start with just 1 cup broth—you’ll end up with 3-4 cups of rich gravy as collagen breaks down. Frozen chicken releases 1-2 cups of liquid, so skip extra water for boneless breasts. Soups and stews need full liquid volume upfront since evaporation is minimal with the lid sealed. When in doubt, remember: slow cooking concentrates flavors, so under-season slightly and adjust at the end.
Pro Techniques for Perfect Results Every Time
Sear First Strategy
Brown meats directly in the Foodi using the Sear/Sauté function before switching to slow cook. For pot roast, sear all sides until deeply caramelized, then deglaze with ½ cup red wine—scrape every browned bit off the pot. These fond particles dissolve into your cooking liquid, creating complex, restaurant-quality depth without extra effort. This step works equally well for chicken thighs or ground beef for chili.
Ingredient Timing Secrets
- Root vegetables (potatoes, carrots): Add at the start—they need 6+ hours to soften
- Delicate veggies (zucchini, peas): Stir in during the final 45 minutes
- Dairy (milk, cream): Mix in during the last 30 minutes to prevent curdling
- Fresh herbs (cilantro, basil): Fold in right before serving for vibrant flavor
Size Matters
A 5-quart model maxes out at 3-4 servings—never fill past the ⅔ line to avoid spills. The 6.5-quart is the Goldilocks size for most families, handling 5-6 portions comfortably. Reserve the 8-quart for meal prep marathons or holiday feasts; its wider base prevents ingredients from crowding, ensuring even heat distribution. Always cut meats and veggies into uniform 1.5-inch chunks—uneven sizes cause some pieces to overcook while others stay raw.
Troubleshooting Common Issues
When Food Won’t Heat
First, confirm the black valve is firmly twisted to VENT—this is the #1 cause of heating failures. Next, check that the pressure lid clicks securely into the base; a misaligned lid triggers safety locks. If issues persist, unplug the unit for 30 seconds to reset the electronics, then restart. Never force the lid open if the red button is raised—that means pressure built accidentally, likely due to a valve left on “Seal.”
Fighting Dry Food
Resist the urge to peek more than twice during cooking—each lift loses enough heat to extend cooking time by 20 minutes. Account for natural moisture release: a 4-pound chuck roast adds 2+ cups of liquid as fat renders. If your stew looks dry at the 6-hour mark, add ½ cup broth rather than water to maintain flavor intensity. For extra insurance, place a heatproof plate over ingredients before adding liquid—it creates a steam barrier that locks in moisture.
Model-Specific Differences Decoded

OL Series (SmartLid Models)
The OL701 and similar SmartLid models eliminate valve confusion with built-in vents. Simply slide the lid’s control to “Slow Cook,” set your time, and start—no manual valve adjustments needed. These models also offer programmable finish times (e.g., set to complete at 6 PM) and display real-time temperature readings. The single-lid system means no switching between pressure and crisping lids, streamlining the process for beginners.
Traditional Dual-Lid Systems
With models like the AF101, always use the pressure lid for slow cooking—never the crisping lid. The valve position is critical: twist it clockwise to VENT until it clicks. Keep both lids accessible since you’ll need the crisping lid for finishing touches like browning shredded pork after slow cooking. Store lids with a paper towel inside to absorb moisture and prevent odors between uses.
Post-Cook Cleanup Protocol
Immediate Steps
- Let cool completely—never handle the hot inner pot with bare hands
- Remove inner pot and wash in dishwasher or with non-abrasive sponge
- Hand-wash pressure lid, focusing on valve crevices where food hides
- Empty condensation tray to stop mold growth in 24 hours
- Rinse anti-clog cap under running water to dislodge trapped particles
Long-term Maintenance
After every use, pull the silicone ring from the pressure lid and wash it separately—this prevents odor transfer between meals. Monthly, test the black valve’s movement by twisting it between positions; if stiff, soak it in warm vinegar for 10 minutes. Store the unit with lids slightly ajar using folded paper towels inside to wick away moisture. Never stack pots or lids directly on the heating element—this damages the non-stick coating.
Time Management Hacks for Busy Cooks
Real-World Timing
Factor in 35-40 minutes for the Foodi to reach full temperature—start traditional 8-hour recipes 30 minutes earlier than you would with a Crock-Pot. For last-minute dinners, begin cooking frozen chicken breasts on HIGH for 3 hours, then switch to Sear/Sauté for 5 minutes to crisp the skin. The ultimate hack? Load ingredients into the inner pot the night before, refrigerate it, then lock the lid and start cooking in the morning—zero morning prep required.
Flavor Layering Tricks
Add dried herbs (thyme, oregano) at the beginning to infuse deeply, but wait until the final 20 minutes to stir in fresh herbs (dill, parsley) for bright notes. Layer spices in stages: garlic powder with the meat, smoked paprika halfway through, and a splash of acid (lemon juice or vinegar) at the end. This creates dimension that single-stage seasoning can’t match—turning basic chili into a flavor masterpiece.
Your Ninja Foodi’s slow cook function isn’t an afterthought—it’s a precision tool that outperforms standalone slow cookers with smarter controls and seamless transitions between cooking methods. By mastering these valve positions, timing tricks, and cleanup protocols, you’ll unlock effortless meals that taste like you hovered over the stove all day. Whether you’re reviving last night’s leftovers or tackling a holiday brisket, this guide ensures your slow cook adventures end in tender, flavorful success every single time. Now go reclaim your evenings—your Foodi has dinner covered.


