

Nothing beats the frustration of unpacking your Ninja Woodfire Grill only to face confusing controls and inconsistent results. This versatile appliance combines seven cooking methods—grill, air crisp, roast, bake, broil, smoke, and dehydrate—but unlocking its full potential requires knowing exactly how to operate each function. Whether you’re searing steaks, smoking ribs, or air frying wings, this guide delivers the precise settings, capacity limits, and pro techniques you need for restaurant-quality results every time.
Stop guessing about preheat times, smoke management, or internal temperature targets. By the end of this guide, you’ll confidently select the right accessory for each meal, program perfect cook cycles, and troubleshoot common issues before they ruin your dinner. Let’s transform your backyard cooking with the exact steps that guarantee success with your Ninja Woodfire Grill.
Selecting and Installing the Right Cooking Accessory
Match Your Accessory to Your Meal Type
Your first critical decision determines cooking success: choosing the correct accessory for your recipe. Slide the cast-iron grill plate into position for authentic sear marks on steaks and burgers. Use the flat-top griddle when preparing pancakes, grilled cheese, or smash burgers that need direct surface contact. For wings, fries, or vegetables requiring maximum crispness, insert the air fryer crisper basket—its perforated design circulates heat evenly from all sides.
When smoking meats, ensure the smoke box on the left side is filled with pellets before powering on. Never skip this step if you want genuine wood-fired flavor. Each accessory clicks securely into place—listen for the audible snap to confirm proper installation before adding food.
Powering Up with the Correct Sequence
Press the Power button first, then rotate the dial to select your cooking method. This sequence prevents error codes and ensures proper system initialization. Immediately after selecting your function, press Woodfire Flavor if you’re using smoke—this activates the pellet ignition system. Set your temperature precisely (400°F for chicken, 450°F for steaks) before programming cook time.
Add 2-3 minutes to your recipe’s specified cook time to prevent the auto-shutoff feature from interrupting your cooking cycle. When the display shows “Add Food”, your grill has reached the exact temperature needed for optimal searing—no more guessing if it’s hot enough.
Maximizing Cooking Capacity Without Sacrificing Results
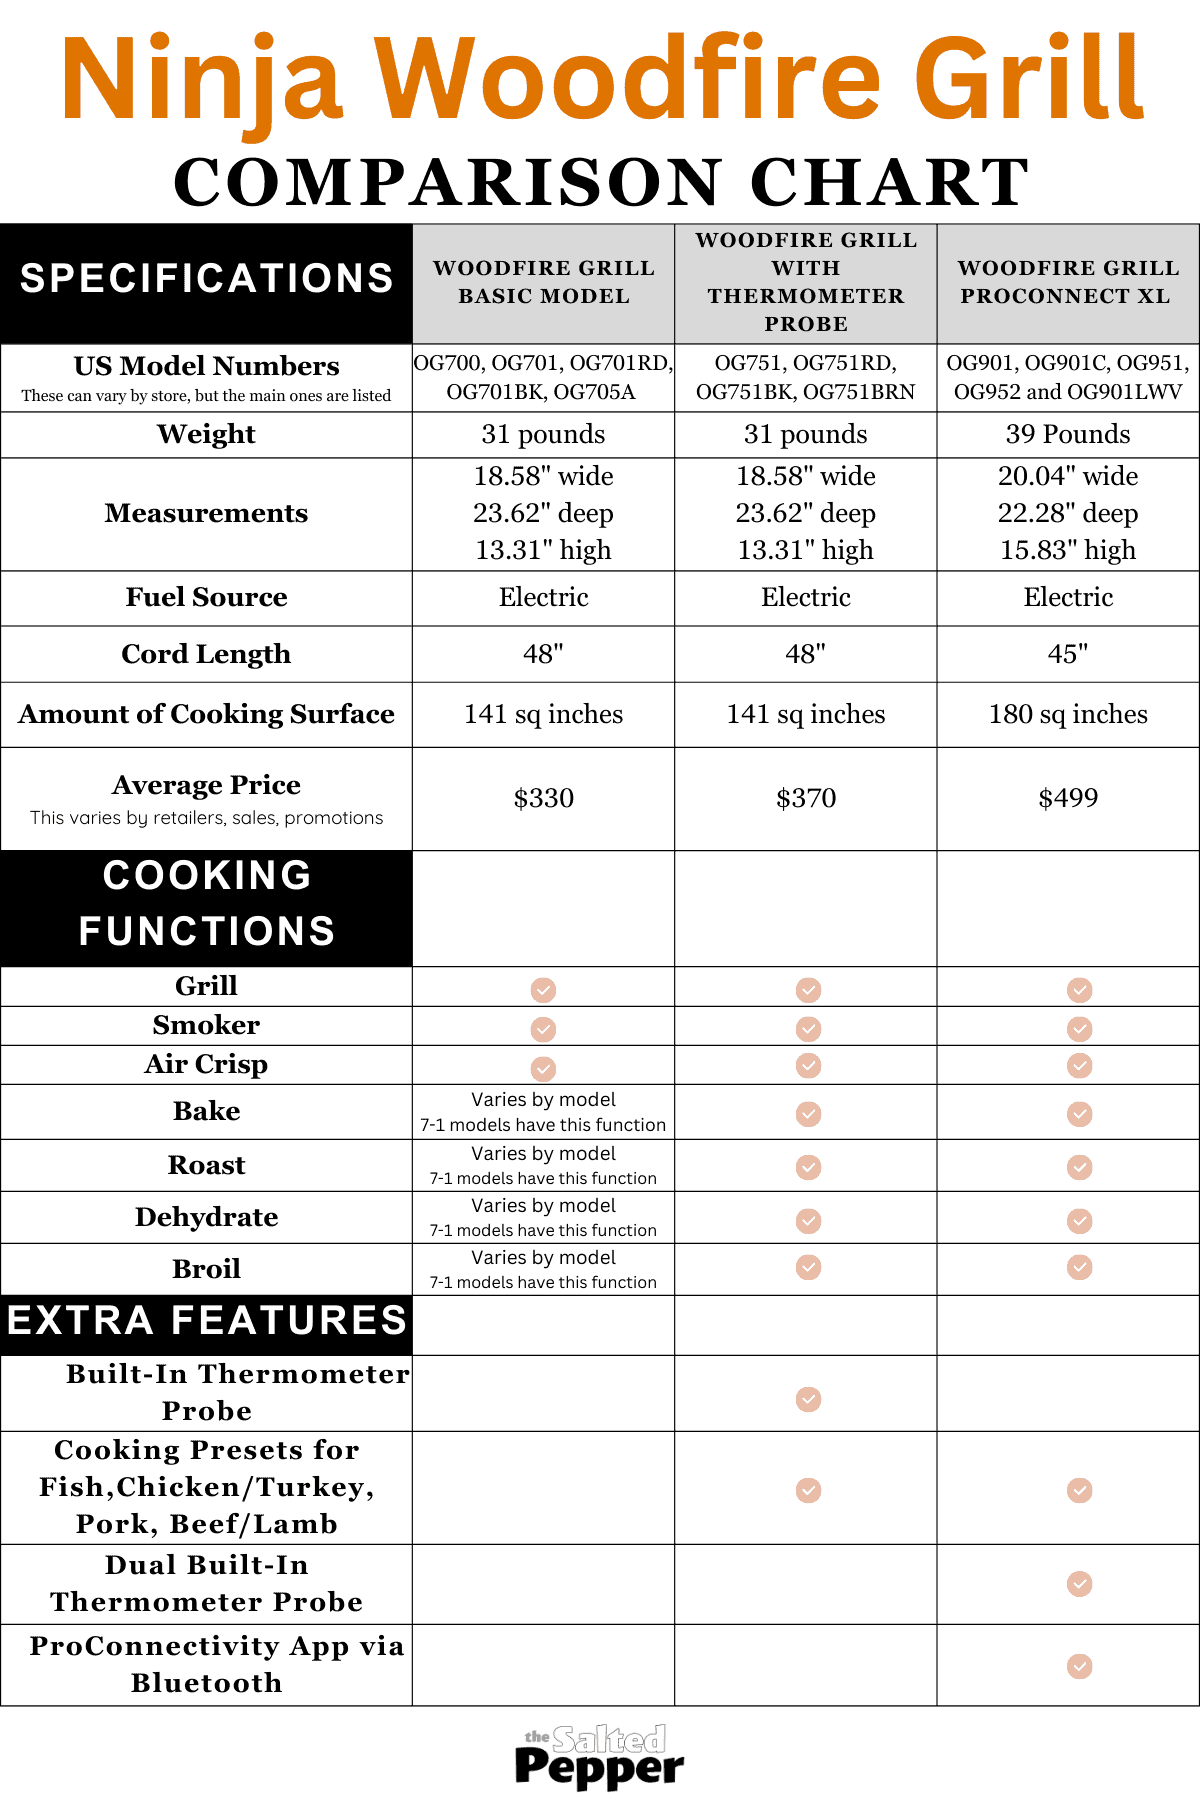
Original Model Space Management
The standard Ninja Woodfire Grill’s 14.5″ x 10.5″ cooking surface requires strategic placement for even results. Arrange 6 standard burgers with at least ½ inch between patties to prevent steam buildup that causes boiling instead of searing. Position 4 chicken breasts diagonally to maximize airflow around each piece. For 3-4 steaks, leave space between thicker cuts to ensure consistent heat distribution.
When cooking two halved rib racks, place them bone-side down with the curved edges facing outward—this creates natural spacing while maximizing surface contact. Never overcrowd the grill; food needs breathing room for proper Maillard reaction development.
XL Model Batch Cooking Strategies
The XL model’s 30% larger cooking area changes your meal planning possibilities. Cook 2 whole rib racks without cutting by positioning them parallel to the grill’s longest dimension. Prepare 10 burgers in a single batch using a checkerboard pattern—offset rows allow heat circulation between patties. When air frying 4 pounds of wings, work in two batches of 2 pounds each for maximum crispness, using the Warm function to hold the first batch.
For two 7-pound whole chickens, position them breast-side up with at least 2 inches between birds. The XL model handles this load, but monitor closely—the outer chicken may finish 5-7 minutes before the center piece.
Perfect Temperature Settings for Every Protein
Chicken Mastery: From Breasts to Whole Birds
Why your chicken breasts dry out: Setting the grill too low prevents proper searing, causing moisture loss. Select Grill at 400°F for 19-22 minutes total, flipping once at the 10-minute mark. Insert your thermometer into the thickest part—165°F is non-negotiable for safety.
For juicy thighs and drumsticks: Use Grill at 450°F for 12-16 minutes. Dark meat needs higher internal temperature (195°F) to break down connective tissue. The Ninja’s precise heat control prevents the common mistake of undercooking dark meat while waiting for white meat to finish.
Wing perfection secret: Start with Air Crisp at 390°F for 15 minutes, then increase to 450°F for the final 10 minutes. This two-stage method renders fat first, then crisps skin without drying meat. Target 195°F internally—this higher temperature ensures tender, pull-off-the-bone texture.
Steak and Burger Precision Cooking
Burger flipping mistake: Flipping too early causes sticking and uneven cooking. Wait until juices visibly bead on the surface (about 3 minutes on high heat), then flip once. Fresh burgers need Grill at 450°F for 5-8 minutes total—add cheese during the last minute for perfect melt.
Filet Mignon timing: This lean cut cooks fast—Grill at 400°F for 9-12 minutes for medium-rare (130°F). The lower temperature prevents the common error of overcooking this expensive cut. Remove at 125°F to account for carryover cooking during rest.
Ribeye sear secret: Position thicker cuts toward the grill’s hotter rear section. Grill at 450°F for 10-18 minutes depending on thickness. For a 1.5-inch ribeye, target 130°F for medium-rare—this marbled cut retains juiciness even at lower internal temperatures.
Smoke Flavor Management Like a Pro
Controlling Smoke Intensity for Different Foods
Light foods need minimal smoke: For mac and cheese, baked potatoes, or desserts, use just 2-3 tablespoons of pellets. Excessive smoke overpowers delicate flavors—think of smoke as seasoning, not the main ingredient.
Heavy meat smoke strategy: For brisket or ribs, fill the smoke box to the top edge. Add fresh pellets when smoke visibly decreases (about halfway through cooking). If pellets extinguish completely, add new ones and press Ignite to restart smoke production without interrupting your cook cycle.
Debunking the Smoke Ring Myth
Many users panic when they don’t see traditional pink smoke rings in their Ninja-cooked meats. Here’s why: the grill uses electric heating elements with pellets only for flavor—not as primary fuel. This means no smoke ring development, but your food still absorbs genuine wood flavor. Don’t judge smoke effectiveness by visual cues; trust the taste instead.
Post-Cooking Procedures That Make the Difference
Resting Times That Preserve Juiciness
Large cuts: Wrap brisket or pork shoulder in foil and rest 30-60 minutes before slicing. This critical step allows juices to redistribute—cutting too soon releases all moisture onto your cutting board.
Individual portions: Let steaks and chicken breasts rest 5-10 minutes tented with foil. The Ninja’s intense heat creates significant carryover cooking—this rest period brings proteins to perfect serving temperature without overcooking.
Immediate service foods: Burgers, wings, and hot dogs need zero rest time. Serve immediately while the crust remains crisp and cheese is perfectly melted.
Cleaning Protocol for Longevity
Never clean while hot: Allow the grill to cool completely before disassembly. Remove all accessories and wash with warm, soapy water—avoid abrasive scrubbers that damage non-stick surfaces.
Grease management: Empty the drip tray after every cook to prevent flare-ups during your next session. Wipe interior surfaces with a damp cloth while residue is still warm (but not hot) for easiest cleaning.
Smoke box maintenance: Brush out pellet ash once cooled—never use water inside the smoke chamber. Pellet residue buildup affects smoke quality over time.
Weather-Adapted Cooking Strategies
Cold Weather Adjustments
When temperatures drop below 50°F, add 3-5 extra minutes to preheating time, especially for the Grill function. The Ninja works harder to maintain temperature in cold conditions—don’t add food until “Add Food” appears, even if it takes longer than usual.
Wind Protection Tactics
Position your grill with the lid hinge facing away from wind direction to prevent heat loss. In high winds, expect 10-15% longer cook times as the grill compensates for temperature fluctuations. Never use the grill in rain or snow—moisture damages electrical components.
Mastering your Ninja Woodfire Grill starts with understanding these precise operational details. Remember to always match accessories to your cooking method, program with extra time buffer, and trust internal temperatures over visual cues. The next time you fire up your grill, you’ll move through setup, cooking, and cleanup with professional confidence—transforming ordinary backyard meals into extraordinary culinary experiences. Start with simple recipes using these exact settings, then expand to more complex techniques as you build familiarity with your grill’s unique capabilities. Your perfectly seared steaks and smoke-infused ribs await.


