
Your Ninja Foodi 9-in-1 sits on the counter like a stainless steel puzzle box. You know it pressure cooks, but every button makes you second-guess yourself. One wrong move and dinner becomes a science experiment with scorched rice or rubbery chicken. This how to use pressure cooker Ninja Foodi 9-in-1 guide cuts through the confusion with exact steps that work. You’ll transform raw ingredients into tender, flavorful meals in under 30 minutes—no more guessing games or “BURN” errors flashing on your display. By the end, you’ll confidently pressure cook perfect pot roast, fluffy rice, and creamy cheesecake while neighbors are still preheating their ovens.
Quick Start: 8 Pressure Cooking Steps for Dinner in 30 Minutes
Skip the manual and start cooking immediately with these pressure-tested steps. This sequence works for 95% of recipes and takes just 5 minutes to set up:
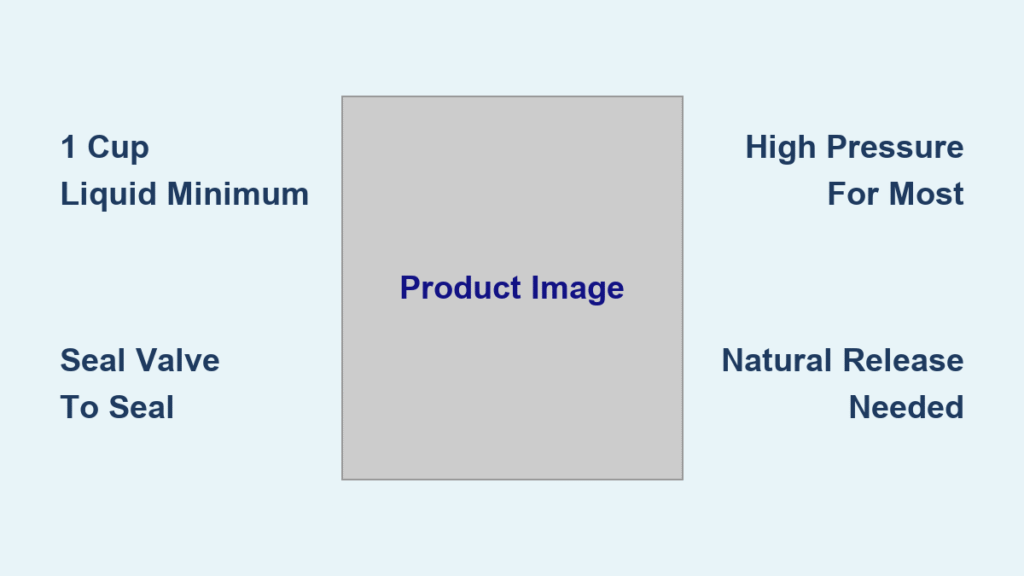
- Pour 1 cup thin liquid (water, broth, or wine) into the inner pot
- Place food directly in liquid, on the reversible rack, or in a pot-in-pot dish
- Lock pressure lid until arrows align with a firm click
- Turn black valve to SEAL (away from you—never toward)
- Select PRESSURE → HIGH → set time with +/- buttons
- Press START/STOP and wait for “On” to appear
- Watch red float valve pop up—this starts your actual cook timer
- Release pressure using QR, NR, or hybrid method when timer ends
The “On” display isn’t cooking time—it’s preheating (5-15 minutes). Your real countdown begins only when the red pin rises. Never skip the 1-cup liquid minimum, even for foods like chicken that release juices. This creates the steam needed to build pressure safely.
Critical Safety Checks That Prevent Burn Notices and Lid Failures
Skipping these checks causes 80% of pressure cooking failures. Spend 60 seconds verifying these before every cook:
Seal Ring Inspection
Press the silicone ring firmly into its groove until it sits flush without twists. Replace immediately if you detect lingering curry smells or see cracks—even hairline fractures cause steam leaks. Always store rings uncompressed by placing the lid upside down.
Valve Movement Test
Spin the black pressure valve with your finger. If it sticks, rinse under warm water and scrub food debris from the base. A frozen valve causes dangerous pressure buildup or prevents sealing.
Minimum Liquid Verification
Never use less than 1 cup thin liquid. For rice or beans, increase to 1½ cups. Thick sauces like tomato paste must be diluted 50% with broth to prevent scorching. Measure liquids before adding food—don’t eyeball.
High vs Low Pressure: When to Use Each Setting for Perfect Results
Your Foodi’s two pressure levels serve distinct purposes—choose wrong and you’ll overcook delicate fish or undercook chuck roast:
HIGH PRESSURE (11.6 PSI)
– Use for: Tough meats (pot roast, short ribs), dried beans, root vegetables
– Temperature: 243°F (117°C)—cooks 70% faster than stovetop
– Default setting: Works for 90% of recipes including chicken and rice
LOW PRESSURE (7.2 PSI)
– Use for: Custards, cheesecakes, delicate fish, and tender vegetables
– Temperature: 238°F (114°C)—gentler heat prevents curdling
– Time note: Adds minimal time savings—reserve for sensitive dishes
Pro tip: Always start with HIGH pressure unless your recipe specifically requires LOW. Low pressure won’t prevent “BURN” errors on thick sauces.
Liquid Rules That Stop “BURN” Errors Before They Happen
The right liquid prevents the dreaded red “BURN” notice while creating flavorful steam. Follow these exact guidelines:
Approved Liquids (Use 1+ Cups)
- Water, unsalted broth, clear juices, wine, beer
- Light soy sauce (diluted 50% with water)
- Thin tomato sauces (mixed with equal broth)
Forbidden Liquids (Alone)
- Milk or cream (curdles and scorches)
- Undiluted cheese sauces (blocks steam vents)
- Pure tomato paste (causes immediate “BURN” notice)
When using barbecue sauce or thick marinades, always add ½ cup extra broth. Never pour sauces directly on the pot’s bottom—layer them over meat to prevent contact with the heating element.
Food Placement Secrets: Direct, Rack, or Pot-in-Pot Methods

How you position food dramatically affects texture. Choose based on your desired outcome:
Direct Submersion Method
Place food directly in liquid for braised textures. Ideal for shredded chicken (2 breasts in 1 cup broth) or beef stew. Warning: Never submerge delicate fish—it will shred.
Rack Steaming Technique
Position food on the reversible rack above liquid. Perfect for hard-boiled eggs (6 eggs on rack, 1 cup water) or asparagus. Creates tender-crisp vegetables without waterlogging.
Pot-in-Pot (PIP) System
Place oven-safe dishes on the rack for layered cooking. Use for:
– Cheesecake (springform pan over 1 cup water)
– Rice while cooking chicken below
– Custards that can’t handle direct steam
Critical rule: Always use 1 cup liquid in the inner pot when PIP cooking—never skip this.
Pressure Release Strategies: Avoid Dry Chicken or Watery Sauces

Your release method determines final texture—choose incorrectly and chicken breasts turn into rubber bands:
Quick Release (QR)
Flip valve to VENT immediately. Steam blasts out in 2 minutes. Best for:
– Vegetables (potatoes, carrots)
– Pasta dishes
– Foods fully submerged in liquid
Natural Release (NR)
Wait 5-45 minutes for pressure to drop. Essential for:
– Pot roast (15 min NR)
– Beans (20 min NR)
– Chicken breasts (5 min NR minimum)
Hybrid Release (NR + QR)
Wait 5-15 minutes, then quick release. Perfect for:
– Chicken thighs (10 min NR)
– Mixed dishes with meat and vegetables
– Cheesecake (10 min NR + QR)
Timing chart:
– Chicken breasts: 5 min NR → juicy results
– White rice: 10 min NR → fluffy texture
– Pot roast: 15 min NR → fall-apart tenderness
Timing Cheat Sheet: Foolproof Times for Chicken, Rice, and Beans
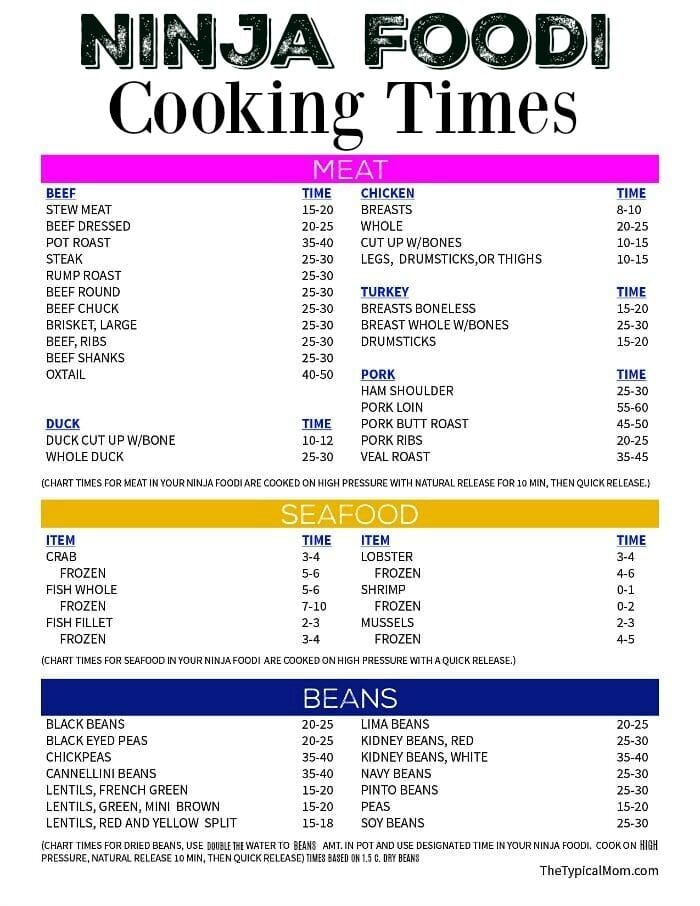
Stop guessing cook times with this pressure-tested reference. All times use HIGH pressure:
| Food (Standard Amount) | Pressure Time | Release Method | Liquid | Result |
|---|---|---|---|---|
| Chicken breasts (2, ¾ lb each) | 4-6 min | NR 5 min | 1 cup broth | Juicy, shreddable |
| Pot roast (2-3 lb) | 45 min | NR 15 min | 1 cup broth | Fork-tender |
| White rice (1 cup) | 3 min | NR 10 min | 1¼ cups broth | Perfectly fluffy |
| Black beans (unsoaked) | 25 min | NR 20 min | 3 cups water | Creamy texture |
| Hard-boiled eggs | 5 min | QR | 1 cup water | No green rings |
Pro tip: Always undercook by 1-2 minutes—food continues cooking during pressure release. For frozen chicken, add 2 minutes pressure time.
Visual Cues That Tell You When Your Foodi Is Working Right
Learn to read your appliance’s body language—these signals prevent disasters:
- Steam from valve for 1-3 minutes: Normal during sealing phase
- Continuous steam from lid edges: Stop immediately—re-seat twisted seal ring
- Red float valve up + silent valve: Full pressure achieved (timer starts)
- Display switches from “On” to countdown: Actual cooking begins
- Pin drops + no steam: Safe to open lid
If the red pin never rises after 20 minutes, check for insufficient liquid or overfilling. A chattering valve means pressure is fluctuating—reduce heat if using stovetop mode.
Troubleshooting the 3 Most Common Pressure Cooking Failures
Fix these issues without restarting your entire cook:
“BURN” Notice Appears
Cause: Insufficient liquid or food stuck to pot bottom
Fix: Cancel program → QR pressure → stir contents → add ½ cup broth → restart. Never ignore this warning—it damages the pot.
Lid Won’t Lock
Cause: Misaligned arrows or twisted seal ring
Fix: Rotate lid until arrows click. Press ring firmly into groove. Check for food debris in lid tracks.
Never Reaches Pressure
Cause: Overfilled pot (past ⅔ line) or cold ingredients
Fix: Reduce food volume. Pre-warm broth before adding. At high altitudes, expect 5-10 minute longer pre-heat.
Cleaning After Pressure Cooking: Prevent Lingering Odors
Proper cleaning stops tomorrow’s dinner from tasting like yesterday’s curry:
- Remove sealing ring and wash with warm, soapy water (never dishwasher)
- Pop out anti-clog shield (red valve cover) and rinse debris
- Hand-wash inner pot—dishwasher use causes discoloration
- Check pressure valve for stuck food particles
- Store lid upside-down to maintain ring shape
Expert note: Keep two seal rings—one for savory dishes, one for desserts. This prevents flavor transfer between meals.
Mastering how to use pressure cooker Ninja Foodi 9-in-1 transforms it from an intimidating appliance into your most valuable kitchen tool. Remember the non-negotiables: 1 cup minimum liquid, valve set to SEAL, and patience during pre-heat. Start with the chicken and rice recipe (4 minutes pressure + 10 min NR), then experiment with pot roast. Within a week, you’ll be pressure cooking restaurant-quality meals while neighbors are still waiting for their ovens to preheat. The secret isn’t complexity—it’s knowing exactly when to seal the lid and how long to wait for that red pin to rise. Your perfectly timed dinner starts the moment you turn that valve to SEAL.


