
When your Niagara station becomes corrupted or you need to repurpose a JACE controller, knowing how to factory reset JACE from Workbench becomes essential knowledge. This critical procedure wipes all custom configurations, programs, and user settings, returning your controller to its original factory state. While it’s a powerful troubleshooting tool, a factory reset should never be your first option—it’s a last-resort solution for severe system corruption or when preparing hardware for a new project. Many technicians have learned the hard way that skipping proper preparation can turn this routine procedure into a system-wide disaster.
You’re probably reading this because your JACE controller is behaving erratically, or you’ve inherited a unit with unknown configuration. Perhaps you’ve tried standard troubleshooting steps without success, and now a complete reset seems necessary. Whatever your situation, this guide will walk you through the precise steps to safely factory reset your JACE using Niagara Workbench, avoiding the common pitfalls that leave controllers unresponsive and systems down. We’ll cover everything from essential pre-reset preparations to post-reset configuration and troubleshooting.
Following the wrong procedure or skipping critical steps can brick your controller, requiring expensive hardware replacement or manufacturer intervention. By the end of this guide, you’ll understand exactly when to perform a factory reset, how to prepare properly, and the step-by-step process to execute it successfully—whether you’re working with a JACE-6, JACE-8000, or other Niagara-compatible controller.
Why Your JACE Controller Needs a Factory Reset (But Only as Last Resort)
Recognizing When a Full Reset Is Necessary
A factory reset should only be considered after exhausting all other troubleshooting options. Your JACE controller might require this drastic measure if you’re experiencing persistent communication failures across multiple protocols, unexplainable station crashes that recur after restarts, or complete inability to access the station despite correct credentials. Another clear indicator is when your station file becomes corrupted to the point where Workbench cannot open it properly, showing error messages about invalid configurations or missing components.
Warning: Never perform a factory reset during normal troubleshooting. This nuclear option erases everything—your custom programs, point configurations, historical data, and even network settings. Many technicians mistakenly believe a reset will fix minor issues that could be resolved with simpler methods like restarting services or clearing temporary files. Reserve this procedure for when your JACE is completely unresponsive to standard recovery methods or when repurposing hardware for a new installation.
Permanent Consequences of Factory Resetting Your JACE
When you execute a factory reset on your JACE controller, the system undergoes a complete wipe of all non-essential data. This includes every custom program you’ve built, all point configurations, historical data logs, user accounts, and security settings. The controller will revert to default network parameters (typically DHCP with a fallback IP like 10.1.1.50), and you’ll need to reapply all licensing information. Any third-party drivers or modules you’ve installed will need to be reconfigured from scratch.
Most critically, this action cannot be undone. Unlike restarting services or clearing caches, a factory reset permanently deletes your configuration. If you don’t have a verified backup, you’ll face days or weeks of reconfiguration work. Always consider less invasive options first, such as restoring from a recent backup or rebuilding specific components of your station rather than wiping everything.
Critical Backup Steps Before JACE Factory Reset That Most Technicians Skip

Creating a Complete Station Backup in Workbench
Before even considering how to factory reset JACE from Workbench, you must create a complete backup of your current station configuration. Launch Niagara Workbench and connect to your JACE station. Right-click on the station name in the Workbench Navigator and select “Export Station.” Choose the “.bog” format, which preserves all programs, points, and configurations in a single archive file. Save this file to at least two separate locations—one local drive and one secure off-site storage.
Pro Tip: Verify your backup by attempting to import it into a test environment before proceeding with the reset. Many technicians assume their backup is valid only to discover later it’s corrupted or incomplete. A valid backup should import without errors and display all expected points and programs when opened in Workbench.
Documenting Essential Configuration Details
Beyond the standard station backup, you need to document critical information that won’t be included in your .bog file. Record all network parameters including the JACE’s current IP address, subnet mask, gateway, and DNS servers. Note all BACnet device IDs, LON network numbers, and any specialized communication settings. Document your license keys for the Niagara framework and any third-party modules, as these will need reapplication after reset.
Don’t forget external connections—record all API keys, database connection strings, and integration details with SCADA systems or other building management platforms. These elements often get overlooked but are essential for full system recovery. Create a simple spreadsheet with this information and store it with your station backup for quick reference during reconfiguration.
How to Verify JACE Connection Status in Niagara Workbench Before Reset
Establishing Proper Workbench Connectivity
Before initiating a factory reset, you must confirm stable connectivity between Niagara Workbench and your JACE controller. In Workbench, navigate to the “Platforms” section and locate your JACE in the station browser. Right-click on the station name and select “Properties” to view connection status. The status should show “Connected” with no error messages. If you see “Disconnected” or “Connection Error,” troubleshoot network issues first—resetting an already disconnected controller creates unnecessary complications.
Check your network configuration to ensure your workstation and JACE are on the same subnet. For JACE-8000 models, verify that your Workbench version is compatible with the controller’s firmware version. Mismatched versions can cause unexpected behavior during the reset process. If you’re using a virtual Workbench environment, confirm proper network bridging settings that allow communication with physical controllers.
Authentication Verification Steps
Ensure you’re logged in with proper administrative credentials before attempting reset. In Workbench, go to Station → User and confirm your account has “Administrator” privileges. The factory reset function is only available to users with full administrative rights—attempting this procedure with limited accounts will fail at the confirmation step. Test your credentials by making a minor configuration change that requires admin rights, such as modifying a service setting.
Critical Check: Verify that your JACE has sufficient power redundancy and that backup systems are operational. A power interruption during the reset process can permanently damage the controller’s firmware, requiring advanced recovery procedures. If working with critical systems, schedule the reset during a maintenance window and notify all stakeholders of the impending service interruption.
Step-by-Step: Executing Factory Reset Through Workbench Interface (JACE-6/JACE-8000)
Navigating to the Reset Function in Workbench
Launch Niagara Workbench and establish connection to your JACE station. In the Workbench Navigator, locate your JACE station under the “Platforms” section. Right-click on the station name (it will typically appear as “MyJACE (JACE-8000)” or similar) and select “Station” from the context menu, then choose “Reset…” This path—right-click → Station → Reset—is critical; the reset function isn’t available through the standard menu bar for many Workbench versions.
A dialog box will appear with reset options. You’ll typically see three choices: “Reset to Factory Defaults,” “Factory Defaults and Station Bundle,” and “Initialize Station.” For 95% of scenarios, “Reset to Factory Defaults” is the correct selection. The other options are for specialized recovery situations and can cause additional complications if chosen incorrectly.
Confirming and Executing the Factory Reset
After selecting “Reset to Factory Defaults,” a critical warning dialog will appear emphasizing that all user data will be permanently deleted. This is your final opportunity to abort the process—read this message carefully. If you’ve completed all backup steps and documented your configuration, click “Yes” to confirm. The JACE will immediately begin the reset process, which takes approximately 5-8 minutes depending on model and storage capacity.
During this time, do not power cycle or interrupt the JACE. The Workbench console will display progress messages as the controller reformats its storage and reinstalls the base operating system. The station will show as “Offline” in Workbench during this process. Wait patiently until the JACE reboots and becomes available on the network again—rushing this step is a common cause of failed resets requiring advanced recovery.
What Happens During JACE Reset: The 5-Minute Reboot Process Explained
Understanding the Internal Reset Sequence
When you initiate a factory reset, your JACE controller undergoes a specific sequence that completely reinitializes its operating environment. First, the system terminates all running services and applications. Next, it erases the user partition where all custom configurations are stored while preserving the core operating system partition. The controller then rebuilds the default directory structure, reinstalls base services, and initializes the database with default parameters.
This process typically takes 5-8 minutes for most JACE models. During this time, the system LED behavior changes—usually cycling through different patterns indicating progress. For JACE-8000 models, the LED will flash rapidly during the erase phase, then pulse slowly during the rebuild phase. Understanding these visual indicators helps you determine if the reset is progressing normally or has stalled.
Recognizing Successful vs. Failed Reset Completion
A successful reset concludes with the JACE rebooting into its factory state. The system LED will return to its standard solid or slow-blinking pattern, indicating normal operation. At this point, the controller should be accessible via its default IP address (usually 10.1.1.50) using the default credentials (typically “admin” for both username and password).
If the LED remains off, flashes erratically, or stays in a rapid blink pattern beyond 10 minutes, the reset may have failed. Power cycling at this stage is dangerous—it can corrupt the filesystem further. Instead, prepare for advanced recovery methods using the serial console, which we’ll cover in a later section. Patience is critical; some JACE models take longer than expected during intensive filesystem operations.
Immediate Post-Reset Actions: Network Configuration Must-Dos
Re-establishing Network Connectivity After Factory Reset
Immediately after reset, your JACE reverts to factory network settings, which typically means DHCP with a fallback static IP (often 10.1.1.50). Configure your workstation’s network adapter to match this subnet (set your PC to 10.1.1.10 with subnet mask 255.255.255.0) and connect directly via Ethernet cable. Launch a web browser and navigate to the default IP address to access the JACE’s web interface.
From the web interface, configure your permanent network settings: assign the documented static IP address, subnet mask, gateway, and DNS servers. Verify connectivity by pinging the gateway and an external address. Never skip this step—attempting to reconnect Workbench before restoring network settings is the most common post-reset mistake technicians make.
Reconnecting Workbench to Your Reset JACE
With network settings restored, launch Niagara Workbench and initiate a station discovery. Go to File → Discover Stations and enter the JACE’s IP address. Workbench should detect the controller as a new station (it won’t recognize your previous station file). Right-click in the discovery results and select “Add Station” to create a fresh connection.
Use the default credentials (admin/admin) to log in. Once connected, you’ll see a completely clean station with only base services running—no custom programs, points, or drivers. This clean state confirms your factory reset was successful and prepares the system for configuration restoration.
Restoring Your Station: Importing BOG Backup Files After Factory Reset
Validating and Importing Your Pre-Reset Backup
With your JACE reconnected in Workbench, it’s time to restore your configuration from the backup created earlier. Right-click on the newly added station in the Workbench Navigator and select “Import Station.” Navigate to your .bog backup file and select it. Workbench will validate the file before beginning the import process.
Watch for error messages during import—these often indicate version incompatibilities between your backup and current firmware. If you encounter errors, you may need to update the JACE firmware first or use a different backup file. A successful import will recreate all your points, programs, and configurations exactly as they were before the reset.
Post-Restore Configuration Verification Steps
After importing your backup, thoroughly verify all system components. Check that all expected points appear in the station and are reporting current values. Test critical control sequences to ensure they execute properly. Validate alarm configurations by triggering test alarms and confirming notifications work.
Don’t forget to reapply your licensing information—without proper licenses, your JACE will operate in limited demonstration mode. Enter your license keys through the Workbench licensing interface, matching them to the JACE’s host ID. Finally, update any network-specific settings that might differ from your backup, such as BACnet device IDs or communication parameters for field devices.
Troubleshooting Common Factory Reset Failures (JACE Won’t Reconnect)
When Your JACE Disappears From the Network After Reset
If you can’t locate your JACE on the network after reset, it’s likely using its default IP configuration. Connect your workstation directly to the JACE with an Ethernet cable and configure your PC’s network adapter to the 10.1.1.x subnet. Use a network scanning tool like Advanced IP Scanner to locate the controller if you’re unsure of its exact IP.
Pro Tip: Some JACE models require a specific time window to appear on the network after reset—typically 2-5 minutes after the LED returns to normal operation. If you scan too soon, you might miss the controller during its boot sequence. Wait at least 8 minutes after initiating the reset before concluding connectivity failure.
Recovery When Workbench Shows “Connection Refused” Errors
If Workbench detects the JACE but shows “Connection Refused” errors, the station services may not have initialized properly. Access the JACE web interface at its IP address and navigate to the Services section. Verify that the Station service is running—restart it if necessary. If services won’t start, you may need to perform a partial reset that preserves the operating system while clearing corrupted configuration data.
For persistent issues, check firewall settings on both your workstation and network infrastructure. Niagara requires specific ports (typically 443, 80, and 4911) to be open for proper communication. Temporarily disabling firewalls for testing can help identify if security settings are blocking the connection.
Advanced Recovery: Serial Console Reset When Workbench Connection Fails
When to Use Serial Console for JACE Factory Reset
If your JACE has become completely unresponsive and you can’t establish a Workbench connection for a standard reset, the serial console method becomes essential. This approach bypasses network dependencies and works directly with the controller’s bootloader. You’ll need a USB-to-serial adapter, a terminal program like PuTTY, and the physical serial cable for your JACE model.
This method is critical when:
– The JACE won’t obtain an IP address
– Network ports are non-functional
– The operating system has become completely corrupted
– Standard reset procedures have failed
Step-by-Step Serial Console Reset Procedure
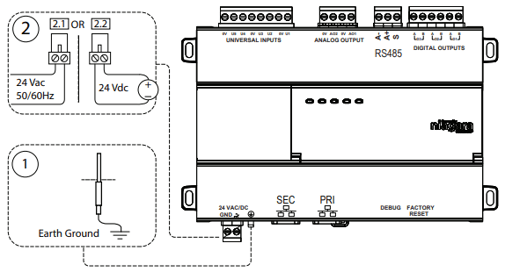
Connect the serial cable between your computer and the JACE’s console port. Configure your terminal program for 9600 baud, 8 data bits, no parity, 1 stop bit (8-N-1). Power cycle the JACE and watch for the bootloader prompt—typically “=>”. Quickly press any key to interrupt the boot process.
At the bootloader prompt, enter the command env default -f followed by saveenv to reset all environment variables to factory defaults. Then type reset to reboot the system. The JACE will restart with clean factory settings, allowing you to establish network connectivity and proceed with standard configuration.
Preventing Future Reset Needs: Maintenance Tips for JACE Controllers
Regular System Health Checks to Avoid Critical Failures
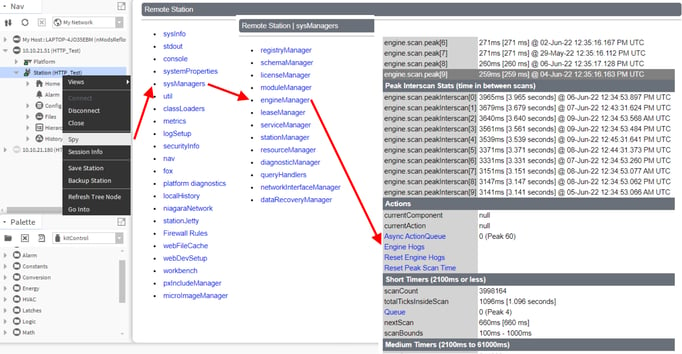
Implement a monthly maintenance routine that includes checking disk space utilization, verifying service health, and reviewing system logs for recurring errors. In Workbench, use the “Diagnostics” view to monitor CPU and memory usage—consistently high utilization often precedes system instability. Schedule regular station backups after significant configuration changes, not just before anticipated resets.
Critical Practice: Before implementing major configuration changes, create a snapshot backup that you can quickly restore if issues arise. This simple habit prevents 80% of situations that lead technicians to consider factory resets. Niagara’s built-in backup scheduler can automate this process, ensuring you always have recent recovery points.
Configuration Management Best Practices
Adopt version control practices for your Niagara station files, treating them like software code. Document all changes systematically and maintain a change log that tracks who made what modification and why. This discipline helps you identify problematic changes before they escalate to requiring a full reset.
Regularly update your JACE firmware to the latest stable version recommended by Tridium—outdated firmware is a common cause of instability that leads to reset scenarios. However, always test firmware updates in a non-production environment first, as incompatible updates can themselves cause system corruption requiring recovery.
By following these procedures and understanding when and how to factory reset JACE from Workbench, you’ll transform what many consider a dangerous last resort into a controlled, reliable recovery process. Remember that proper preparation—not technical skill—is what separates successful resets from catastrophic failures. Keep this guide bookmarked, maintain your backups religiously, and you’ll navigate even the most challenging JACE recovery scenarios with confidence.


