
Dust buildup inside your laptop isn’t just unsightly—it’s a performance killer that silently strangles your machine. When vents clog and fans choke on pet hair or carpet fibers, your laptop overheats, throttles speed, and may even shut down during critical work. Most users mistakenly think they need expensive repairs or a new device when a simple air duster cleaning could restore smooth operation in under 15 minutes. But here’s the critical catch: improper air duster use causes more laptop damage than dust itself. Spraying at the wrong angle, spinning fans uncontrollably, or triggering liquid propellant spray can fry circuits or freeze components. This guide reveals the exact professional technique for safely cleaning your laptop with air duster—no technical skills required—so you eliminate overheating without risking $300 repair bills.
Why Dust Clogs Cause Sudden Laptop Shutdowns Within 6 Months
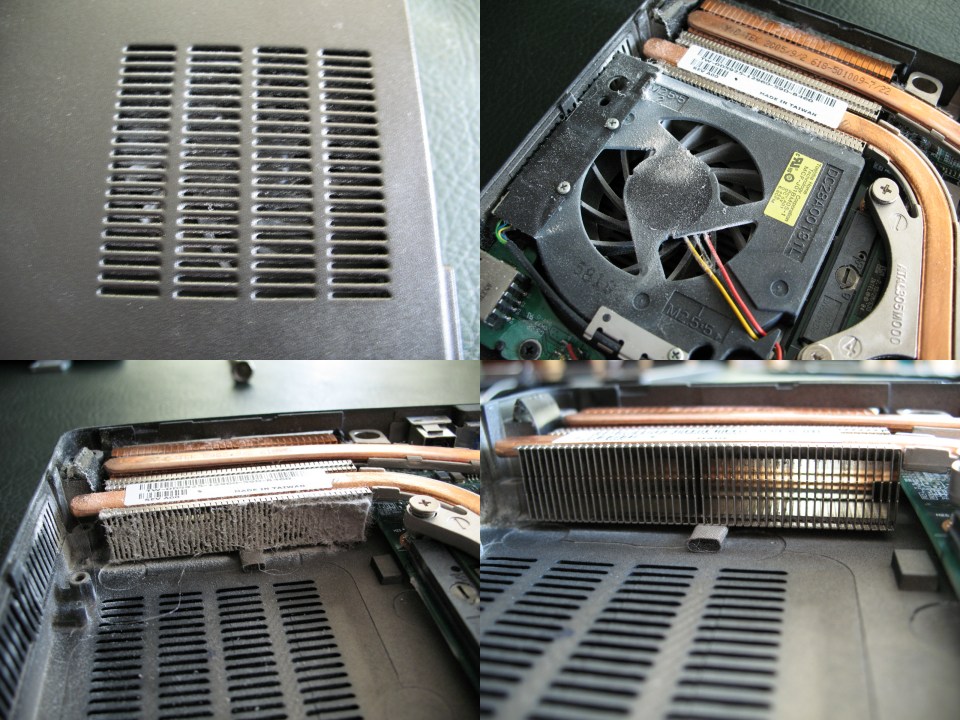
Dust isn’t passive debris—it actively sabotages your cooling system through three destructive mechanisms. First, accumulated fibers around intake vents create an insulating layer that traps heat like a winter blanket over radiators. Second, pet hair and carpet fibers weave into dense mats inside heatsink fins, blocking airflow channels designed for micro-cooling. Third, conductive metal particles from keyboard wear can bridge circuits when blown deeper by improper air duster use. Laptops operating above 90°C (194°F) for just 30 minutes suffer permanent CPU degradation, explaining why many machines fail within 18 months in dusty environments. You’ll recognize this stage when your fan runs at jet-engine volume during simple web browsing or the bottom casing burns your legs. This isn’t age—it’s a clogged cooling system screaming for air duster intervention.
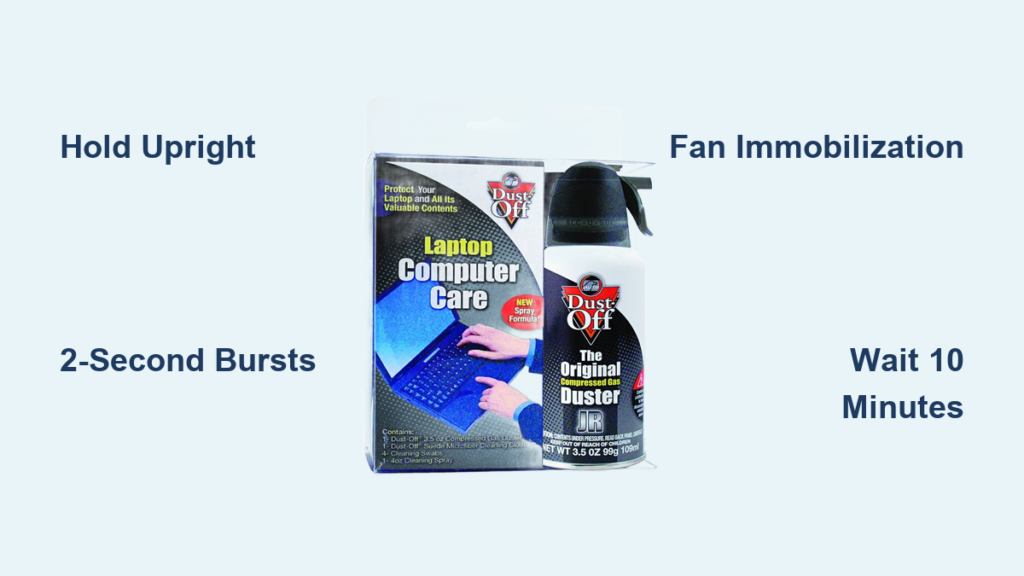
Golden Safety Rule: Hold Your Air Duster Upright at All Times

Tilting your compressed air can even slightly risks catastrophic liquid propellant spray. Most cans contain difluoroethane that flashes from liquid to gas at -28°C (-18°F). If sprayed upside down, this supercooled liquid coats motherboard components in frost within seconds—causing immediate short circuits or latent corrosion that kills your laptop weeks later. Always keep the can perfectly vertical during use, even when targeting hard-to-reach ports. Test this by spraying into empty space first: if you hear liquid sloshing or see white vapor instead of dry air, stop immediately and reposition. This single rule prevents 90% of “air duster ruined my laptop” disasters reported to repair shops.
Never Spray Continuously: The 2-Second Burst Technique
Continuous air duster blasts create three hidden dangers that short bursts avoid. First, sustained pressure forces dust deeper into thermal paste interfaces between the CPU and heatsink—reducing heat transfer by up to 40%. Second, it spins fans at 15,000+ RPMs, turning them into miniature generators that back-feed damaging voltage into power circuits. Third, it depletes propellant too fast, causing the can to cool and expel liquid residue. Limit every trigger pull to 1-2 seconds with 5-second pauses between bursts. This maintains optimal can pressure while letting dislodged dust escape. Pro technicians use a metronome app to time bursts—try counting “one-Mississippi” for perfect rhythm.
Step 1: Preparing Your Laptop and Workspace for Safe Cleaning
Skipping preparation turns cleaning into a hazard. Begin by shutting down completely—not sleep mode—and unplug all cables, including the charger. For older laptops with removable batteries, eject them now; modern sealed-battery models require only full shutdown. Next, ground yourself by touching a bare metal desk leg or radiator for 10 seconds to neutralize static electricity—this prevents invisible sparks that fry logic boards. Work outdoors or over a trash can in a well-lit area, holding your laptop at a 45-degree downward angle (keyboard facing the floor). This gravity-assisted position lets dislodged dust fall out rather than recirculate. Gather only essential tools: air duster with straw nozzle attached, non-conductive plastic spudger (or toothpick), and microfiber cloth—no vacuums or brushes.
How to Identify Critical Vents Without Opening Your Laptop
Locate exhaust vents (usually on left/right sides or rear) by feeling for warm airflow during operation—they’ll be near fan grilles with curved fins. Intake vents (often on the bottom edge) pull cool air inward and typically have straight, parallel slots. Never spray into optical drives or card slots—only target vents, USB ports, and keyboard areas. For MacBooks, focus on the left-side exhaust vent above the speaker grille; for Dell XPS models, prioritize the thin vent along the rear hinge. Misidentifying vents wastes air duster and risks damaging sensitive components.
Step 2: Cleaning Vents and Ports Without Opening the Case
This non-invasive method resolves 80% of overheating issues. Insert the air duster straw directly into exhaust vents and blast in 1-second bursts while angling the laptop downward. Move the straw in small circles to cover all vent sections—dust often clogs corners first. Repeat for intake vents, but use even shorter 0.5-second bursts since these pull debris inward. For keyboards, tilt the laptop vertically and spray horizontally across keys to eject crumbs without forcing debris deeper. Target USB ports by angling the straw downward and using micro-bursts: dust here causes connection failures but requires gentle handling. You’ll know you’re done when no visible dust plumes escape after 3-4 bursts per vent.
Why Keyboard Cleaning Prevents Sticky Key Failures
Keycaps trap hair, skin flakes, and cookie crumbs that jam scissor mechanisms beneath keys. When these particles absorb moisture from your hands, they form gummy paste that sticks keys. Air duster clears this without disassembly: hold keys sideways and blast between them at 45-degree angles. Focus on WASD cluster and spacebar—most-used keys fail first. After cleaning, test keys by rapidly tapping; if any feel stiff, repeat with shorter bursts. This prevents the “sticky key” frustration that makes users think their keyboard is broken.
Step 3: Advanced Internal Cleaning (With Fan Immobilization)

Warning: Opening your laptop may void warranty. Skip if uncomfortable. Only attempt this if your model has a removable bottom panel (usually 4-6 screws). After shutdown and grounding, remove the panel to expose the cooling system—a metal heatsink block with copper pipes leading to a small fan. Critical step: Insert a plastic spudger or toothpick between fan blades and housing to lock rotation. Without this, air blasts spin the fan uncontrollably, generating reverse voltage that can kill the motherboard. With fan immobilized, blast heatsink fins from multiple angles using 2-second bursts. Alternate between blowing from the fan side outward and from exhaust vents inward to dislodge packed dust. Stop when dust stops exiting vents.
How to Spot When Internal Cleaning Is Absolutely Necessary
Your laptop needs internal air duster cleaning if: 1) Surface temps exceed 55°C (131°F) during light tasks (check via HWMonitor app), 2) Fan runs constantly at full speed even when idle, or 3) You smell burning electronics during use. External cleaning alone won’t fix these—dense dust cakes insulate the CPU directly. Never skip fan immobilization; one unblocked blast can send 5V back through fan wires, frying voltage regulators. This step adds 5 minutes but prevents $400 motherboard replacements.
Critical Mistakes That Fry Your Laptop During Air Cleaning
Three errors cause irreversible damage. First, using vacuums or brushes—static electricity from plastic nozzles jumps to components, melting transistors. Second, spraying while plugged in—even when “off,” chargers feed residual power that interacts dangerously with moisture. Third, ignoring post-cleaning drying time—propellant residue needs 10 minutes to evaporate before power-on. One technician reported a client who sprayed an upside-down can onto a hot GPU, freezing thermal paste and cracking the chip. Always wait 5-10 minutes after cleaning before reconnecting power—this simple pause prevents condensation shorts.
How Often to Clean Your Laptop and When to Call a Pro
Schedule air duster cleaning every 6 months in standard environments, or quarterly if you have pets/work in dusty areas. Listen for these warning signs: fan noise increasing by 20% (use Decibel X app), sudden shutdowns during Zoom calls, or hot spots near vents. For Chromebooks or ultrabooks with sealed cases, stick to external cleaning—never force open panels. If your laptop still overheats after proper air duster cleaning, thermal paste degradation is likely; this requires professional repasting ($50-$100). Never attempt internal cleaning on gaming laptops with complex cooling systems—they need specialized maintenance.
Regular 10-minute air duster sessions add 2-3 years to your laptop’s lifespan by maintaining optimal thermal performance. By immobilizing fans, using vertical bursts, and respecting drying time, you transform a risky chore into a safe, empowering maintenance ritual. Your machine will run 15-20°C cooler immediately—proving that sometimes the simplest tool, used correctly, beats expensive “upgrades.” Grab your air duster now; your overheating laptop will thank you before your next video conference.


