
That first freezing splash when your camp shower bag runs cold while strangers hike past your tent site? It’s enough to make you skip washing for days. But you don’t need to sacrifice privacy or comfort—you can build a rugged, portable shower tent for under $50 using materials from your garage. Learning how to make a camping shower tent solves the biggest pain points of outdoor bathing: wind exposure, greywater mess, and zero privacy. Within 30 minutes, you’ll transform basic tarps and PVC pipes into a private sanctuary that holds heat, contains water, and survives mountain gusts. Skip the $200 store-bought models and discover why thousands of backpackers swear by this DIY solution—it’s lighter, more adaptable, and surprisingly durable.
Why Your Campsite Needs a Custom Shower Tent Now
Forget flimsy pop-up tents that collapse in breeze. A properly built DIY shower tent actively improves your hygiene routine while protecting the environment. Without one, soapy runoff seeps into trails and contaminates water sources—violating Leave No Trace principles. More critically, a dedicated structure traps steam in cold weather, turning a shivering ordeal into a rejuvenating ritual. You’ll conserve water too; military-style showers average 2 gallons when contained versus 5 gallons when exposed to wind. And unlike commercial models, your custom build adapts to any terrain: stake it on sand, anchor it between trees, or set it up on rocky ground. This isn’t just convenience—it’s campsite etiquette that keeps rangers happy and your gear dry.
Essential Tools and Materials Checklist
Gather these exact items before starting—substitutions cause leaks and instability. For a 10’x10′ tent (ideal for 1-2 people):
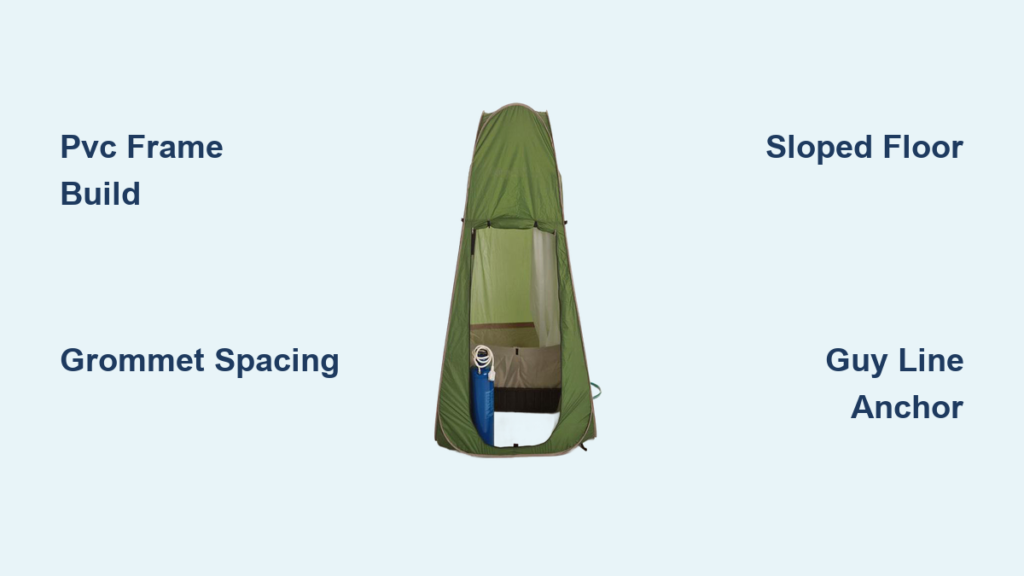
- Frame: Four 10-foot PVC pipes (1-inch diameter) for vertical posts + four 8-foot pipes for crossbars
- Connectors: Four 1-inch PVC T-connectors (bottom joints) + four 4-way cross-connectors (top corners)
- Walls: One 12’x12′ heavy-duty tarp (200g polyethylene) + one 8’x10′ tarp for floor
- Hardware: 50 feet of 1/4″ braided nylon rope, 8 UV-resistant grommets, 4 Y-stakes (not basic pegs)
- Shower System: Solar shower bag with on/off valve + 10′ garden hose (kink-resistant)
- Critical Extras: Waterproof tarp tape, grommet installation kit, sharp utility knife
⚠️ Pro Tip: Skip cheap tarps—they tear at grommets. Test yours by hanging 20 lbs from a corner overnight. If it rips, upgrade to 300g material.
Cut PVC Pipes to Exact 10-Foot Lengths

Your frame’s stability hinges on precision. Measure pipes with a metal tape (not fabric—stretch causes errors) and mark cuts with a carpenter’s pencil. Use a PVC pipe cutter—not scissors—to avoid jagged edges that weaken joints. For vertical posts, cut four pipes to exactly 10 feet; for top crossbars, cut four to 8 feet. Dry-fit all pieces: T-connectors go at ground level (one pipe straight down, two horizontal), while 4-way crosses sit at the top corners. Shake the frame—it should wobble less than 1 inch. If unstable, shorten vertical pipes by 2 inches; tall frames catch wind like sails.
Install Grommets Every 18 Inches for Windproof Walls
Lay your 12’x12′ tarp flat on grass (not concrete—it dulls grommet tools). Position the first grommet 6 inches from the corner, then space subsequent ones every 18 inches along all edges. Why 18″? Closer spacing strains the tarp; wider invites rips. Use a hole punch from your kit to create clean openings—never cut with scissors. Hammer each grommet until the washer flange is flush with the tarp backside. Test one by pulling hard on a rope threaded through it; if the fabric puckers, add tarp tape behind the grommet. This step takes 15 minutes but prevents catastrophic failure when winds hit 20 mph.
Assemble the Frame and Anchor Against Wind

Slide vertical pipes into T-connectors, then attach crossbars to 4-way tops. Lift the frame upright—never assemble it standing. Stake the base before adding tarps: Drive Y-stakes at 45-degree angles 18 inches from each corner, looping rope through T-connector bases. Now drape the tarp over the frame. Tie grommets to vertical posts using trucker’s hitches (not simple knots)—this lets you tighten walls like a drumhead. Critical move: Add a second guy line from the top crossbar to a stake 10 feet away. This counters wind uplift that flips 90% of DIY shower tents.
Create a Sloped Floor That Channels Greywater
Your floor tarp isn’t just for comfort—it’s an environmental safeguard. Lay the 8’x10′ tarp inside the frame, then stake only three corners. Pull the fourth corner taut 2 inches lower than the rest to create a drainage slope. Place a 5-gallon bucket under this low point, or dig a 6-inch sump hole lined with gravel. Pour 2 gallons of water inside; it should drain completely within 60 seconds. If pooling occurs, reposition stakes until water flows smoothly. Never skip this—stagnant greywater attracts insects and violates campsite rules.
Hang the Shower System Without Leaks
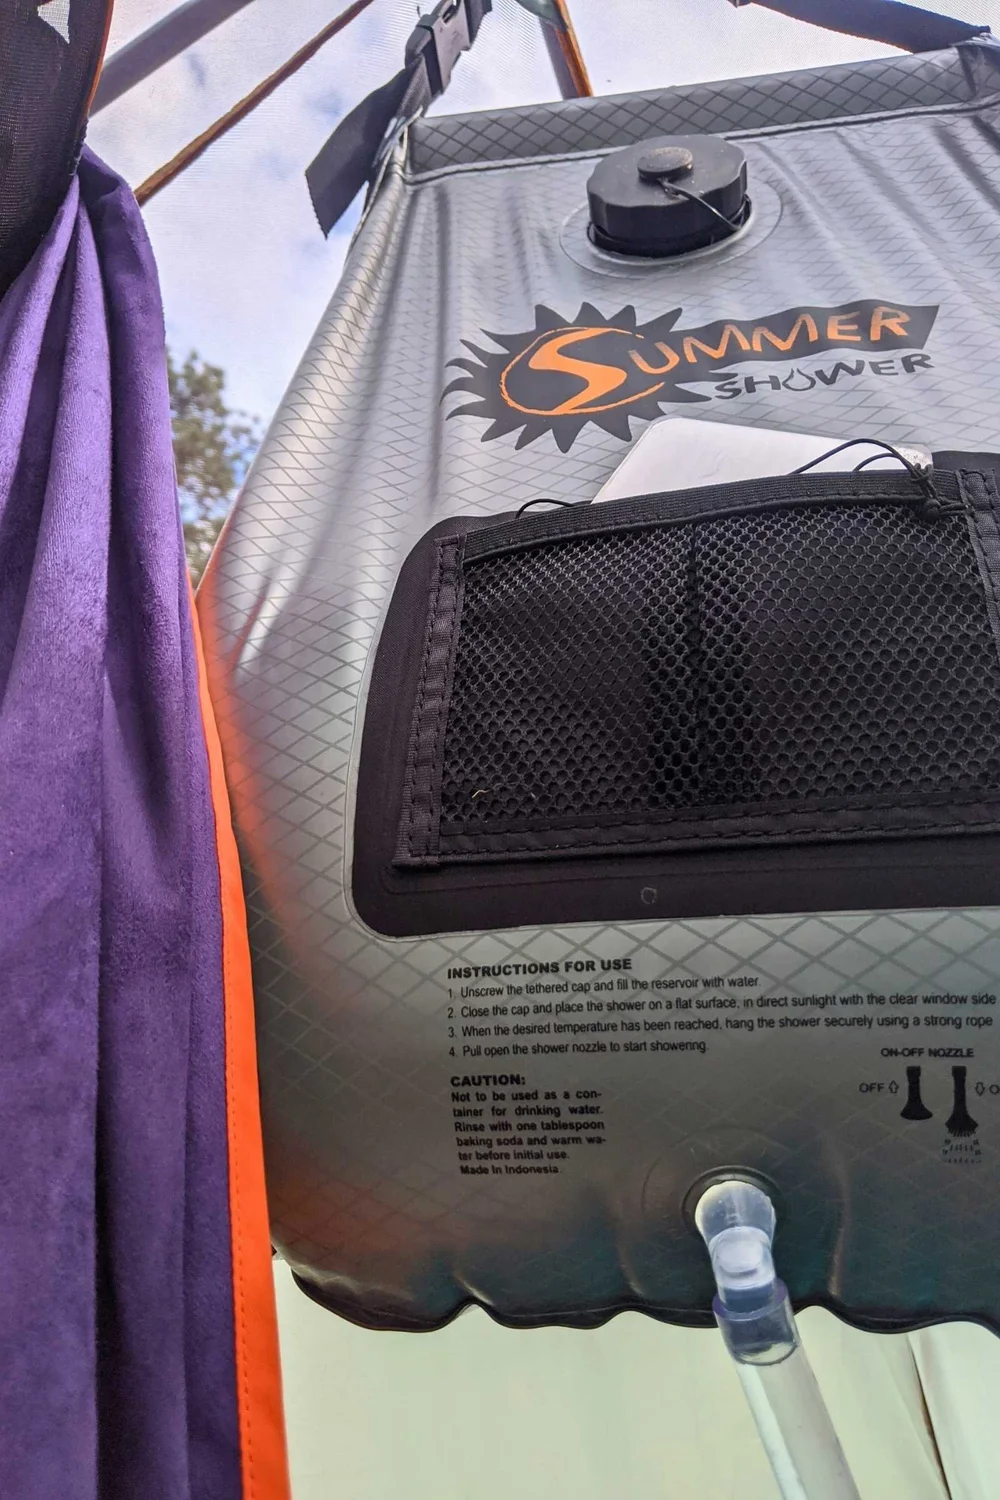
This is where most DIYers fail. Don’t hang your solar shower bag directly from the frame—it strains joints and drips inside. Instead, tie a rope horizontally between two crossbars 6 feet high. Suspend the shower bag from this rope using a carabiner, keeping the bag 3 feet above your head. Connect the hose to the bag’s valve before hanging it; test for leaks by filling with 1 quart of water. Hang the showerhead from a separate rope 6 inches above your shoulders—use a bungee cord so it retracts when not in use. Check valve accessibility: You must reach it without stepping outside.
Add Ventilation That Prevents Condensation Drips
Steam buildup turns your tent into a sauna that drips icy water on your head. Fix this in 60 seconds: Cut a 6″x6″ vent 12 inches below the roof on the downwind wall. Cover it with mesh netting stapled to the tarp—this blocks rain while allowing airflow. In cold weather, add a second vent near the floor on the opposite wall to create convection currents. You’ll feel the difference immediately: no more fogged-up mirrors (or goggles) and faster drying time for clothes hung inside.
Secure Against 30-MPH Winds: The Ranger’s Trick
Park rangers in windy regions like Utah’s canyon country use this pro method: Wrap 2-foot sections of duct tape around each pipe joint outside the connectors. The tape acts like a shock absorber, letting the frame flex without snapping. Then, drive stakes every 3 feet along guy lines—not just at corners. For extreme conditions, replace two vertical pipes with tent poles from a broken dome tent; their spring-loaded tension handles gusts better than rigid PVC.
Why Greywater Disposal Isn’t Optional—And How to Do It Right
Soapy water kills aquatic life even with “biodegradable” soap. Rangers cite improper greywater disposal as the #1 violation in national parks. Always carry out greywater: After showering, funnel floor water into a collapsible bucket, then pour it through a strainer into a deep cathole 200+ feet from water sources. In developed campgrounds, use designated sumps. Never let runoff flow downhill—dig a small trench to redirect it away from trails. This takes 2 extra minutes but keeps ecosystems intact.
Cold-Weather Hacks That Make Winter Showers Possible
When temperatures dip below 40°F, add these layers: Wrap the frame with silver emergency blankets (shiny side out) to reflect body heat. Line the interior with a $5 shower curtain—this creates an air gap that insulates like double-pane glass. Pre-heat water to 110°F (test with a thermometer—too hot melts PVC!), and time showers for midday sun. With these tweaks, you’ll tolerate 25°F showers comfortably. Skip the curtain liner in summer though—it turns your tent into a steam room.
Your Turn to Build a Shower Tent That Outperforms Store-Bought Models
You now have a battle-tested blueprint for a camping shower tent that costs less than half of retail options while solving real problems: containing greywater, blocking wind, and holding heat. Remember the non-negotiables—grommet spacing every 18 inches, sloped flooring, and top-mounted guy lines—and your tent will survive seasons of use. On your next trip, step into your private oasis knowing you’ve mastered how to make a camping shower tent the right way. Not only will your showers be warmer and more private, but you’ll leave no trace behind. Pack your PVC pipes and tarps—your most refreshing camp experience starts with this simple build.


