
Nothing ruins a camping trip faster than waking up to a wet sleeping bag and dripping tent walls. That morning condensation isn’t just uncomfortable—it’s actively damaging your gear and creating a breeding ground for mold. The solution? Proper ventilation, which removes the 1-2 liters of moisture your body produces each night through breathing and sweating. By mastering tent airflow techniques, you’ll transform your camping experience from soggy misery to restful comfort regardless of weather conditions.
Most campers make the critical mistake of sealing their tents completely at night, trapping moisture inside with nowhere to go. The reality is you need consistent airflow even in cold or rainy conditions—just strategically managed. Whether you’re using a basic dome tent or a high-end backpacking shelter, understanding how to manipulate your tent’s ventilation system will keep you dry and extend your gear’s lifespan. This guide reveals exactly how to ventilate your camping tent effectively for any season or weather condition.
Why Your Tent Walls Are Dripping Every Morning
Your tent transforms into a moisture trap the moment you zip it closed. As you sleep, your body releases approximately one liter of water vapor through normal respiration and perspiration—enough to fill a standard water bottle. This warm, moist air rises until it hits the cooler tent walls and ceiling, where it condenses into visible droplets. The problem intensifies when external humidity exceeds 90% or when temperature differences between inside and outside your tent are significant.
How to Identify Dangerous Condensation Levels
Check your tent walls immediately upon waking. If you see widespread droplets that bead and run down the fabric, your ventilation strategy has failed. Mild condensation that evaporates quickly with morning light is normal, but heavy moisture accumulation indicates insufficient airflow. Pay special attention to areas where your sleeping bag or gear touches the tent walls—these contact points create cold spots where condensation forms first and most heavily.
The Hidden Moisture Sources You’re Ignoring
Beyond your own breathing, damp gear stored inside your tent adds significant moisture. Wet hiking clothes, damp towels, and even seemingly dry ground moisture rising through your tent floor can contribute hundreds of milliliters of additional water overnight. Never cook inside your tent or vestibule—the steam from boiling water overwhelms ventilation systems instantly. Even breathing heavily during sleep increases moisture output by up to 50% compared to resting respiration.
Rainfly Positioning Secrets for Maximum Airflow
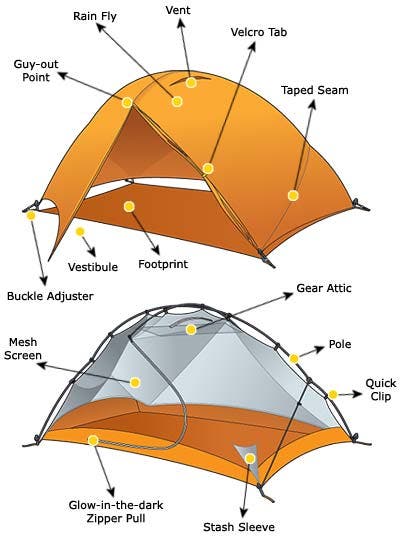
Your rainfly isn’t just for keeping rain out—it’s a critical component of your tent’s ventilation system when positioned correctly. The single most effective technique is maintaining that essential 1-2 inch gap between your rainfly and inner tent body. This space allows moisture to escape while still protecting you from precipitation.
Creating the Perfect Rainfly Gap for Moisture Escape
When setting up your tent, stake out your rainfly so it creates visible tension away from the inner tent. Use all available guylines to pull the rainfly outward, especially at the peak and corners. If your tent has adjustable vents at the top of the rainfly, open them completely—this is where warm, moist air naturally accumulates and needs to escape. Never let your rainfly sag against the inner tent, as this creates direct contact points where condensation forms.
How to Stake Your Rainfly for Optimal Ventilation
Position your rainfly stakes at 45-degree angles away from the tent rather than straight down. This creates outward tension that maintains the critical air gap. In rainy conditions, angle the rainfly slightly downward on the windward side to deflect rain while still allowing airflow underneath. For tents with vestibules, leave the vestibule door partially open even during light rain—this creates additional airflow paths while keeping your main sleeping area protected.
Summer Tent Ventilation: Open Everything, Even at Night

During warm weather camping, the temptation to close vents to keep insects out creates exactly the opposite problem you want to avoid. Proper summer ventilation requires strategic openness that balances bug protection with maximum airflow.
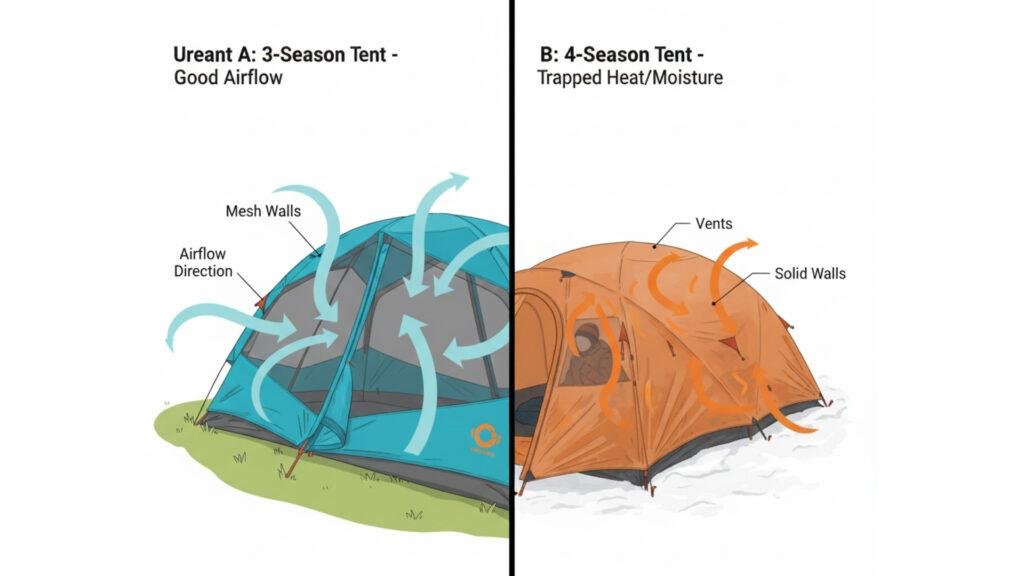
Mesh Panel Management for Hot Weather Camping
Fully open all mesh panels on both ends of your tent, even if insects are present. Quality mesh provides excellent bug protection while allowing air to flow freely. If your tent has adjustable panels that convert from mesh to solid fabric, keep them in mesh mode regardless of nighttime temperatures—condensation risks outweigh minor temperature drops. Position your tent so prevailing breezes flow through opposite mesh panels, creating natural cross-ventilation that carries moisture away.
When It’s Safe to Ditch Your Rainfly Completely
In dry summer conditions with no rain in the forecast, remove your rainfly entirely. This exposes maximum mesh surface area and eliminates the barrier between inner tent and outside air. Check the weather forecast carefully—just a brief evening shower can leave you scrambling. If you’re concerned about unexpected rain, keep your rainfly nearby but unattached, secured with a single stake at the peak so you can quickly deploy it if needed.
Cold Weather Ventilation: The Minimal Opening That Solves Everything
The biggest mistake cold-weather campers make is sealing their tents completely against the elements. While counterintuitive, maintaining even minimal airflow prevents the dangerous buildup of moisture that freezes on tent walls.
Finding the Right Balance Between Warmth and Dryness
Keep at least one high vent partially open regardless of outside temperature. This allows moisture to escape without creating significant drafts over your sleeping area. In freezing conditions, aim for a 1-2 cm opening at the peak vent—enough for moisture to escape but small enough to prevent excessive heat loss. If you notice frost forming inside your tent, increase ventilation immediately before it melts and soaks your gear.
High-Low Vent Strategy for Winter Camping
Create a natural convection current by opening a small vent at ground level on the leeward side (away from wind) and a vent at the peak. Cool, dry air enters through the low vent, warms as it circulates, then carries moisture out through the high vent. This “chimney effect” works continuously without creating uncomfortable drafts. For extreme cold, add moisture-absorbing materials like silica gel packets in breathable cloth bags near ventilation points.
Morning Condensation Routine: What to Do Before Packing Up
Your ventilation strategy doesn’t end when you wake up—it continues through your morning routine. How you handle morning moisture determines whether your gear stays dry for the rest of your trip.
The 15-Minute Morning Ventilation Protocol
Immediately upon waking, fully open all vents, doors, and windows, even if it’s still dark outside. Let fresh air circulate for at least 15 minutes before beginning your morning routine. Hang damp sleeping bags and clothes in the vestibule or outside on a line to air out. If morning sun is available, position your tent to catch those early rays—they’ll help evaporate residual moisture quickly.
How to Check for Hidden Moisture Before Storage
Before packing your tent away, inspect all contact points where gear touched the walls. Run your hand along seams and corners where moisture accumulates. If you feel any dampness, extend your airing time or wipe down with a microfiber towel. Never pack a tent that feels even slightly damp—residual moisture trapped in your stuff sack will cause mildew within hours. If packing while damp is unavoidable, unpack and air it thoroughly at your first opportunity.
Tent Placement Tactics That Reduce Condensation by 50%
Where you pitch your tent dramatically impacts how much condensation forms overnight. Strategic placement leverages natural airflow and minimizes moisture accumulation.
Why Low Spots Are Moisture Magnets
Avoid camping in depressions, valleys, or near water sources where cold air settles overnight. These low spots collect moisture like natural bowls, increasing both external humidity and ground moisture. Instead, choose higher ground with gentle slopes that allow cold air to flow away from your tent. Even a slight elevation of 3-5 feet makes a significant difference in moisture management.
Positioning Your Tent to Catch Natural Breezes
Orient your tent so doors and vents face the prevailing wind direction. If wind direction shifts frequently, position your tent perpendicular to the most common wind pattern to maximize cross-ventilation potential. Use natural windbreaks like rock formations or tree lines strategically—place them on the windward side to redirect airflow through your tent rather than blocking it completely.


