

That annoying wobble in your floor lamp isn’t just irritating—it’s a genuine safety concern waiting to happen. When your lamp sways with every breeze or tap, you’re one accidental bump away from shattered glass, damaged furniture, or worse. The good news? Most wobbly floor lamp bases can be fixed in under an hour with basic tools you probably already own. Whether your lamp’s instability comes from stripped threads, a broken mounting bolt, or normal wear and tear, this guide delivers the most effective repair strategies tested by lamp repair specialists. You’ll learn exactly where to look for the problem, which fixes work best for different lamp designs, and how to prevent future wobble before it starts.
Why Your Floor Lamp Base Keeps Wobbling (And Where to Look)
The shaking in your floor lamp almost always originates from one specific weak point in the connection between the lamp pole and its base. Understanding exactly where and why this happens is half the battle toward a permanent fix.
The Most Common Culprit: Stripped Threads in the Base Connection
Over time, the constant tightening and loosening of the central mounting bolt wears down the threads inside the base plate. This is especially common in lamps with plastic bases where the threads gradually strip out from normal use. When you try to tighten the bolt, it simply spins without creating a secure connection, leaving your lamp dangerously unstable. Check for fine plastic shavings around the base bolt—this is a dead giveaway that thread stripping has occurred.
Broken or Shortened Mounting Bolts: The Silent Instability Cause
Many homeowners don’t realize their lamp uses a specialized mounting bolt with unique features. Carriage bolts with square shoulders, threaded rods with specific diameters, or manufacturer-specific fasteners can break or become shortened through improper tightening. When this happens, the bolt can’t properly secure the pole to the base, creating that characteristic wobble. If you’ve recently disassembled your lamp and the bolt seems too short to properly tighten, this is likely your issue.
How Normal Wear Creates Dangerous Wobble Over Time
Even with proper care, floor lamps experience constant stress from movement, temperature changes, and minor impacts. The connection point between the pole and base undergoes microscopic shifting that accumulates over months and years. What starts as a barely noticeable wiggle becomes a full-blown wobble that threatens to topple your lamp. This gradual deterioration explains why lamps that were perfectly stable when new suddenly develop instability after several years of use.
Essential Safety Steps Before Fixing Your Wobbly Lamp
Why Unplugging Is Non-Negotiable for Lamp Repairs
Always unplug your lamp before beginning any repair work. Even minor adjustments to a wobbly base can accidentally tug on internal wiring, creating shock hazards or short circuits. Many lamp bases contain wiring channels that run through the central bolt area—working on a plugged-in lamp risks serious electrical injury. Make this your first and non-negotiable step every single time.
Proper Lifting Techniques for Heavy Floor Lamps
Floor lamps with solid metal or marble bases can weigh 20-30 pounds or more. When moving your lamp to a work surface, bend at the knees—not the waist—and lift with your legs. For extremely heavy bases, recruit a helper to prevent back strain or accidental drops. Place the lamp on a stable work surface covered with a soft towel to prevent scratches during repair.
How to Diagnose Exactly Where Your Lamp Is Wobbling
The One-Hand Test: Pinpointing the Weak Connection Point
With your lamp unplugged and on a stable surface, perform this simple diagnostic test: firmly grip the base with one hand while gently shaking the lamp pole with the other. Move your grip up the pole in 6-inch increments until you feel where the wobble originates. 90% of wobble problems occur at the base connection point, but occasionally the issue is higher up where the pole connects to the lamp head. If the wobble happens at the base connection, proceed with the fixes below.
Floor Surface Check: Is Your Problem Really the Base?
Before diving into disassembly, rule out simple environmental causes. Place your lamp on a known flat surface like a tile floor or table. If the wobble disappears, your original floor was uneven or you were using a thick rug that created instability. Try rotating the lamp 90 degrees on its current surface—sometimes this simple adjustment aligns the base legs with the floor’s contours for immediate stability.
Fix #1: Tightening or Replacing the Central Mounting Bolt (5-Minute Fix)
How to Identify Your Bolt Type (Carriage, Threaded Rod, or Custom)
Examine the bolt securing your lamp pole to the base. Most lamps use one of three types:
– Carriage bolts with a square shoulder under the head (prevents spinning during tightening)
– Threaded rods that run through the entire base assembly
– Custom manufacturer bolts with unique heads requiring special tools
If your bolt spins freely without tightening, it’s likely stripped or broken. Remove it completely to inspect for damage—you’ll need this bolt as a template when purchasing a replacement.
Hardware Store Shortcut: Finding the Perfect Replacement Bolt
Take your original bolt to a hardware store for an exact match. For carriage bolts, focus on three measurements: diameter, length, and the square shoulder size. If you have a custom bolt with special features (like two flat sides), ask the hardware store associate about modification options—they can often file down a standard bolt to match your specifications. For best results, choose a stainless steel replacement bolt that won’t corrode over time.
Fix #2: Thread Repair Solutions for Stripped Base Connections
Plumber’s Tape Method: The Quick Thread Gap Filler
For mildly stripped threads, wrap 2-3 layers of white PTFE thread seal tape around the bolt threads before reinserting. The tape fills microscopic gaps in the stripped threads, creating a tighter fit when tightened. This isn’t a permanent solution for severely damaged threads but works surprisingly well for minor wobble issues. Apply the tape clockwise (following the thread direction) for maximum effectiveness.
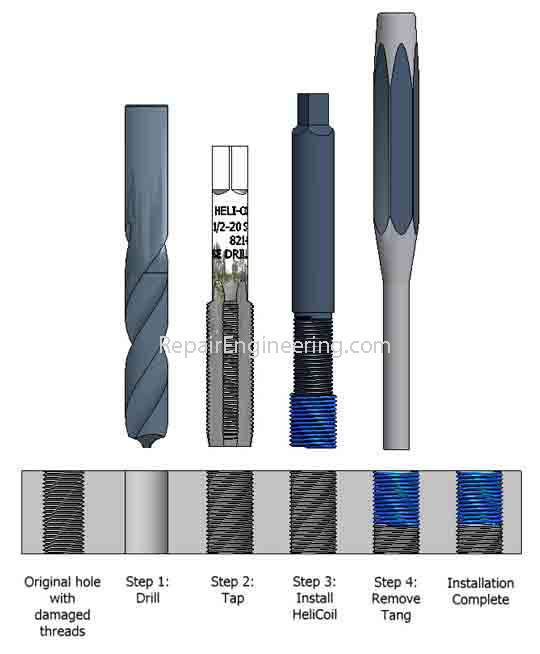
Helicoil Inserts: Permanent Metal Thread Restoration
For metal bases with completely stripped threads, Helicoil inserts create new, stronger threads. This professional-grade solution involves:
1. Drilling out the stripped hole to a specific size
2. Tapping new threads for the insert
3. Installing the spiral wire insert
4. Reinserting your original bolt
While it requires special tools, a Helicoil repair lasts longer than the lamp itself and maintains the original bolt size—no modifications needed.
Fix #3: The Shim Technique for Loose Pole-to-Base Connections
Best Materials for Lamp Shims (Plastic Bottle vs. Aluminum Can)
When the lamp pole fits loosely in its socket, shims provide instant stability. Cut a thin strip from:
– A plastic soda bottle (ideal thickness for most lamps)
– An aluminum beverage can (more rigid for heavier lamps)
– Copper or aluminum flashing (best for professional results)
The plastic bottle shim is easiest for beginners—simply cut a 1/2-inch wide strip and wrap it around the bottom of the lamp pole where it inserts into the base. This takes up excess space and creates a snug, wobble-free fit when you re-tighten the central bolt.
Fix #4: Epoxy Reinforcement for Severe Wobble Problems
Surface Preparation: Why This Step Makes or Breaks Your Repair
Proper surface prep is critical for epoxy success. Clean both the lamp pole and base socket with 90%+ isopropyl alcohol to remove oils and debris. Lightly sand both surfaces with 220-grit sandpaper to create “tooth” for the epoxy to grip. Wipe away all dust with a clean cloth—any contamination will prevent proper bonding and cause your repair to fail prematurely.
Proper Epoxy Application for Lamp Base Stability
Mix a 2-part epoxy like JB Weld according to package instructions. Apply a thin, even layer to the bottom 1-2 inches of the lamp pole, focusing on areas that contact the base socket. Insert the pole firmly into the base and tighten the mounting bolt to proper tension. Wipe away excess epoxy immediately with a paper towel dampened with acetone. Allow full 24-hour cure time before using the lamp—using it too soon creates microscopic shifts that weaken the bond.
When Quick Fixes Won’t Work: Advanced Repair Strategies
Weighted Base Solutions for Cylindrical Lamp Designs
Cylindrical base lamps present unique challenges as they often lack a central mounting bolt. For these designs, add weight to the base interior:
1. Remove any access panel or decorative cap
2. Clean the interior thoroughly
3. Add small lead weights or steel washers
4. Secure with epoxy if necessary
5. Reassemble and test stability
This lowers the center of gravity and counters wobble without modifying the lamp’s appearance.
Preventing Future Wobble: Maintenance Tips That Work
The Quarterly Bolt Tightening Routine You Should Follow
Set a calendar reminder to check your lamp’s stability every three months. Gently attempt to wiggle the lamp—if you detect any movement, tighten the central bolt just enough to eliminate play. Never overtighten, as this accelerates thread damage. For lamps in high-traffic areas, perform this check monthly to catch developing problems early.
Floor Protection That Doubles as Wobble Prevention
Apply self-adhesive felt pads to all contact points on your lamp base. This serves two purposes: it prevents floor scratches and creates a more stable grip on hard surfaces. For tile or wood floors, use slightly thicker rubber pads that provide more grip. Replace these pads annually as they wear down and lose effectiveness.
When to Replace Rather Than Repair Your Wobbly Floor Lamp
Warning Signs Your Lamp Base Is Beyond Repair
Certain damage simply can’t be fixed safely:
– Cracks in cast metal or marble bases
– Multiple stripped connection points
– Visible electrical damage near the base
– Severe corrosion in metal components
If your lamp base shows these issues, replacement is safer and more cost-effective than continued repair attempts. A severely compromised base creates an unacceptable tipping hazard that no repair can fully eliminate.
Final Note: A wobbly floor lamp doesn’t have to spell the end of its useful life. By following these targeted repair methods, you can restore stability to most lamps in under an hour. Remember to always start with the simplest solution—tightening or replacing the central bolt—before moving to more involved techniques like epoxy reinforcement. For ongoing stability, implement the quarterly maintenance routine to catch developing problems early. With proper care, your repaired lamp should remain steady and safe for years to come.


