
Your hands ache after hours of typing, knitting, or lifting weights—but grabbing that massage gun could do more harm than good if you don’t know the critical safety zones. Using percussive therapy on hands requires radically different technique than treating legs or back due to the dense network of bones, nerves, and blood vessels just beneath the skin. When applied correctly with the right attachment and pressure, a massage gun can relieve stiffness in the thenar eminence (thumb pad), hypothenar eminence (pinky pad), and forearm flexors that cause carpal tunnel symptoms. This guide reveals the exact protocol physical therapists recommend for hand recovery—plus the 4 danger zones that could trigger permanent nerve damage if you make one mistake. You’ll learn how to safely target arthritis pain, post-workout soreness, and repetitive strain in under 90 seconds per hand.
Why Your Massage Gun Can Harm Hands Without These Safety Steps
Skipping proper preparation risks bruising delicate hand tissues or compressing nerves. Start with these non-negotiable safety protocols before powering on your device:
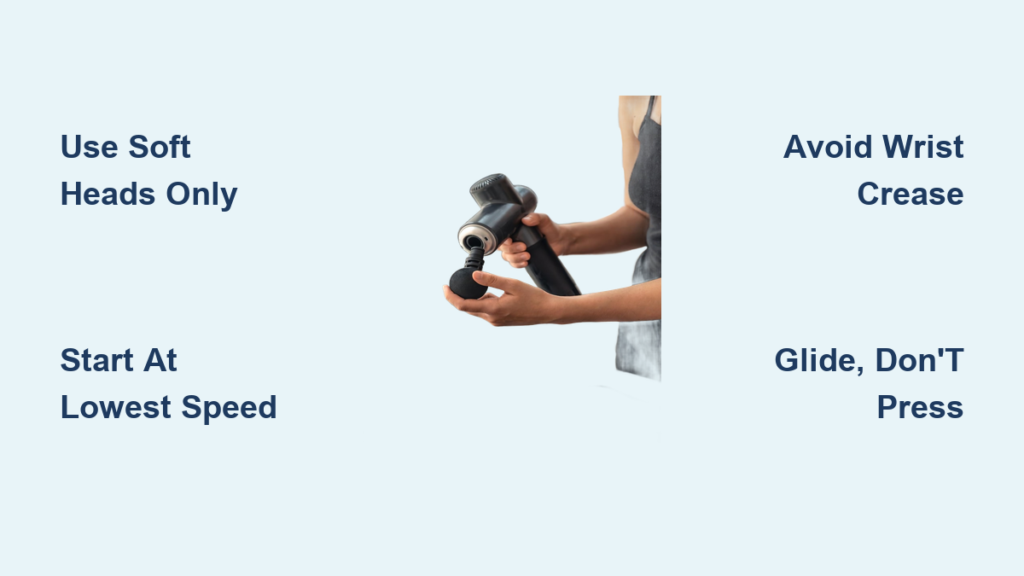
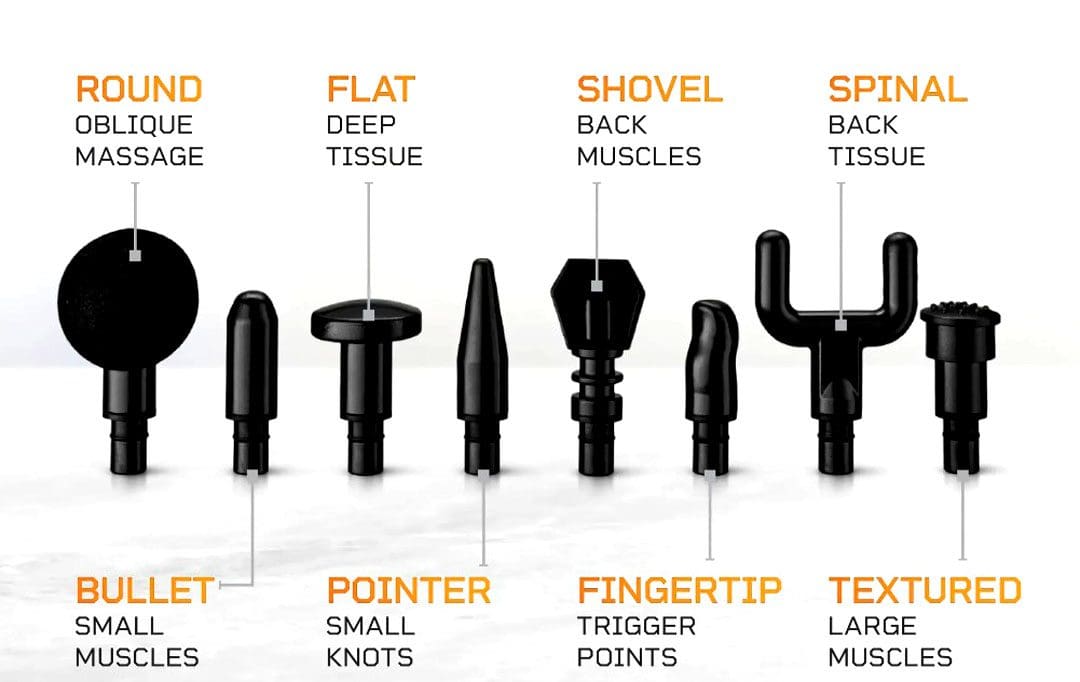
Attach Only Soft, Rounded Heads (Never Pointed Attachments)
Your massage gun’s bullet or fork head belongs nowhere near hands. These concentrate force into pinpoint areas that can rupture capillaries or irritate the ulnar nerve. Grab your standard ball or flat foam head—its wider surface distributes pressure safely across fleshy muscle zones. If your device lacks these attachments, do not proceed. The resource document explicitly states: “Do not use bullet heads, cone heads, or any sharp-pointed attachments on the hand and wrist area.”
Set Speed to Absolute Minimum Before Contact
Hand muscles respond to the lowest intensity setting. Cranking past level 1-2 risks microtrauma to tendons. Power on your device away from your body, dial to minimum speed, then test pulses on your thigh first. If you feel even mild discomfort here, reduce further. Remember: Hand recovery requires 10x less force than quads—what feels “too weak” is likely correct.
Warm Muscles With Heat (Critical for Arthritis Users)
Cold, stiff hands can’t absorb percussion safely. Soak hands in warm water for 2-3 minutes or wrap in a heated towel. This isn’t optional for arthritis sufferers—the resource document notes inflamed joints must never receive direct pressure, and warmth reduces spasm risk during treatment. Skip this step, and you risk aggravating conditions like trigger finger.
Stop Bruising Your Hands: Correct Massage Gun Technique for Palms
Most users press too hard and hold the gun stationary—a recipe for nerve compression. Follow this exact movement pattern:
How to Glide Over Fleshy Palm Zones Without Hitting Bone
Place the ball attachment lightly against your palm’s meaty center—no downward pressure needed. The device’s weight alone provides sufficient contact. Now glide slowly (1-2 inches per second) in small circles over three key zones:
– Thumb pad (thenar eminence): Circle the fleshy mound where thumb meets palm
– Pinky pad (hypothenar eminence): Target the soft triangle opposite your thumb
– Central palm: Focus between metacarpal bones (avoid knuckle bones)
Spend precisely 30 seconds per zone. If you hear cracking or feel sharp pain, you’re pressing too hard or hitting bone. Stop immediately—this indicates potential interossei muscle damage.
Why You Must Avoid These 4 Hand Zones (With Visual Cues)
Never apply percussion to these danger areas—permanent nerve injury can occur in seconds:
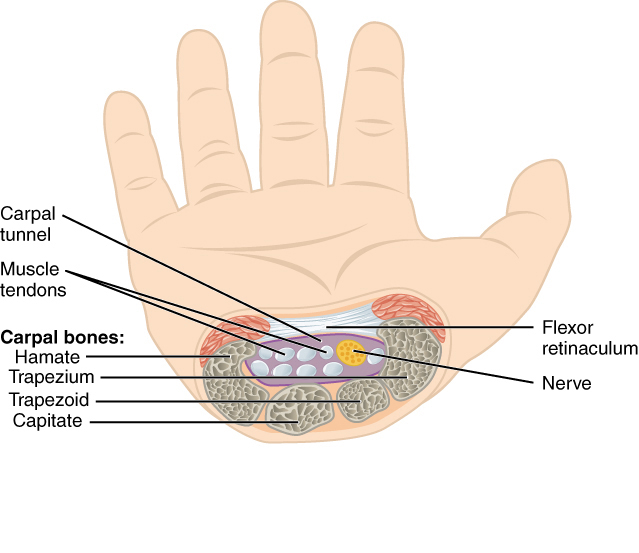
– Inner wrist crease: Where carpal tunnel houses the median nerve (feel for pulse here)
– Back of hand: Tendons sit millimeters under skin (visible when making fist)
– Knuckle bones: Protrusions where metacarpals end (redness = tissue damage)
– Swollen joints: During arthritis flares, avoid 1-inch radius around hot, red areas
Watch for these visual warnings during treatment: skin turning white (excessive pressure), visible trembling (nerve irritation), or bruising within 24 hours. If any appear, discontinue use for 72 hours.
Your 90-Second Hand Recovery Routine for Common Issues
Tailor your approach to your specific pain point using these condition-specific protocols:
Carpal Tunnel Relief: The Safe Forearm-Only Method
Do not massage wrists—this compresses the median nerve. Instead:
1. Make a fist to locate forearm flexor muscles (underside of forearm)
2. Glide ball attachment slowly along these muscles from elbow to wrist crease
3. Use lowest speed for 45 seconds per forearm
4. Never cross the wrist line—stop 1 inch before the crease
This reduces tension in flexor tendons that contribute to carpal tunnel symptoms. The resource document confirms: “Never apply directly to the carpal tunnel (the inner wrist).”
Arthritis Pain Protocol: Targeting Around Joints
For osteoarthritis or rheumatoid flare-ups:
– Use lowest speed setting only
– Glide around (not on) base of thumb joint
– Focus on fleshy palm areas ½ inch from painful joints
– Stop if joint feels warmer post-treatment
– Limit sessions to 20 seconds per zone
Critical: If joints are red/hot, skip treatment entirely. Percussion increases blood flow—which worsens inflammation during active flares.
Post-Workout Hand Soreness Fix (Climbers, Lifters, Typists)
After intense gripping activities:
1. Warm hands with warm water soak (2 min)
2. Massage thenar/hypothenar eminences at speed 1 for 30 sec each
3. Glide up forearm flexors/extensors for 20 sec
4. Finish with prayer stretch (palms pressed together)
Total time: 90 seconds. Exceeding this risks overstimulating small hand muscles.
Emergency Stop Signs: When to Discontinue Immediately

Your hands will signal dangerous pressure through these non-negotiable warning signs—stop using the massage gun the moment you feel:
– 🔴 Electric-shock sensations (median/ulnar nerve compression)
– 🔴 Numbness spreading to fingers (nerve impingement)
– 🔴 Pins-and-needles in palm (vascular compromise)
– 🔴 Sharp pain at tendon insertion points
Persistent symptoms after stopping indicate potential injury. Consult a physical therapist within 24 hours—especially if you have pre-existing conditions like Raynaud’s disease or diabetes. The resource document stresses: “If pain, numbness, or tingling persists after a session, discontinue use and consult a doctor.”
Massage Gun Hand Settings Cheat Sheet
| Setting | Safe for Hands? | Why It Matters |
|---|---|---|
| Attachment | ||
| Ball/Flat head | ✅ Yes | Distributes pressure over safe zones |
| Bullet/Fork head | ❌ Never | Concentrates force → nerve damage risk |
| Speed Level | ||
| 1-2 (Lowest) | ✅ Yes | Matches delicate hand tissue tolerance |
| 3+ (Medium/High) | ❌ Never | Causes microtrauma to tendons |
| Pressure | ||
| Device weight only | ✅ Yes | “Apply gentle, light pressure” (Resource) |
| Pressing downward | ❌ Never | Risks bone bruising & nerve irritation |
Final Protocol: Your Daily Hand Maintenance Plan
For safe daily use, follow this 2-minute sequence:
1. Warm hands with warm towel (2 min)
2. Attach ball head, set to speed 1
3. Glide over thenar eminence (30 sec)
4. Glide over hypothenar eminence (30 sec)
5. Glide up forearm flexors (20 sec)
6. Perform finger stretches (make fist → spread wide)
Never exceed 2 minutes total per hand. If you have chronic conditions like carpal tunnel syndrome, get clearance from a physical therapist before starting. Remember: massage guns treat muscle tension around joints—not the joints themselves. They’re recovery tools, not medical devices. When used correctly with this protocol, you’ll unlock faster relief from stiffness, reduced post-activity soreness, and improved grip strength—all without risking the nerve damage that sends 12,000+ users to clinics yearly from improper hand use. Keep your attachments clean, store your gun vertically, and prioritize gentle technique over intensity for lifelong hand health.


