
That nagging muscle ache after leg day or the stiffness from sitting at your desk all afternoon? Millions turn to percussion massage guns for relief, but using a percussion massage gun incorrectly can worsen soreness or cause injury. Many users simply blast high speeds on tender spots, missing the real benefits of this powerful recovery tool. Proper technique transforms it from a noisy gadget into a precision instrument that melts tension, boosts circulation, and accelerates recovery. In this guide, you’ll master the exact steps to target sore muscles safely—whether you’re a weekend warrior, office worker, or elite athlete.
Skip the trial-and-error frustration. You’ll learn how to choose the right attachments for stubborn knots, avoid dangerous areas like joints and bones, and apply the perfect pressure for deep tissue release. Most importantly, you’ll discover why less time on each muscle group delivers better results than marathon sessions. Let’s unlock your massage gun’s full potential starting today.
Start with Correct Setup and Muscle Preparation
Skipping preparation is the #1 mistake new users make, leading to bruising or ineffective sessions. Your muscles need priming before percussion therapy begins.
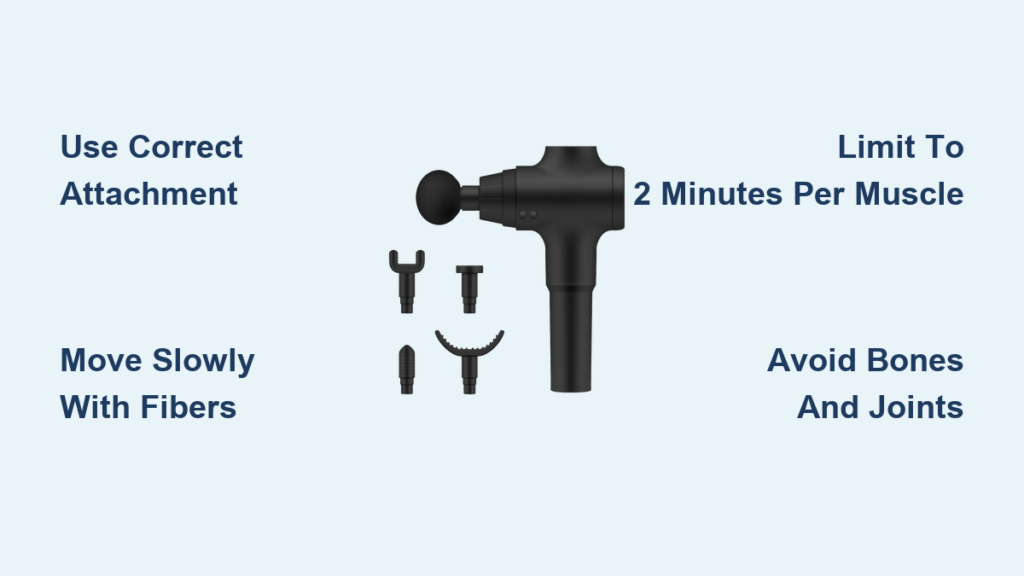
Choose the Right Attachment for Target Muscles
Never use the same head for every area—this causes discomfort and reduces effectiveness. For dense muscle groups like quads, glutes, or lats, snap on the large flat or round ball attachment. Its broad surface distributes force evenly across thick tissue. Switch to the bullet or fork head when tackling triggers points in shoulders or calves; these concentrate vibration into tight knots. The U-shaped head? Reserve it strictly for parallel spine muscles (like erectors), never directly on the spine itself. Always match the tool to the terrain.
Activate Muscles Before Applying Pressure
Cold, stiff muscles reject percussion therapy. First, move the target area through its natural range: circle your ankle before treating calves, or do arm swings for shoulders. This increases blood flow and “warms up” tissue. Then position yourself so the gun glides smoothly—lie face-down for back work, sit for quads, or stand against a wall for hamstrings. Never force awkward angles that compromise your posture.
Apply Percussion Therapy with Precision Technique
How you move the gun determines whether you relieve pain or create new problems. Speed and pressure matter less than your hand placement and motion patterns.
Move Slowly With Muscle Fiber Direction
Place the gun perpendicular to your skin and let its weight provide pressure—no pushing down. Start at the lowest speed setting (even if your model has 20+ levels). Glide the attachment slowly along muscle fibers: upward on calves, downward on quads, sideways across lats. Moving too fast skips tissue; too slow concentrates excessive force. Imagine “combing” the muscle like hair—smooth, deliberate strokes covering the entire area.
Limit Time Per Muscle Group to Avoid Overuse
Set a timer: 30 seconds is the minimum, 2 minutes is the absolute maximum per muscle group. Longer sessions trigger inflammation instead of reducing it. Focus on one area until you feel tension release (a “good hurt” sensation), then move on. Example sequence:
1. Glutes: 90 seconds with flat head
2. Hamstrings: 60 seconds with ball head
3. Calves: 45 seconds with bullet head
Never hold the gun stationary on one spot—constant movement prevents nerve compression.
Target Major Muscle Groups Safely and Effectively

Certain areas respond dramatically to percussion therapy when treated correctly, while others risk injury if mishandled. Know exactly where and how to apply pressure.
Leg and Back Treatment Protocol
For quads and hamstrings, position the gun vertically along the muscle’s length. On glutes, angle it diagonally toward the hip joint to follow fiber direction. When treating upper/mid-back, lean against a wall and move horizontally across lats—never directly on the spine. The lower back? Use extreme caution: apply the U-head beside the spine (1-2 inches out) for 45 seconds max. Stop immediately if you feel nerve tingling.
Shoulder and Neck Danger Zones
The traps and deltoids welcome percussion therapy, but the neck requires special care. Only use the lowest speed on the back of the neck (posterior muscles), avoiding the front/sides where carotid arteries and nerves live. Never treat the collarbone, armpits, or front of shoulders—these areas contain fragile vessels and lymph nodes. If targeting shoulder knots, keep the gun moving in small circles over the muscle belly only.
Avoid Critical Safety Mistakes That Cause Injury

Over 60% of massage gun injuries stem from ignoring these biological boundaries. Your safety depends on respecting anatomy.
Never Target Bones, Joints, or Sensitive Areas
The vibration penetrates 1-2 inches deep—enough to bruise bone or inflame joints. Absolute no-go zones:
– Spine (direct contact)
– Knee/elbow joints
– Front/sides of neck
– Collarbone and armpits
– Shins or ankles
Apply the gun only where you can pinch at least 1 inch of soft tissue. If you feel hard bone beneath the skin, move 2 inches away.
Recognize Pain Signals That Demand Immediate Stop
Sharp, shooting, or electric pain means you’ve hit a nerve—shut off the gun instantly. Dull, achy pressure is normal; burning or numbness is not. Reduce speed if discomfort exceeds a 5/10 intensity. People with blood thinners, clotting disorders, or pregnancy must avoid percussion therapy entirely on legs/abdomen—consult your doctor first.
Optimize Session Timing for Maximum Recovery
More time ≠ better results. Over-treating muscles creates microtrauma that delays healing.
Ideal Duration Per Muscle and Session
Stick to these science-backed limits:
– Per muscle group: 30-90 seconds (max 2 minutes)
– Total session: 8-12 minutes for full body
– Frequency: 1-2 times daily with 4+ hours between sessions
Overworked muscles show redness, swelling, or increased soreness 24 hours later—signs you’ve overdone it. Start with 3-minute sessions on 2 muscle groups, gradually adding time as your body adapts.
Strategic Timing for Performance Gains
Use percussion therapy 15 minutes pre-workout on cold muscles to increase blood flow and range of motion. Post-workout? Wait 45-60 minutes after intense exercise to avoid interfering with natural inflammation processes. For chronic stiffness (like desk-job back pain), daily 5-minute sessions in the morning reset muscle tone.
End Sessions with Movement to Lock in Benefits
Stopping abruptly wastes your recovery effort. What you do in the final 60 seconds determines how long relief lasts.
Immediate Post-Treatment Movement Protocol
After turning off the gun, perform 30 seconds of active movement in the treated area:
– Calves: Ankle circles
– Shoulders: Arm swings
– Back: Cat-cow stretches
This flushes metabolic waste and “sets” improved mobility. Follow with 1-2 minutes of static stretching—never skip this step. Without movement, muscles revert to tight patterns within minutes.
When to Skip Percussion Therapy Entirely
Avoid using your gun if you have:
– Open wounds or skin infections in the area
– Recent fractures (within 3 months)
– Active tendonitis (sharp pain on movement)
– Fever or acute inflammation (swollen, hot muscles)
When in doubt, treat a different muscle group first to gauge your body’s response.
Final Note: Mastering how to use a percussion massage gun transforms it from a novelty into a non-negotiable recovery tool. By preparing muscles first, moving slowly with fiber direction, respecting strict time limits, and avoiding danger zones, you’ll dissolve knots safely and consistently. Remember: precision beats power every time. Start with 30-second sessions on quads or glutes using the flat head at low speed—within a week, you’ll notice faster recovery and greater flexibility. For persistent pain that doesn’t improve in 2 weeks, consult a physical therapist to rule out underlying issues. Your muscles will thank you.


