
That deep muscle ache after an intense workout won’t magically disappear—but your percussion massage gun can dramatically speed up recovery when used correctly. Millions of athletes and fitness enthusiasts rely on these powerful devices to relieve soreness and improve mobility, yet many unknowingly use them in ways that reduce effectiveness or risk injury. If you’ve ever wondered why your massage gun isn’t delivering the promised relief, the problem likely isn’t your device—it’s your technique. This guide reveals exactly how to use a percussion massage gun properly for both pre-workout activation and post-exercise recovery, ensuring you maximize benefits while avoiding common mistakes that could sideline your training.
Percussion massage guns deliver rapid, concentrated pulses that penetrate deep into muscle tissue, but improper application turns this recovery tool into a potential hazard. Many users make critical errors like pressing too hard, lingering too long on one spot, or targeting dangerous areas like joints and bones. The truth is, this isn’t just about pressing a button and letting the device do the work—proper positioning, movement patterns, and timing determine whether you’ll experience profound relief or unnecessary discomfort. By the end of this guide, you’ll know precisely which attachments to use for specific muscle groups, how long to treat each area, and the exact technique that transforms your percussion massage gun from an expensive paperweight into your most valuable recovery asset.
Why Your Massage Gun Isn’t Working: Correct Technique Revealed
Most users never achieve the full benefits of their percussion massage gun because they skip the fundamental techniques that make percussive therapy effective. The difference between relief and discomfort comes down to precise application methods that leverage the device’s power without overwhelming your tissues.
The 90-Degree Rule for Maximum Effectiveness
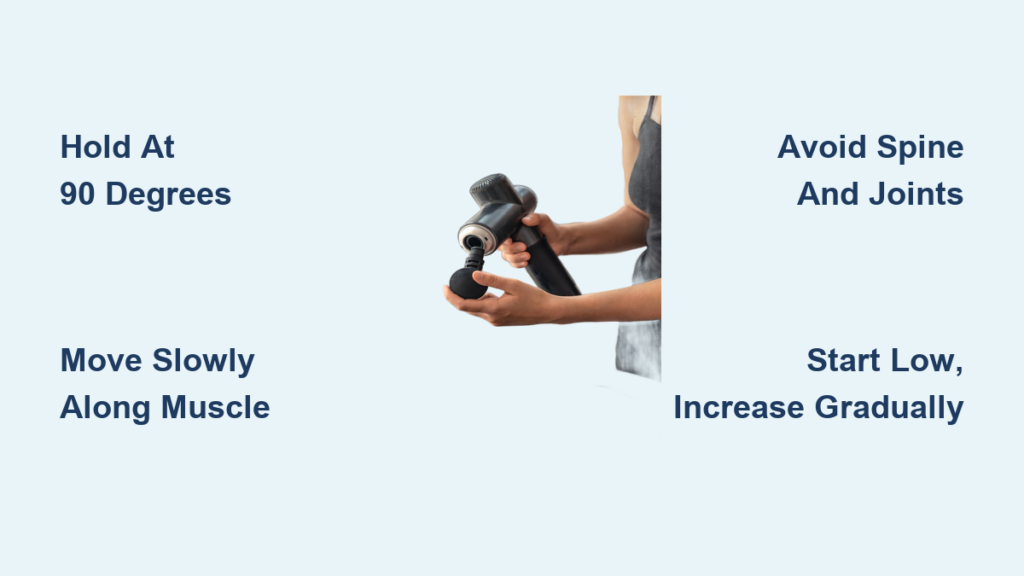
Hold your massage gun perpendicular to your skin surface for optimal results—never at an angle. When you tilt the device, you concentrate force unevenly across the attachment head, creating uncomfortable pressure points and reducing therapeutic effectiveness. Place the attachment gently against your skin without pressing down; the gun’s percussive action works through rapid movement, not applied force. For stubborn knots, maintain light contact and let the device’s pulses penetrate naturally rather than jamming it into your tissue. This technique prevents bruising while ensuring consistent pressure distribution across the target area.
Movement Patterns That Actually Release Tension
Static application causes more harm than good—your massage gun needs deliberate movement to be effective. For large muscle groups like quads and hamstrings, glide the device slowly (about one inch per second) along the muscle fiber direction, starting near the joint and moving toward the muscle belly. When targeting trigger points, use small circular motions with the bullet attachment rather than holding stationary. Never stay in one spot longer than 60 seconds, as prolonged exposure can damage tissue. If you feel sharp pain rather than therapeutic pressure, immediately reduce intensity or change position—your body’s discomfort signals that you’re applying the percussion massage gun incorrectly.
Targeting Specific Muscle Groups Like a Professional
Each muscle group requires unique treatment approaches to maximize your percussion massage gun’s benefits while avoiding injury. Generic application wastes time and risks tissue damage, especially in sensitive areas.
Quads, Hamstrings and Glutes: The Powerhouse Treatment Protocol
These large muscle groups can handle higher intensity settings and benefit from systematic treatment. Begin with the standard ball attachment on medium speed. For quads, work from just above the knee toward the hip in slow, upward strokes. On hamstrings, start near the back of the knee and move toward the glutes. Treat each quad for 60-90 seconds, spending extra time on particularly tight areas but never exceeding two minutes total per muscle group. For glutes, use the flat head attachment with slow circular motions, focusing on the outer hip area where tension commonly builds.
Upper Back and Shoulders: The Safe Approach
The upper back requires special caution due to proximity to the spine. Use the fork attachment on low speed to target muscles alongside your spine without direct contact with vertebrae. Place the fork arms on either side of your spine and slowly move upward from the mid-back toward the shoulders. For shoulders, use the bullet attachment on trigger points at the top of the shoulder but avoid the neck area entirely. Never exceed 30 seconds on any single shoulder spot—these smaller muscles become overstimulated quickly.
Pre-Workout vs. Post-Workout: Two Completely Different Applications
Using your percussion massage gun correctly before versus after exercise produces dramatically different results. Most users apply identical techniques regardless of timing, missing out on key performance and recovery benefits.
Pre-Workout Activation: Wake Up Your Muscles in 90 Seconds
Before exercise, use your percussion massage gun as a dynamic activator, not a deep tissue tool. Set to the lowest speed and use quick, light strokes (15-30 seconds per muscle group) to stimulate blood flow without fatiguing muscles. Target major muscle groups you’ll use in your workout—glutes before squats, shoulders before overhead presses, or calves before running. The goal isn’t deep tissue release but nervous system activation: you should feel energized, not relaxed. This pre-workout percussion routine enhances muscle recruitment and range of motion without compromising strength.
Post-Workout Recovery: The 48-Hour Window That Matters Most
After exercise, your approach shifts to recovery enhancement during the critical 48-hour window when DOMS (Delayed Onset Muscle Soreness) develops. Use medium speed settings and spend 60-90 seconds per major muscle group, focusing on areas you worked hardest. The percussion massage gun helps flush metabolic waste products like lactic acid while increasing oxygen-rich blood flow to damaged tissues. For best results, combine your post-workout session with proper hydration—drink 16-24 ounces of water immediately after your massage to accelerate the flushing process. Never use high intensity immediately after intense exercise; start gentle and increase only as soreness permits.
Critical Safety Rules That Prevent Serious Injury
Your percussion massage gun can cause significant tissue damage if used incorrectly on certain body areas. These safety protocols aren’t suggestions—they’re essential for preventing injury.
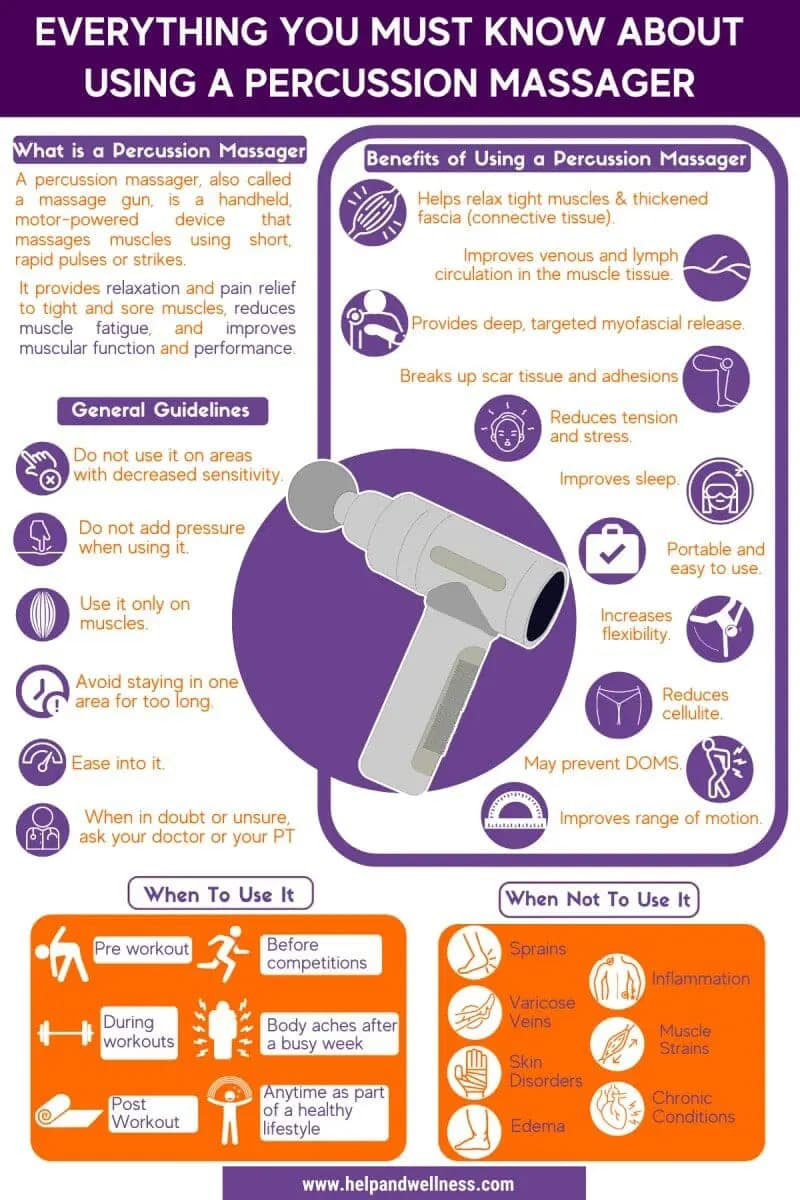
The Absolute No-Go Zones
Never apply your percussion massage gun to these high-risk areas regardless of attachment or speed setting:
– Spine and vertebrae (use the fork attachment alongside but never directly on the spine)
– Neck and throat (risk of nerve damage and compromised blood flow)
– Joints (knees, elbows, ankles—only treat surrounding muscle tissue)
– Bony prominences (elbow points, kneecaps, hip bones)
– Abdomen (risk of internal organ damage)
When to Stop Immediately
Recognize these danger signs that require you to stop using your percussion massage gun:
– Sharp, shooting pain (not just deep pressure sensation)
– Numbness or tingling that persists after stopping
– Visible bruising during or immediately after use
– Increased swelling in the treated area
– Muscle spasms triggered by the massage
If you experience any of these symptoms, discontinue use and consult a healthcare professional before resuming. Individuals with blood clotting disorders, deep vein thrombosis, or who take blood thinners should avoid percussion massage entirely without medical clearance.
Common User Mistakes That Waste Your Time and Money

Most users unknowingly sabotage their percussion massage gun results through preventable errors. Fix these three critical mistakes to transform your recovery sessions.
Mistake #1: Pressing Too Hard for “Deeper” Penetration
Your instinct to press the gun harder when targeting deep tissue actually reduces effectiveness. The percussive mechanism works through rapid movement, not applied force. Excessive pressure compresses tissue, preventing the gun from delivering its full amplitude. Instead, maintain light contact—let the device’s weight provide sufficient pressure while the motor does the work. You’ll achieve deeper penetration with less discomfort by relaxing your muscles and allowing the pulses to penetrate naturally.
Mistake #2: Treating Cold Muscles at Full Intensity
Starting at high speed on cold muscles causes micro-tears and increased soreness. Always begin at the lowest setting, even on warm muscles, and gradually increase intensity as your tissue responds. Spend the first 30 seconds on low speed to warm the area before increasing. This progressive approach prevents tissue shock and delivers more effective long-term results than aggressive high-intensity treatment from the start.
Mistake #3: Ignoring Attachment Selection
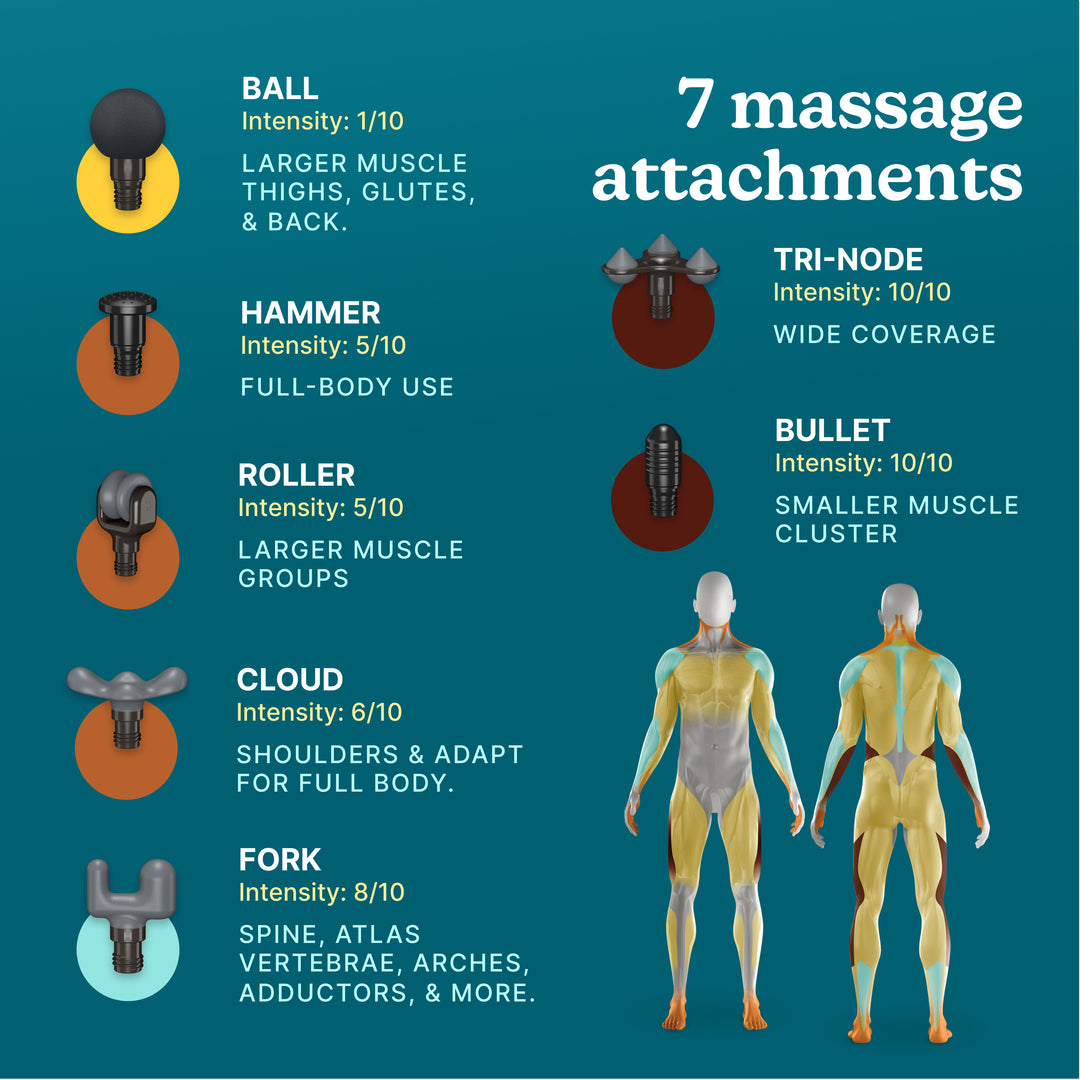
Using the wrong attachment wastes time and reduces effectiveness. Match attachments to your target area:
– Ball head: General use for large muscles (quads, hamstrings, glutes)
– Flat head: Broad surface areas requiring even pressure (calves, lats)
– Fork head: Muscles alongside spine and neck (never directly on spine)
– Bullet head: Precise trigger point work (shoulders, hips, feet)
Final Recovery Protocol: Your 5-Minute Daily Routine
Implement this efficient routine to maximize your percussion massage gun benefits without wasting time:
- Assess: Identify 2-3 priority muscle groups needing attention
- Attach: Select appropriate heads for each area
- Start Low: Begin at minimum speed for 30 seconds per muscle
- Treat: Spend 60-90 seconds per major muscle group (max 2 minutes)
- Hydrate: Drink 16 ounces of water immediately after
This targeted approach delivers maximum recovery benefits while preventing overuse. Consistent, correct application of your percussion massage gun will transform your recovery process, reduce downtime between workouts, and keep your muscles functioning at their best—when you follow these precise techniques rather than guessing your way through each session. Remember: proper percussion massage gun use isn’t complicated, but it does require attention to detail that separates effective recovery from wasted effort.


