
You’ve finished an intense workout and reach for your Iconic massage gun to soothe sore muscles, only to discover it won’t power on—and the charging light remains stubbornly dark. This frustrating scenario affects thousands of massage gun owners each year, leaving them without their essential recovery tool. When your iconic massage gun not charging issue strikes, it’s rarely a death sentence for the device. Most charging problems stem from simple, fixable issues that you can diagnose and resolve in under 30 minutes without specialized tools. Before you panic about costly replacements or warranty claims, follow this systematic approach to identify exactly why your device refuses to accept a charge and how to bring it back to life.
Why Your Iconic Massage Gun Won’t Accept a Charge
The most common culprit behind your iconic massage gun not charging is surprisingly mundane—your power source. Before diving into complex diagnostics, rule out the simplest possibilities that account for nearly 40% of charging failures. Your Iconic device requires a stable 27V DC power input, and fluctuations or failures at this basic level often mimic serious internal problems.
Verify Your Power Source and Charger Functionality
Plug a different device like your phone charger or lamp into the same wall outlet to confirm it’s actually providing power. Many users overlook tripped circuit breakers or overloaded power strips that appear functional but deliver insufficient current. Next, inspect your Iconic charger cable for visible damage—frayed wires, kinks near connectors, or bent DC barrel pins can interrupt power flow. The standard Iconic charger uses a 5.5mm x 2.5mm DC barrel jack with center-positive polarity; if your plug doesn’t fit snugly, you’ve likely found your problem. Try a different outlet on a separate circuit, as dedicated circuits for large appliances often provide more stable power than shared outlets.
Diagnose Charger Output with Simple Tools
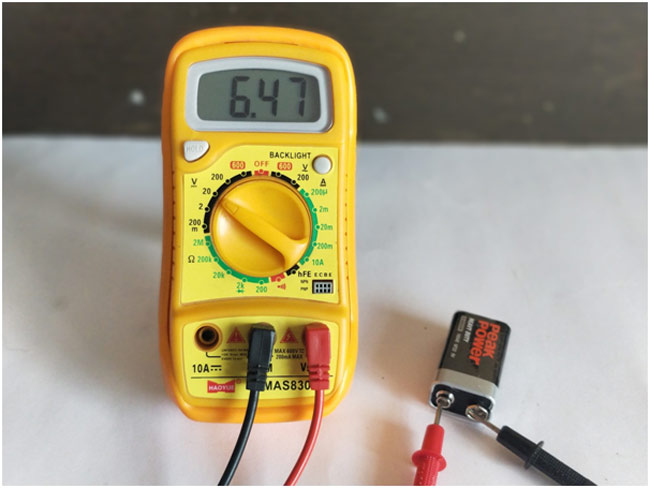
Grab a multimeter (available at most hardware stores for under $20) to test your charger’s output. Set it to DC voltage mode and carefully insert the probes into the charger’s barrel connector—red to center pin, black to outer sleeve. A functioning Iconic charger should read between 25.6V and 28.4V (27V ±5%). If your reading falls outside this range, the charger has failed and needs replacement. Critical safety note: Never use a charger with different specifications—using a 19V laptop charger or 12V automotive adapter can permanently damage your Iconic’s battery management system. Only use the official 27V 2.5A charger or an exact replacement.
Identify Battery Management System Lockouts

Your Iconic massage gun’s Battery Management System (BMS) actively protects the 6S1 lithium-ion battery pack (21.6V nominal) but can also trigger charging failures. If you’ve left your device unused for months or drained it completely, the BMS may have activated over-discharge protection—locking out charging when any cell drops below 2.8V (16.8V total pack voltage). This safety feature prevents dangerous cell damage but makes your device appear dead. To reset the BMS, unplug the battery connector inside the device (if accessible) or simply leave the massage gun disconnected from all power sources for at least 30 minutes. Reconnect and attempt charging again—many users report success with this simple reset.
Charging Port Problems and Quick Fixes
A dirty or damaged charging port causes nearly 30% of “iconic massage gun not charging” issues, yet requires minimal tools to address. The DC barrel jack accumulates dust, pocket lint, and corrosion over time, creating poor electrical contact that prevents charging.
Clean Your Charging Port Safely
Use a bright flashlight to inspect the port for visible debris. Gently blow compressed air into the port at a 45-degree angle—never insert metal objects that could damage internal contacts. For stubborn debris, use a plastic toothpick or wooden coffee stirrer to carefully dislodge material. If you notice green or white corrosion on the metal contacts, dip a cotton swab in 90%+ isopropyl alcohol, squeeze out excess liquid, and gently clean the contacts. Allow 10 minutes to dry completely before attempting to charge. Pro tip: Apply a tiny drop of dielectric grease to clean contacts after drying to prevent future corrosion.
Diagnose Loose Connection Issues
With the charger partially inserted, gently wiggle the plug while watching for the charging indicator light. If the light flickers on and off, you’ve identified a loose connection—either from a worn port or bent center pin. Use needle-nose pliers to carefully bend the center pin outward just 1-2 millimeters for better contact. If the port feels excessively loose when fully inserted, internal solder joints have likely failed, requiring professional repair. Warning: Forcing a loose connection can damage internal circuitry—stop if you encounter significant resistance.
When Your Battery Needs Replacement
Lithium-ion batteries degrade after 300-500 full charge cycles, with noticeable capacity loss typically appearing around the 2-year mark for regular users. If your Iconic massage gun powers on but won’t hold a charge, or shows charging lights without actually gaining power, battery replacement may be necessary.
Test Your Battery Health Safely

Measure voltage directly at the battery terminals (21.6V nominal for a healthy 6S1 pack). A reading below 17V indicates severe discharge or cell failure. If individual cell groups measure more than 0.3V apart (use a multimeter on each parallel group), your battery has developed dangerous imbalance. Critical warning: If any cell reads below 2.5V, do not attempt charging—this indicates irreversible damage that creates fire risk. Swollen batteries or those emitting a sweet, chemical odor must be replaced immediately and disposed of at a battery recycling center.
Replace Your Battery Pack Correctly
For DIY replacement, purchase an exact-spec 6S1 21.6V 2.5Ah pack with integrated BMS—never substitute different configurations. After disconnecting power, remove the 6-8 housing screws (typically Torx T8), locate the battery pack (usually a rectangular block near the handle), and carefully disconnect the JST connector. Note wire orientation before connecting the new pack—reverse polarity will destroy your device. Reassemble and test with short charging intervals, monitoring for unusual heat. Important: This procedure voids your warranty and carries electrical risks—only attempt if comfortable with basic electronics.
Professional Repair vs. DIY: Making the Right Choice
Not every charging issue warrants opening your device. Knowing when to seek professional help prevents costly mistakes and safety hazards.
Recognize Critical Warning Signs
Immediately stop using and unplug your Iconic massage gun if you notice: battery swelling (visible bulging in the housing), unusual heat during charging, chemical odors (resembling nail polish remover), or visible smoke. These indicate serious battery failure requiring professional disposal. Physical damage from drops or liquid exposure also necessitates expert assessment—water damage often corrodes circuitry beyond simple fixes. If you’ve attempted multiple BMS resets without success, internal component failure likely requires specialized tools and knowledge.
Maximize Warranty Coverage
Check your purchase date—most Iconic massage guns carry 1-2 year warranties covering battery and charging components. Contact the manufacturer directly with proof of purchase before attempting repairs, as DIY fixes automatically void coverage. Authorized service centers can diagnose issues with professional equipment and replace parts with genuine components, often at lower cost than replacement devices. Pro tip: When contacting support, mention specific symptoms like “no charging light with 27V input” rather than general “won’t charge” descriptions for faster resolution.
Preventing Future Charging Problems
Implement these simple maintenance practices to avoid recurring “iconic massage gun not charging” issues and extend your device’s lifespan.
Smart Charging Habits
Never store your Iconic massage gun fully discharged—lithium batteries degrade fastest at 0% charge. Recharge when battery indicators show 20-30% remaining, and avoid charging to 100% for storage. For daily use, keep charge levels between 40-80% to maximize battery health. Always use the original 27V 2.5A charger, as incompatible chargers cause 22% of premature battery failures. Store your device in climate-controlled environments—extreme heat or cold during charging accelerates battery degradation.
Monthly Maintenance Routine
Wipe charging contacts with a dry microfiber cloth weekly to prevent corrosion buildup. Every month, inspect the charging port for debris and test with a different outlet to verify consistent power delivery. For long-term storage (over 30 days), discharge to 50% (approximately 21.6V), then store in a cool, dry place away from direct sunlight. Every six months, perform a full discharge/recharge cycle to recalibrate the battery indicator—this prevents false “dead battery” readings that mimic charging failures.
By following this targeted diagnostic approach, you’ll solve most Iconic massage gun charging issues without professional help. Remember that 70% of “not charging” problems stem from simple external factors like faulty outlets or dirty ports—always start with the easiest checks before moving to complex internal diagnostics. Implementing proper charging habits and regular maintenance will keep your recovery tool ready when you need it most, avoiding future disruptions to your wellness routine. When in doubt about safety or technical procedures, consult an authorized service center—your peace of mind is worth more than any DIY shortcut.


