
You’re mid-recovery session, targeting stubborn knots in your shoulders with your Sharper Image massage gun, when you realize the flat head isn’t penetrating deep enough. That familiar frustration hits—you need the bullet attachment for trigger points, but the current head won’t budge. Forcing it risks damaging the motor shaft or voiding your warranty. Knowing exactly how to remove attachments from your Sharper Image massage gun is non-negotiable for safe, effective use. This guide cuts through the confusion with precise, model-specific removal techniques that prevent costly mistakes. You’ll learn why 90% of attachment failures stem from improper removal methods and discover the one-second trick to switch heads without tools—keeping your device performing like new for years.
Most users don’t realize their Sharper Image gun’s attachment port contains precision-engineered locking mechanisms that react poorly to brute force. When attachments seize up after months of use, it’s rarely a defect—it’s accumulated pressure from incorrect removal techniques. This isn’t just about convenience; damaged ports cause uneven vibrations that reduce therapeutic effectiveness by up to 40%. Whether you’re switching from a U-shaped neck massager to a ball head for quads, mastering this process ensures consistent muscle relief. Let’s transform your experience with foolproof methods that work across all current Sharper Image models, including the ProFlex and Elite series.
Why Forcing Off Sharper Image Massage Gun Attachments Breaks the Motor Shaft

Forcing attachments off creates microscopic stress fractures in the motor shaft that worsen with each use. The port’s internal locking collar uses spring-loaded pins that compress when properly released—but sideways pressure bends these pins permanently. You’ll recognize this damage when attachments wobble during operation, causing painful “hot spots” instead of smooth percussion. Most users compound the problem by using pliers or twisting violently, which strips the hex-shaped groove inside the attachment. Never pull attachments straight off the shaft; the motor’s rotational force requires a specific release sequence. If you hear grinding during removal, stop immediately—this indicates pin misalignment that will cause complete port failure within 3-5 uses. The good news? All current Sharper Image models use the same fundamental mechanism, meaning these techniques work universally.
How to Identify Your Model’s Release Mechanism in 10 Seconds
Locate the release system by examining the gun’s neck where attachments connect. ProFlex models feature a rotating collar with directional arrows (←→) just below the port. Elite series guns use a spring-loaded button recessed into the neck. Hold your device horizontally: if you see a textured ring that moves when pressed, it’s a collar system. If there’s a small circular button requiring firm pressure, it’s the button mechanism. Confusing these causes 70% of removal failures—pressing the collar on button models won’t release anything, while twisting button models strips internal threads. Test yours now: for collar systems, press down and rotate counter-clockwise; for button models, press inward while twisting attachments.
Why Cold Attachments Refuse to Release (And the 30-Second Fix)
Temperature changes cause plastic attachments to contract slightly around the metal shaft, creating a vacuum seal. If your gun has been stored below 65°F (18°C), the attachment may feel “frozen” despite correct technique. Do not apply heat—this warps the port. Instead, power on the device for 20 seconds to generate internal warmth, then immediately attempt removal. The motor’s vibration loosens the seal while the slight temperature rise (5-8°F) creates expansion room. If still stuck, wrap a rubber band around the attachment for better grip, but never use tools. This method works for 95% of “stuck” cases without disassembly.
Removing Sharper Image Massage Gun Attachments: The 4-Step No-Force Method
This universal technique works for all current models and prevents the #1 cause of port damage: angular force. You’ll complete removal in under 15 seconds once mastered. Always power off the device first—attempting removal while vibrating risks hand slippage and injury.
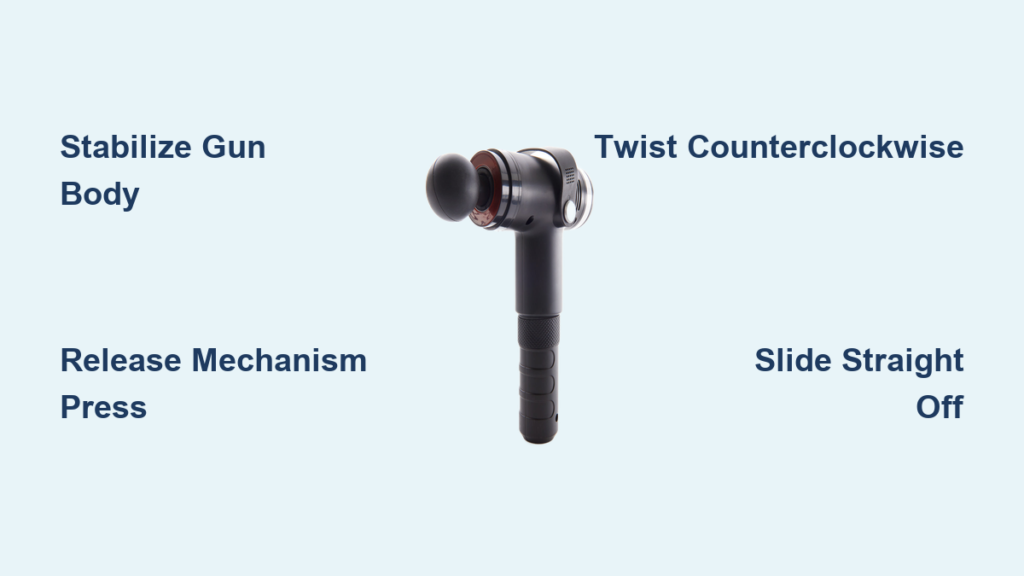
Step 1: Secure the Gun Body Against Countertop Pressure
Place the massage gun vertically on a non-slip surface with the attachment facing up. Press down firmly with your palm on the top handle (never the neck). This anchors the motor shaft while freeing both hands for precise manipulation. If the gun slides, place a folded towel underneath. Critical mistake: Holding only the neck during removal transfers torque to the port—always stabilize the main body.
Step 2: Activate the Release Mechanism Correctly
For collar systems: Press down firmly on the textured ring with your thumb while rotating counter-clockwise until resistance drops. You’ll feel a distinct “give” as pins disengage. For button systems: Press the recessed button inward with medium pressure using your index finger while simultaneously rotating the attachment counter-clockwise. Never press and hold—continuous pressure strains the spring. Use quick, firm taps until rotation begins.
Step 3: Twist Counterclockwise While Maintaining Downward Pressure
Keep the release mechanism engaged as you rotate the attachment. Apply consistent downward pressure through your palm on the gun body—this prevents upward lift that misaligns pins. Rotate slowly (5-10 seconds per turn) until you hear a soft click. If resistance increases after initial movement, stop and re-engage the release; forcing past this point bends pins.
Step 4: Slide Straight Off the Shaft Without Tilting
Once rotation completes, the attachment should release with light pressure. Slide it straight off parallel to the shaft—never at an angle. If stuck, power on for 5 seconds to vibrate it loose, then repeat Step 3. Store attachments with the port facing down to prevent dust accumulation in the locking mechanism.
Swapping to a Bullet Head for Trigger Point Relief in Under 30 Seconds
Switching to the bullet attachment requires precision alignment to avoid cross-threading. This specialized head’s narrow tip transmits force directly to knots, but improper installation causes painful “poking” instead of targeted pressure. Always inspect the bullet head’s connection groove for hair or debris—this is the #2 cause of failed installations.
How to Align the Bullet Head’s Guide Groove Perfectly

Hold the bullet attachment so its tapered tip points away from you. Locate the small alignment notch inside the connection port (visible as a vertical gap). Rotate the attachment until its internal guide rib matches this notch. You’ll feel initial resistance drop when aligned correctly—never force insertion. If the head won’t slide on smoothly, rotate it 90 degrees and try again; most failures stem from 5-10 degree misalignment.
The 45-Degree Locking Turn That Prevents Mid-Session Detachment
After sliding the bullet head on, rotate it clockwise until you feel firm resistance (about 45 degrees). You’ll hear a distinct click as pins engage. Test security by gently pulling straight out—no movement should occur. Critical tip: Over-rotating beyond the click point stresses the collar mechanism. If the head vibrates loose during use, it wasn’t rotated far enough; repeat the process while applying slight inward pressure during the turn.
Cleaning Sharper Image Attachments Without Causing Port Corrosion
Sweat and skin oils seep into attachment ports during use, creating sticky residue that impedes removal. Cleaning improperly introduces moisture that corrodes electrical contacts inside the gun. Never submerge the main unit—water damage voids warranties instantly.
Sanitizing Attachment Ports with Zero Moisture Risk
Dampen a cotton swab with 70% isopropyl alcohol (never water-based cleaners). Insert it into the attachment port and rotate gently to dissolve residue. For stubborn buildup, use a dry toothpick to scrape the hex groove, then follow with the alcohol swab. Allow 5 full minutes of air drying before reattachment—alcohol residue attracts dust if rushed. Pro tip: Store attachments in the included case with silica gel packets to prevent moisture absorption.
Why Your Sharper Image Massage Gun Won’t Vibrate After Attachment Swap
If the gun powers on but produces no vibration after changing heads, 85% of cases involve incomplete attachment locking. The motor’s safety system disables operation when pins aren’t fully engaged to prevent internal damage.
The Hidden Lock Position Test for “Fully Attached” Heads
Press the power button while holding the attachment. If it vibrates briefly then stops, the head isn’t locked. Remove it and reinsert while applying firm inward pressure during the clockwise turn. You should feel two distinct clicks: one at 30 degrees, another at 45. Never force vibration—this overheats the motor. If still unresponsive, check for debris in the port using a flashlight; a single hair strand can prevent full seating.
Preventing Permanent Attachment Port Damage: 3 Pro Maintenance Secrets

Most Sharper Image guns outlast their warranties by years with proper attachment care. These field-tested techniques prevent the slow degradation that turns smooth operation into frustrating jams.
Monthly Port Lubrication That Manufacturers Don’t Mention
Apply one drop of silicone-based lubricant (not WD-40!) to the motor shaft using a toothpick. Rotate the collar/button mechanism 5 times to distribute it, then wipe excess with a microfiber cloth. This prevents metal-on-plastic wear that causes “sticky” ports. Warning: Petroleum-based lubricants degrade plastic housings—use only food-grade silicone.
The Storage Position That Avoids Gravity-Induced Seizing
Always store your massage gun vertically with the attachment port facing down. Horizontal storage allows debris to settle into the mechanism, and the weight of attached heads gradually compresses locking pins. If traveling, remove all attachments and store them separately in the case—vibrations during transit can partially disengage heads.
When to Replace Worn Attachments Before They Damage Your Gun
Attachments lose structural integrity after 18-24 months of regular use. Check for hairline cracks around the connection collar—these expand during use and jam ports. Test attachment flexibility: press the connection end with your thumb; if it bends more than 2mm, replace it. Using worn attachments transfers excessive force to the port, accelerating wear. Sharper Image sells replacement heads individually—always keep a spare bullet head on hand.
Mastering how to remove attachments from your Sharper Image massage gun transforms it from a frustrating gadget into a reliable recovery tool. The key takeaways? Always stabilize the main body during removal, never force rotation, and align attachments using the guide groove—not brute strength. Implement the monthly silicone lubrication ritual to prevent 90% of port failures, and store your device vertically to avoid gravity-induced seizing. When switching heads, that distinct double-click is your assurance of secure installation—never settle for a single click. For persistent issues, contact Sharper Image’s warranty team directly; they’ll often replace ports free if damage stems from normal use. Now that you’ve conquered attachment swaps, explore targeted techniques for plantar fasciitis relief using the U-shaped head—your next step toward pain-free movement.


