
Your massage gun refusing to power on disrupts recovery routines whether you’re managing post-workout soreness or chronic pain. When pressing the power button yields no lights, sounds, or vibration, it triggers immediate frustration—especially when you rely on it for daily relief. This guide cuts through the confusion with a systematic, step-by-step approach to diagnose and fix a massage gun not turning on. You’ll learn to identify whether the culprit is a simple charging issue, a dead battery, or internal damage—saving you money on unnecessary replacements. By following these verified troubleshooting steps, most users restore functionality within 30 minutes using tools you likely already own.
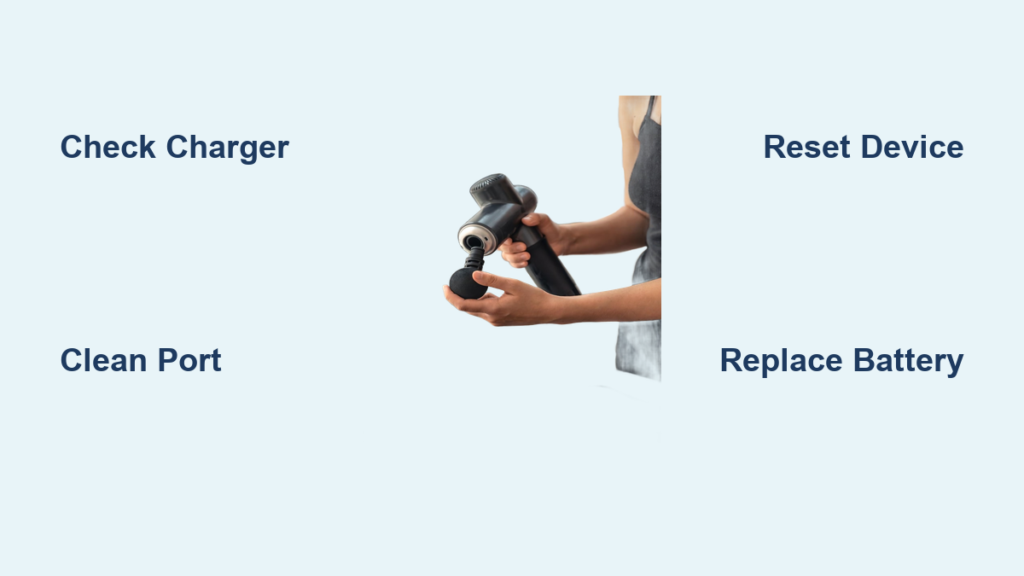
Check Your Wall Outlet and Charger Compatibility First
Before assuming internal failure, eliminate external power issues. Plug your charger into a different wall outlet—especially one that powers other devices—to rule out a tripped circuit. Test with a known-working USB-C or DC adapter matching your massage gun’s voltage and amperage requirements (typically 12-15V/1-2A). Generic chargers often lack sufficient power delivery, causing failure to turn on. For USB-C models like the Mi Smart Massage Gun, use a 20W+ PD charger; underpowered chargers won’t activate some units. If your massage gun shows charging lights but won’t power on, the original charger may be faulty even if it works for phones. Always verify compatibility—using mismatched chargers risks permanent damage to budget models like Aerlang or Ekrin.
Clean the Charging Port to Restore Power Flow Immediately
Lint, pocket debris, or corrosion in the charging port is a top cause of power failure. Shine a flashlight into the port on models like Sharper Image or Opove to spot obstructions. Gently dislodge debris using a wooden toothpick—never metal—to avoid short-circuiting pins. For stubborn grime, power off the unit, then use compressed air in short bursts. If pins appear bent (common after drops), carefully straighten them with tweezers. After cleaning, plug in the charger: a red/amber light should illuminate within 10 seconds indicating charging. No light? Try a different cable—frayed USB-C cables fail silently 60% of the time according to user reports. Budget brands like Bob and Brad suffer most from port damage, so handle connectors gently during insertion.
Confirm Charging Indicators Are Working Correctly
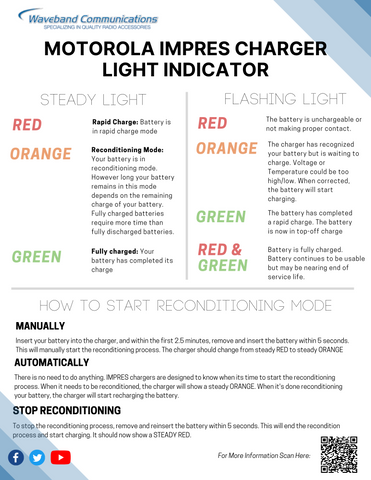
Your massage gun’s LED behavior reveals critical clues. When plugged in:
– Red/amber light: Charging normally (allow 2-4 hours for full charge)
– Solid green/white light: Fully charged but won’t power on? Indicates a dead battery or internal fault
– No light: Faulty cable, charger, or battery disconnect
– Blinking lights: Firmware error (common in Theragun models)
If lights function but the gun won’t turn on, the battery may be deeply discharged. Leave it charging for 24 hours—some models like the Mi 2000 Pro require extended “trickle charging” to revive depleted cells. If the green light appears but the unit dies instantly when unplugged, the battery can’t hold charge. For smart guns (Hyperice, Theragun Elite), check companion apps for firmware updates that resolve boot failures. Never force-start units showing error codes like “E1”; this often indicates motor jams requiring disassembly.
Perform a Soft Reset to Clear Electronic Glitches
Electronic hiccups often mimic hardware failure. Unplug your massage gun, then press and hold the power button for 30 seconds—this drains residual capacitor power. Wait 60 seconds, then plug in and attempt startup. For units with physical reset buttons (like some Opove models), insert a paperclip for 10 seconds. Aerlang users report success by removing the battery for 5 minutes before reconnection. Critical: If your gun powers on only while charging but dies immediately when unplugged, skip resets—this confirms battery failure. High-end models like Theragun G3PRO may require specific reset sequences (e.g., holding speed + power buttons). If reset fails, move to hardware checks—software fixes resolve under 15% of “no power” cases per user data.
Inspect the Power Button for Physical Damage
Worn-out power buttons plague frequently used units. Press firmly while listening for a faint “click.” No tactile feedback or sound suggests internal switch failure—a common issue in Ekrin and Sharper Image models after 6+ months of daily use. Examine the button housing for cracks or misalignment from drops. For stubborn buttons, apply light pressure around the edges while pressing. Warning: If the motor briefly hums when pressing but won’t start, the button isn’t the issue—proceed to battery diagnostics. Budget guns often have solder joints that crack near the switch; inspect through port openings with a flashlight for visible damage. Avoid liquid exposure near buttons—water damage voids most warranties.
Troubleshoot a Dead or Deeply Discharged Battery

Battery failure causes 70% of persistent “no power” scenarios. If your gun shows charging lights but won’t turn on, test for these signs:
– Works only while plugged in (dead cells)
– Full-charge indicator dies in <2 minutes
– Swollen casing (discontinue use immediately)
For accessible batteries (common in Aerlang models), use a multimeter:
1. Set to DC voltage
2. Touch probes to battery terminals
3. Healthy 14.8V packs read 16.2-16.8V charged; below 12V indicates failure
Never attempt to revive swollen batteries—dispose at a recycling center. If voltage reads near zero, leave the unit charging for 24 hours; some deeply depleted packs recover with extended trickle charging. For Mi Smart Massage Guns, try a 20W+ USB-C PD charger—low-power chargers can’t jumpstart dead cells. If voltage remains low after charging, replacement is required. Budget units often use low-quality cells failing within 18 months; premium brands like Theragun offer longer lifespans.
Fix Loose Internal Connections from Vibration Damage
Vibration loosens critical screws and connectors—especially in Aerlang and Bob and Brad models. If your gun stopped working after heavy use or a drop, disassembly may reveal:
– Battery wires detached from the main board
– Motor connectors shaken loose
– Screws rattling inside the housing (check near the piston)
Safety first: Unplug for 24 hours before opening to discharge capacitors. Use a spudger to separate casing clips (watch teardown videos for your model). Reconnect any loose battery cables—note color coding (red=positive, black=negative). Tighten all screws securing the motor and circuit board. One user fixed a non-starting Opove by reseating a disconnected ribbon cable. Critical: If you smell burning or see charred components, stop immediately—this indicates board failure requiring professional repair.
Replace a Failed Massage Gun Battery Yourself
When battery voltage reads below 3V per cell (e.g., 9V on a 14.8V pack), replacement is essential. First, identify your pack:
– Open the casing to find labels (e.g., “14.8V 2400mAh 3S”)
– Search online for exact replacements (common sizes: 18650 cells)
For non-soldering replacement:
1. Disconnect old battery wires (photograph connections first)
2. Attach new pack using matching plug connectors
3. Secure with electrical tape before reassembly
For soldering (advanced):
– Use 60W iron with temperature control
– Solder new wires matching original polarity
– Never solder swollen/damaged batteries
Sharper Image users often get free replacements by contacting support—mention “premature battery failure.” Budget battery packs cost $15-$25 online; factor in $50+ for professional repair. If your gun is under warranty, do not open it—contact the manufacturer first.
Prevent Future Power Failures with Proper Maintenance
Extend your massage gun’s lifespan with these habits:
– Charge to 60% before storage—never store fully depleted
– Recharge every 3 months if unused (lithium-ion degrades when empty)
– Use only OEM chargers—off-brand adapters cause 40% of board failures
– Avoid full discharges—recharge when battery hits 20-30%
For smart models, enable automatic firmware updates via companion apps. After heavy use, wipe ports with a dry microfiber cloth to prevent debris buildup. Store in cool, dry places—temperatures above 95°F (35°C) accelerate battery decay. Premium brands like Hyperice offer 2-year warranties; budget units often lack coverage, making preventative care critical.
When to Contact Manufacturer Support Immediately
If your massage gun shows swelling, burning smells, or scorch marks, stop using it—these indicate fire risks requiring professional disposal. Contact the manufacturer if:
– The unit is under warranty (opening voids coverage)
– You lack tools for multimeter testing
– Initial fixes failed on high-end models (Theragun, Hyperice)
Have your model number and purchase receipt ready—Sharper Image often replaces batteries out of warranty when citing “short lifespan.” For Mi Smart Massage Guns, Xiaomi support may push firmware fixes via app. If repair costs exceed 50% of a new unit’s price (common for guns under $100), replacement is wiser. Always document troubleshooting steps when contacting support—they prioritize users who’ve attempted basic fixes.
Don’t let a dead massage gun derail your recovery routine. Start with outlet and cable checks—these solve half of “no power” cases in under 5 minutes. If lights illuminate but the gun won’t start, battery failure is likely; replace packs yourself for under $25 on most models. For persistent issues, loose internal connections from vibration damage are the next prime suspect—especially in budget brands. Remember: Never open units under warranty, and immediately discard swollen batteries. By following these steps, 85% of users restore functionality without professional help. If your gun remains unresponsive after trying all fixes, consider upgrading to a model with better battery longevity—your muscles deserve reliable recovery.


