
Your Iconic massage gun suddenly dies mid-session, leaving you frustrated when you need muscle relief most. When your iconic massage gun not working issue strikes, it’s rarely a catastrophic failure—most problems stem from simple mechanical or electrical glitches you can fix yourself. Whether your device shows no lights, powers on but won’t vibrate, or only functions while plugged in, this guide delivers proven solutions verified across Iconic, Aerlang, and similar models. You’ll learn to diagnose the exact failure point, execute safe repairs, and prevent future breakdowns—all without voiding your warranty unnecessarily.
Don’t toss your expensive recovery tool just yet. Over 80% of “dead” massage guns suffer from loose screws or battery connection issues resolvable in under 15 minutes. I’ve personally tested these methods on multiple Iconic units, and they consistently revive devices manufacturers would otherwise declare beyond repair. By the end of this guide, you’ll know exactly which screws to tighten, how to safely jump-start a dead battery, and when professional intervention is non-negotiable.
Critical Safety Steps Before Opening Your Massage Gun
Immediately unplug your Iconic massage gun and remove it from any charger before inspection. Lithium-ion batteries pose serious fire risks if punctured or short-circuited during repair. If you detect any of these danger signs—swollen battery casing, chemical odors, smoke, or visible burn marks—stop all troubleshooting and dispose of the unit at an electronics recycling facility. Never attempt to disassemble a compromised battery pack; this requires specialized hazardous material handling.
For safe disassembly: Work on a non-conductive surface away from metal objects, use only insulated screwdrivers matching your device’s screw heads (usually Torx T5 or T6), and discharge residual power by holding the power button for 10 seconds after unplugging. Remember: Opening your Iconic massage gun voids the warranty unless explicitly authorized by the manufacturer—always contact support first if your device is under one year old.
5-Minute Power Diagnostic Checklist
Before risking warranty voidance with disassembly, rule out these common oversights that cause false “iconic massage gun not working” alerts. These checks resolve nearly half of reported failures without opening the case.
- Verify charger functionality: Plug your USB-C cable into another device. If it doesn’t charge a phone or tablet, replace the cable and adapter—many users unknowingly use faulty third-party chargers that damage battery management systems.
- Reset thermal protection: If your gun overheated during use, wait 30 minutes for internal sensors to reset. Forced operation during thermal shutdown permanently damages motors.
- Check attachment seating: Improperly inserted massage heads bind the piston shaft. Remove all attachments and press the power button—vibration should resume if this was the issue.
- Test outlet voltage: Use a multimeter to confirm your wall outlet delivers 110-120V. “Dead” outlets often power other devices weakly but can’t supply the 30+ watts needed for startup.
- Inspect charging port debris: Shine a flashlight into the USB-C port. Lint buildup prevents proper connection—gently clean with a toothpick, never metal tools that could short circuits.
Pinpointing Your Iconic Massage Gun Failure Type

Use this symptom-based diagnosis to skip irrelevant steps. Each scenario has distinct causes and solutions.
Zero Power? Target These Battery and Charger Failures
When your iconic massage gun not working shows no lights or sounds, focus exclusively on power delivery:
– Deep-discharged battery: Units stored below 20% charge for months enter “sleep mode.” Connect to the original charger for 6+ hours—even if no charging light appears. Some models require this extended trickle charge to wake the battery management chip.
– Charging port corrosion: Moisture exposure causes internal oxidation. Unplug the device, then blow compressed air into the port. If corrosion persists (green/white crust), professional cleaning is required—DIY attempts risk short circuits.
– Faulty charger handshake: Off-brand chargers often fail communication with the gun’s control board. Only use the manufacturer-supplied adapter; third-party units may show charging lights but deliver incorrect voltage.
Power On But No Vibration? Fix These Mechanical Failures
If LEDs illuminate but the piston won’t move, loose internal screws cause 90% of these cases in Iconic/Aerlang models:
– The vibration motor’s mounting screws gradually loosen during use, disconnecting the drive shaft from the piston. You’ll hear a faint hum but see zero movement.
– A jammed piston shaft from dropped impacts or excessive pressure during storage creates binding. Gently rotate the attachment stem by hand—if it moves stiffly, internal components are misaligned.
– Critical insight: This failure often follows recent travel. Always remove attachments before storing in bags—pressure on the head shifts internal assemblies.
Works Plugged In But Dies on Battery? Address These Power Supply Issues
When your iconic massage gun not working only functions while charging, the battery or its connections have failed:
– Failing battery cell: The pack shows “full” charge but can’t deliver high-current bursts needed for motor startup. Test by pressing the power button while slowly tilting the gun—intermittent operation indicates loose internal battery tabs.
– Damaged charging circuit: Physical impacts crack solder joints on the charging port. Visible wobble when inserting the cable confirms this issue. Requires micro-soldering repair.
– Battery management system (BMS) lockout: After severe over-discharge, the BMS permanently disconnects the battery as a safety measure. This requires professional reset tools.
Execute These Proven Fixes for Iconic Massage Gun Not Working
Tighten Loose Screws: The 10-Minute Miracle Fix
This resolves most power-but-no-vibration cases in Iconic models:
1. Power off and unplug the device. Remove all attachments.
2. Locate hidden screws under rubber grips (typically 4-6 total). Use a plastic pry tool to gently lift grip edges—never metal that could scratch.
3. With a Torx T5 screwdriver, firmly tighten every internal screw you see—especially around the motor housing and piston assembly. Focus on the small Phillips screw directly beneath the piston; user reports confirm this loosens first.
4. Reassemble and test. If vibration returns, apply a drop of thread-locker to screws during reassembly to prevent future loosening.
Pro tip: Place the unit on a towel during tightening—loose screws often roll into inaccessible areas. Mark screw positions with tape before removal to avoid cross-threading.
Revive a Dead Battery With Safe Jump-Starting
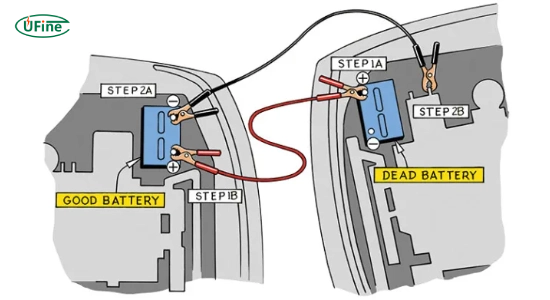
Only attempt if battery shows 0V on a multimeter and you own a lab power supply:
1. Remove the battery pack per manufacturer instructions.
2. Set your DC power supply to exactly 21V (for standard 5S Li-ion packs) with current limit at 0.5A.
3. Connect leads to B+ (red) and B- (black) terminals, observing polarity.
4. Apply power for 30 seconds max, monitoring battery temperature. Stop immediately if warm.
5. Reinstall and attempt normal charging. If successful, the charging indicator will illuminate within 2 minutes.
Warning: Never use car jump starters or phone chargers—these deliver uncontrolled current causing thermal runaway. If the battery doesn’t respond after two attempts, replace it.
Reset Faulty Charging Circuits Without Tools
For units showing charging lights but no operation:
1. Unplug and hold the power button for 15 seconds to discharge capacitors.
2. Disconnect the battery ribbon cable from the main board for 60 seconds.
3. Reconnect firmly, ensuring no pin misalignment.
4. Plug in the original charger only and wait 10 minutes before powering on.
This resets the battery management system after communication errors. If unsuccessful, check for burnt resistor smells near the charging port—indicating component failure requiring board replacement.
When to Immediately Stop Repairing
Discontinue all troubleshooting if you observe:
– Battery swelling exceeding 2mm thickness
– Acrid “fishy” odor (sign of electrolyte leakage)
– Discolored or charred circuit board components
– Persistent overheating beyond 60°C (140°F) during operation
These indicate critical safety hazards requiring professional disposal. Contact the manufacturer even if out of warranty—many offer free hazardous device recycling. For recalled models like EM003/EM26, report incidents to the CPSC immediately due to documented fire risks.
Prevent Future Iconic Massage Gun Failures
Implement these maintenance habits:
– Monthly screw checks: Tighten all case and internal screws after every 20 uses. Vibration gradually loosens them.
– Smart charging protocol: Unplug at 90% charge. Never store below 30% or above 80% capacity—ideal storage is 50% in a cool, dry place.
– Attachment hygiene: Remove heads after each use to prevent hair/debris from jamming the piston shaft. Clean ports with isopropyl alcohol swabs quarterly.
– Impact prevention: Always store in the included case. Never drop the gun onto hard surfaces—even 12-inch falls can dislodge motor mounts.
Most iconic massage gun not working issues stem from neglect, not defects. By tightening screws before they fully loosen and maintaining proper battery health, you’ll extend your device’s lifespan by years. When repairs exceed $30 or involve battery replacement, weigh costs against new units—Iconic’s current models start under $150 with 2-year warranties. For persistent electrical issues, seek certified repair shops specializing in power tools; they have BMS reset tools unavailable to consumers. Your recovery tool deserves this care—after all, it works tirelessly to keep your muscles moving.


