

That first excruciating step out of bed in the morning—the one that feels like stepping on broken glass—is the telltale sign of plantar fasciitis. If you’re searching for “how to use massage gun for plantar fasciitis,” you’re not alone. Millions suffer from this stubborn heel pain that turns simple walking into agony. The massage gun has emerged as a game-changing tool for plantar fasciitis relief, with users reporting up to 90% improvement in just days. This guide delivers the exact protocol used by physical therapists and recovered sufferers to break the pain cycle. You’ll learn precisely where to apply pressure, which attachments work best, and the critical mistakes that could worsen your condition—so you can finally walk without wincing.
Why Percussion Therapy Works for Plantar Fasciitis Pain
Plantar fasciitis isn’t just foot pain—it’s a complex web of tight fascia, restricted blood flow, and often neglected calf muscles pulling your foot out of alignment. Massage guns deliver targeted percussive therapy that penetrates deeper than manual massage, breaking down scar tissue while flooding the area with oxygen-rich blood. Users consistently report an “extremely satisfying sensation” as adhesions release, followed by a “rushing sensation of blood flow” to previously starved tissues. Unlike foam rollers or stretching alone, the rapid pulses of a massage gun reach the deep layers of the plantar fascia that conventional methods miss. This isn’t temporary masking of symptoms—it’s active tissue remodeling that addresses the root cause of your pain.
The Critical Role of Calf Muscles in Foot Pain
Your calves are likely the hidden culprit behind your heel pain. Tight gastrocnemius and soleus muscles pull directly on your plantar fascia through the Achilles tendon. When these muscles shorten from inactivity or overuse, they create constant tension on the fascia, preventing healing. One user with chronic plantar fasciitis for over a year discovered that focusing solely on their foot provided minimal relief, but adding calf treatment delivered “80-90% improvement” within days. Never skip calf treatment—it’s non-negotiable for lasting results. Spend equal time on your calves as your feet for maximum benefit.
Choosing the Right Massage Gun and Attachments for Foot Therapy
Not all massage guns deliver equal results for plantar fasciitis. The wrong model or attachment can worsen pain or provide negligible relief. Your ideal tool must balance precision with gentleness—too powerful causes bruising, while underpowered units won’t penetrate deep fascial restrictions.
Metal vs. Foam Attachments: What Actually Works
Metal ball attachments outperform foam tips for plantar fasciitis according to user reports. The rigid metal surface delivers deeper penetration to break up stubborn adhesions in the thick plantar fascia tissue. Users specifically praise the Bob & Brad X6 model’s metal head for allowing “both gentle and direct pressure application” without slipping on the foot’s curved surface. Start with a soft foam dampener if you’re new to treatment or have extreme sensitivity, but transition to metal within days as your tolerance increases. Avoid pointed bullet attachments directly on the arch—reserve these only for isolated calf trigger points with extreme caution.
Top Models That Deliver Real Plantar Fasciitis Relief
Based on user experiences, these models consistently deliver results:
– Theragun Pro: Features app-guided plantar fasciitis routines with precise pressure recommendations
– Hyperice Hypervolt Go 2: Compact enough for targeted foot work with quiet operation
– Renpho Massage Gun: Budget-friendly option that users report “works surprisingly well” for foot pain
Pro Tip: Look for models with variable speed settings down to 1,200-1,800 percussions per minute—the lower range is essential for sensitive feet. Higher speeds often cause more pain than therapeutic benefit on the plantar surface.
Step-by-Step Plantar Fasciitis Treatment Protocol
Follow this exact sequence used by physical therapists and recovered sufferers. Deviating from this order reduces effectiveness and risks aggravating your condition.
Your First-Time Setup: Avoiding Early Mistakes
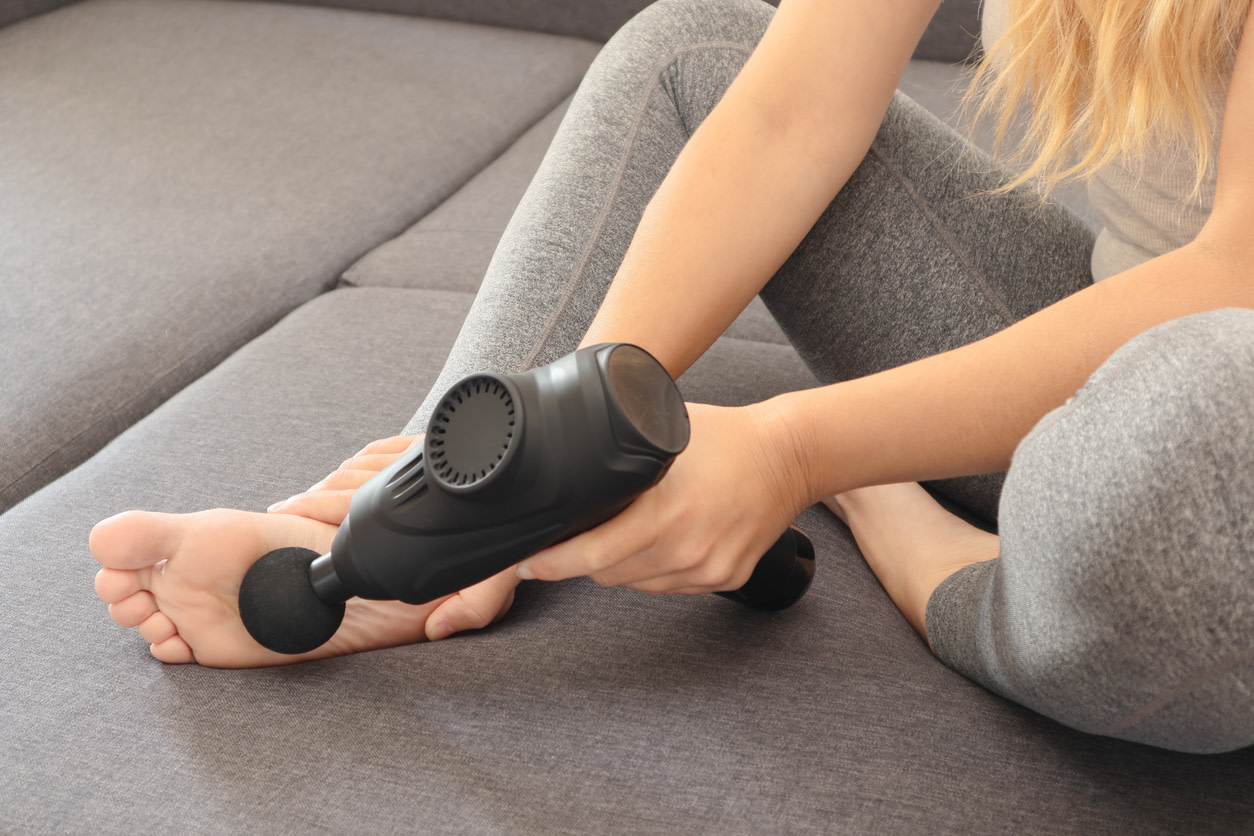
Sit comfortably with your affected foot resting on the opposite knee. Never treat a cold foot—warm the area first with a heating pad or warm towel for 2 minutes to increase tissue pliability. Start with the massage gun on its lowest speed setting (usually 1 of 5) and the softest attachment available. Position yourself where you can clearly see your foot and maintain steady pressure without straining. Have your phone timer ready—over-treating is the #1 beginner mistake that causes flare-ups.
The 4-Step Treatment Sequence That Delivers Results
-
Calf Muscle Release (90 seconds per leg): Place the ball attachment at the base of your calf. Slowly glide upward toward the knee using 2-inch strokes. Pause for 5 seconds on any tender “knots.” Tight calves often hide trigger points that refer pain directly to the heel.
-
Achilles Tendon Activation (30 seconds): Gently apply the massage gun vertically along both sides of your Achilles tendon. Never press directly on the tendon itself—stay on the surrounding muscle tissue. This prepares the connection point between calf and foot.
-
Arch Treatment (60 seconds): Switch to the metal ball attachment. Start at the heel pad (not the bone) and use slow, deliberate strokes along the entire arch toward the toes. Apply only enough pressure to create mild discomfort—not sharp pain. Imagine “ironing out” wrinkles in the fascia.
-
Heel Focus (30 seconds): Circle the massage gun around the perimeter of your heel pad. Avoid direct pressure on the heel bone—stay on the soft tissue surrounding it. This targets the plantar fascia’s insertion point without risking bone bruising.
Finding Your Perfect Pressure Level
Most users make the critical error of using too much pressure. Your ideal setting creates a deep “therapeutic ache” that subsides within minutes after treatment—not lingering pain. One user reported worsening their condition by “using aggressive pressure for weeks” before discovering “lighter pressure with consistent daily use” delivered better results. Start at 20% of what feels “right”—you’ll be surprised how little pressure is needed. Gradually increase intensity only after 3-5 pain-free sessions.
Critical Mistakes That Worsen Plantar Fasciitis

Even with the right technique, common errors sabotage results. These missteps turn potential relief into aggravated pain.
The Direct Heel Bone Pressure Trap
Never apply the massage gun directly to your heel bone. Several users reported “significant worsening” of symptoms after pressing the device directly against the calcaneus (heel bone), causing bone bruising that took weeks to heal. The plantar fascia attaches to the heel bone but doesn’t sit directly on top of it—stay on the fleshy pad surrounding the bone. If you feel hard resistance under the gun, you’re pressing too deeply.
Overuse: The Silent Treatment Killer
While users report benefits from 2-3 daily sessions, more than 4 minutes total per foot triggers flare-ups according to multiple accounts. One user described how “massage guns can cause a flare-up of plantar fasciitis if overused,” turning mild discomfort into debilitating pain. Stick to this safe protocol:
– Days 1-3: 30 seconds per area, twice daily
– Days 4-7: 60 seconds per area, twice daily
– Maintenance: 90 seconds per area, once daily
Pro Warning: If pain increases the next morning, reduce time by 50%—your tissue needs more recovery than you think.
Combining Treatments for Maximum Healing
Massage guns work best as part of a comprehensive approach. Isolating this tool delivers only temporary relief.
The Stretching Routine That Doubles Your Results
Perform these stretches immediately after massage gun treatment when tissues are most pliable:
– Wall calf stretch: 30 seconds per leg, 3 sets
– Towel stretch: Seated with towel looped around foot, gently pull toes toward you for 30 seconds
– Frozen water bottle roll: Roll underfoot for 2 minutes to reduce residual inflammation
Users who combine massage gun therapy with daily stretching report “significantly faster recovery” than massage alone. One user noted that adding stretching transformed their “temporary relief” into “lasting improvement.”
Night Splints and Massage Guns: The Overnight Recovery Hack
For severe morning pain, wear a night splint while using the massage gun during daytime hours. Night splints maintain the foot in a stretched position overnight, preventing fascia tightening. Pair this with twice-daily massage gun sessions for “dramatic reduction in first-step pain” within a week, according to user reports.
Real User Results: What to Expect Timeline
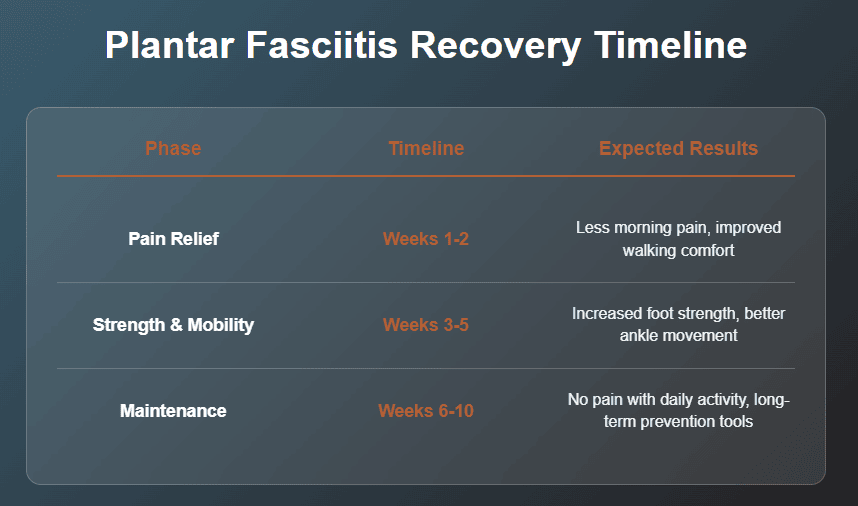
Understanding the healing timeline prevents discouragement and over-treatment:
- Day 1: Possible mild soreness after treatment (normal tissue response)
- Days 2-3: Reduced morning pain, especially when combined with stretching
- Week 1: Noticeable improvement in walking comfort, 50-70% pain reduction for consistent users
- Week 2-4: Most users report 80-90% improvement with continued daily treatment
- Beyond Month 1: Transition to maintenance mode (1-2 sessions weekly) while continuing stretches
One user with year-long plantar fasciitis shared: “After using it two to three times a day for just a few days, I was walking normally again—something stretching alone never accomplished.”
Final Protocol Reminder: For immediate results with your massage gun, follow this sequence daily: calf release → Achilles prep → arch treatment → heel focus. Start with low pressure for short durations, never press directly on bones, and always combine with stretching. If pain increases after 3 days of proper use, consult a physical therapist to rule out other conditions. The massage gun isn’t a magic cure—it’s a powerful tool that, when used correctly as part of a comprehensive plan, can finally break your plantar fasciitis pain cycle and get you back on your feet.


