
Nothing ruins an evening outdoors faster than swarms of mosquitoes and flies buzzing around your patio. The Black Flag Bug Zapper offers a chemical-free solution, but simply plugging it in won’t guarantee results. Many homeowners waste money because they place their zapper incorrectly or neglect essential maintenance. This guide reveals the exact techniques to maximize your Black Flag Bug Zapper’s performance—whether you’re battling mosquitoes on your deck or flies in your garage. You’ll learn strategic placement secrets, maintenance schedules that prevent failure, and critical safety steps most users overlook.
Your Black Flag Bug Zapper works by emitting UV-A light that attracts flying insects toward an electrified grid. But effectiveness depends entirely on proper setup and operation. Most users make critical mistakes like placing the unit too close to seating areas or ignoring bulb replacement schedules. By following these specific protocols, you’ll transform your zapper from a decorative light into a precision pest control tool that reduces flying insects by up to 80% during peak season.
Critical Black Flag Bug Zapper Safety Steps Before First Use
Ignoring these safety protocols risks electrical hazards or reduced effectiveness. Always complete these checks before plugging in your device.
Electrical Safety Checklist for Indoor and Outdoor Use
Your Black Flag Bug Zapper requires 120V standard household power, but outdoor setups need special precautions. Always plug outdoor units into a GFCI-protected outlet—this shuts off power instantly if moisture is detected. Never use extension cords unless absolutely necessary, and if required, choose a heavy-duty outdoor-rated cord with a minimum 16-gauge thickness. Before first use, test your outlet with another device to confirm it’s functional. For indoor models, keep the unit at least 3 feet from flammable materials like curtains or paper, and never operate near gas appliances or flammable vapors. If you hear buzzing or smell ozone, unplug immediately—this indicates potential electrical issues.
Preventing Accidental Contact with the Electrified Grid
The high-voltage grid delivers 2,000+ volts to eliminate insects, making safety critical around children and pets. Always position your Black Flag Bug Zapper where curious hands or paws can’t reach—minimum 6 feet off the ground for outdoor models. Never place it near playground equipment, pet feeding areas, or low railings. If using indoors, mount it high on a wall bracket rather than placing on furniture. Never attempt to clean or inspect the grid while plugged in, as residual charge can persist for minutes after disconnection. Keep a visible “Danger: High Voltage” sticker near the unit if children frequent the area.
Your Black Flag Bug Zapper First-Time Setup Checklist
Skipping these initial steps compromises performance and safety. Complete this verification process before permanent installation.
Unboxing Verification and Component Inspection
After removing all packaging, confirm you have: the main zapper unit, power cord, and collection tray (if model includes one). Inspect the UV bulb for cracks—even hairline fractures create electrical hazards. Check the power cord for nicks or exposed wires, which require immediate replacement. For outdoor models, verify the weatherproof seal around the electrical compartment is intact. If your unit includes stakes for ground mounting, ensure they’re undamaged and fit securely into the base. Do not plug in the unit if any component appears damaged—contact Black Flag support for replacement parts.
Power-Up Test Before Final Placement
Plug your Black Flag Bug Zapper into an indoor outlet away from flammable materials for initial testing. The UV bulb should emit a distinct blue-violet glow within 30 seconds—if it flickers or appears dim, the bulb may be defective. Listen for a faint electrical hum indicating the transformer is active. Confirm the indicator light (if equipped) illuminates. This test should take no more than 2 minutes. If the unit fails this basic check, do not proceed with outdoor installation—return it for replacement. Never skip this step, as faulty units can overheat when left unattended outdoors.
Strategic Black Flag Bug Zapper Placement: Indoor vs. Outdoor Hotspots
Where you position your zapper determines 90% of its effectiveness. Follow these location-specific protocols for maximum insect capture.
Outdoor Placement That Actually Pulls Bugs Away From You
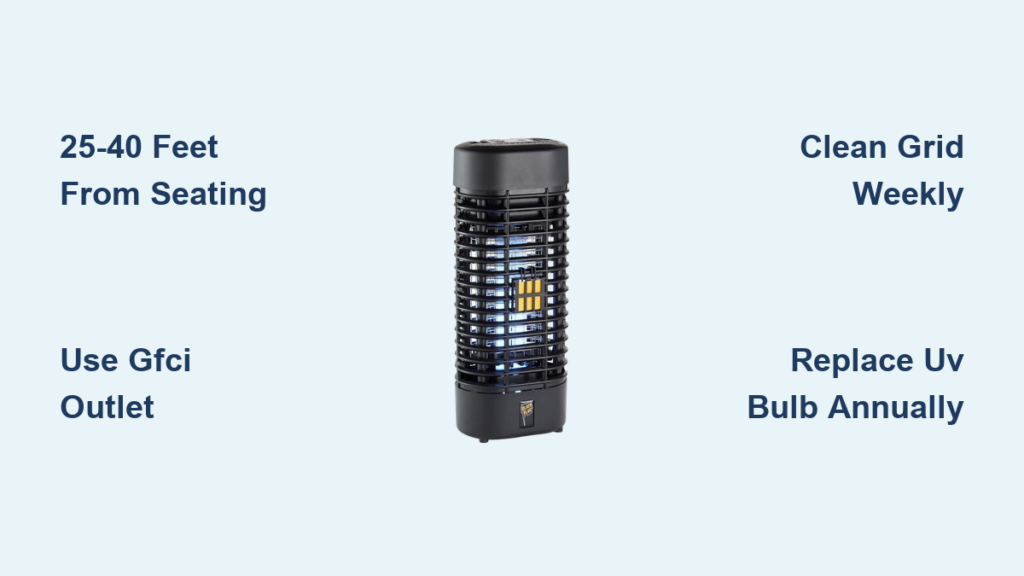
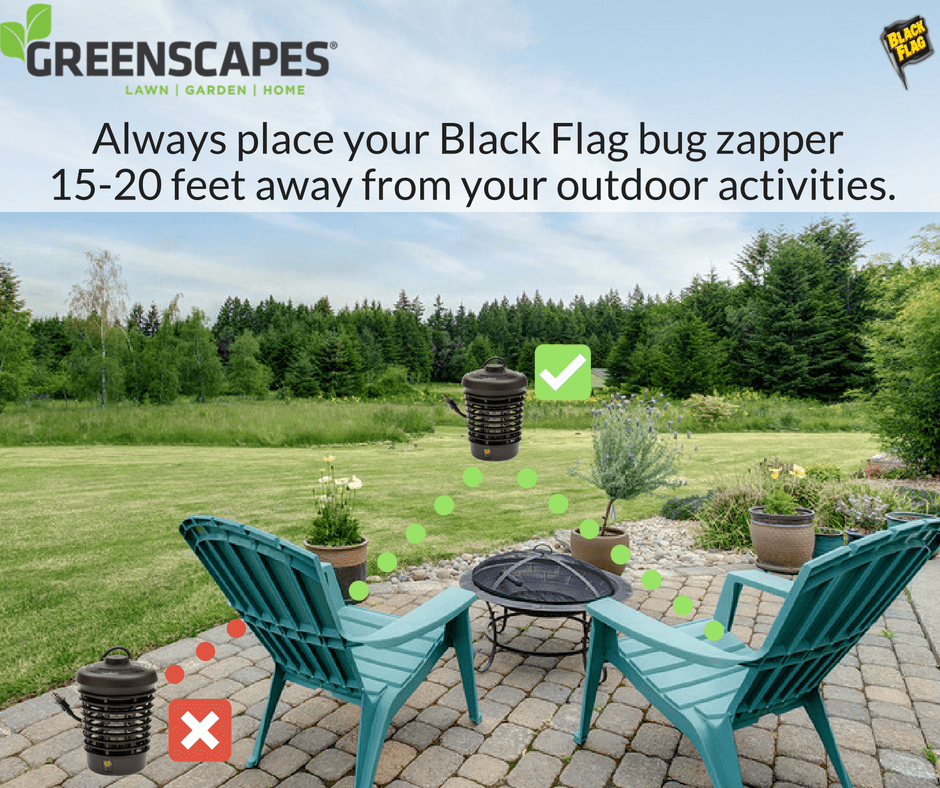
Most users make the fatal error of placing zappers too close to seating areas, drawing insects toward people. Position your Black Flag Bug Zapper 25-40 feet from patios or decks—this creates a protective buffer zone. Mount it 5-6 feet high on a fence post or shepherd’s hook stake (never directly on grass where moisture accumulates). Crucially, place it between insect breeding grounds (like ponds or gardens) and your living space. For mosquito control, position within 50 feet of standing water sources. Avoid competing light sources—keep it at least 20 feet from porch lights or windows. During peak mosquito hours (dusk to dawn), run it continuously for maximum impact.
Indoor Placement That Cuts Insect Traffic at Entry Points
Indoor zappers work best as interception devices, not area repellents. Place your Black Flag Bug Zapper 10-15 feet from seating areas but near entry points like doors or windows where insects invade. Elevate it 3-4 feet on a shelf—never on the floor where airflow is restricted. Critical mistake to avoid: never position it directly in front of windows, as this attracts insects into your home. Instead, place it perpendicular to entry points, creating a “bug funnel” away from living spaces. For garage or workshop use, mount near overhead doors but away from vehicle exhaust fumes that interfere with insect detection. Run it 24/7 during bug season for continuous protection.
Black Flag Bug Zapper Operation: Timing and Maintenance Schedule
Correct usage goes far beyond plugging it in. These protocols ensure consistent performance all season long.
When to Turn On Your Zapper for Maximum Insect Capture
Timing your zapper’s operation aligns with insect behavior patterns. Activate your Black Flag Bug Zapper 30 minutes before sunset—this catches mosquitoes during their peak feeding window. For all-night protection, leave it running until sunrise. During intense infestations, run it 24/7 but monitor the collection tray daily. Never operate during rain unless your model is specifically rated for wet conditions (check IP rating). In humid conditions above 70°F, expect significantly higher capture rates—this is when mosquitoes thrive. During dry spells, reduce runtime to conserve bulb life.
Weekly Maintenance That Prevents Performance Collapse
Neglecting cleaning causes most zapper failures. Every 7 days:
1. Unplug and let cool for 20 minutes
2. Remove collection tray and discard insect debris
3. Use a soft brush (never metal) to clear the electrified grid
4. Wipe housing with a dry microfiber cloth
Monthly deep cleaning is non-negotiable: Replace the UV bulb if it appears dim or darkened at the ends—even if still glowing, its insect-attracting UV output degrades after 6,000 hours. Check for corrosion on electrical contacts and wipe with isopropyl alcohol. For outdoor models, inspect weather seals and tighten any loose mounting hardware. A single week of neglect can reduce effectiveness by 40% due to grid obstruction.
Troubleshooting Your Black Flag Bug Zapper: Quick Fixes That Work

Don’t replace your unit prematurely—90% of issues have simple solutions.
Unit Won’t Power On: 3-Step Diagnostic
- Verify outlet function by plugging in another device (common issue: tripped GFCI outlet outdoors)
- Inspect cord for damage—fraying near the plug indicates replacement is needed
- Check bulb seating—loose UV bulbs prevent startup in some models
If these fail, contact Black Flag support—do not attempt internal repairs.
Low Insect Capture: Placement and Maintenance Fixes
When your zapper stops “zapping,” first check these:
– Bulb age: Replace if older than one season (UV output fades before visible burnout)
– Competing lights: Nearby LEDs or bright windows reduce effectiveness by 60%+
– Tray overflow: A full collection tray insulates the grid—empty weekly
– Wind interference: Reposition if in a breezy area (insects avoid strong airflow)
Pro Tip: During mosquito season, add a CO2 emitter (sold separately) near—but not touching—your zapper for 3x more captures.
Essential Off-Season Storage for Longevity

Improper storage ruins next season’s performance. Before winter:
1. Unplug and clean thoroughly per maintenance guidelines
2. Remove UV bulb and store separately in original packaging
3. Place silica gel packets inside the housing to prevent moisture
4. Store upright in a dry basement or closet (never garage where temps fluctuate)
Never store with dead insects inside—this attracts carpet beetles that chew wiring. Check your unit monthly during storage for moisture buildup.
Your Black Flag Bug Zapper becomes exponentially more effective when you follow these precise placement, timing, and maintenance protocols. Remember: strategic positioning 25-40 feet from living areas creates a protective buffer, while weekly grid cleaning prevents performance collapse. Replace UV bulbs annually regardless of appearance—diminished UV output is invisible to humans but critical for insect attraction. By implementing these techniques, you’ll transform your zapper from a novelty light into a precision pest control system that makes outdoor evenings enjoyable again. For persistent mosquito problems, combine your zapper with standing water elimination and fans (15+ mph airflow deters most mosquitoes)—this integrated approach delivers the insect-free environment you deserve.


