
That stale, musty flavor in your GE water cooler isn’t just unpleasant—it’s a warning sign. Mineral deposits, mold spores, and bacteria silently accumulate in reservoirs and drip trays, turning your trusted appliance into a breeding ground. Left unchecked, these contaminants cause pink slime in the drip tray, bitter-tasting water, and clogged dispensers. This guide delivers the exact steps GE technicians use to restore fresh-tasting water, whether you own a GXCF05D or other GE Profile model. You’ll learn how to deep-clean the reservoir without damaging components, remove hard water scale from faucets, and prevent mold in just 45 minutes—no special tools required.
Essential Safety Steps Before Cleaning Your GE Water Cooler
Skipping safety protocols risks electrical shock or chemical damage to your appliance. Always unplug the power cord directly from the wall outlet—not just the switch—before any cleaning. For hot/cold models like the GXCF05D, wait 2 hours after unplugging to let residual heat dissipate from the hot tank. Never mix cleaning agents; combining vinegar and bleach creates toxic chlorine gas. Gather these supplies: white vinegar, unscented bleach, soft bottle brush, microfiber cloth, mild dish soap, and a 5-gallon bucket. Avoid steel wool or abrasive pads that scratch plastic reservoirs and trap bacteria.
Critical Safety Checks for Hot Water Models
Why your GXCF05D’s hot tank needs special handling
Hot water dispensers build pressure that can cause scalding if released improperly. Before accessing the reservoir:
1. Dispense all hot water until only steam emerges
2. Hold the hot water tap open for 30 seconds to release residual pressure
3. Confirm the tank is cool to the touch (no warmth through exterior panel)
Pro Tip: Place a towel over the hot faucet spout while releasing pressure to catch any residual drips—this prevents mineral stains on countertops.
Weekly Cleaning: Stop Mold Before It Starts
Most GE water cooler failures trace back to neglected drip trays. Weekly maintenance prevents 90% of mold issues and takes just 7 minutes. Target the drip tray first—it’s the #1 contamination zone where spills pool and evaporate, leaving sugary residue that feeds mold.
How to Remove Stubborn Grime from GE Drip Trays
Why vinegar alone won’t cut through sticky residue
Mineral deposits from hard water bond to plastic trays, creating a rough surface where mold anchors. For GXCF05D models:
1. Pull the drip tray straight out (no tools needed—it slides on rails)
2. Soak in warm water with 1 tbsp dish soap for 5 minutes
3. Scrub grooves with a bottle brush dipped in baking soda paste
4. Rinse under running water until smooth to the touch
Visual cue: Pink or black spots mean immediate sanitizing is required—don’t just wipe them away.
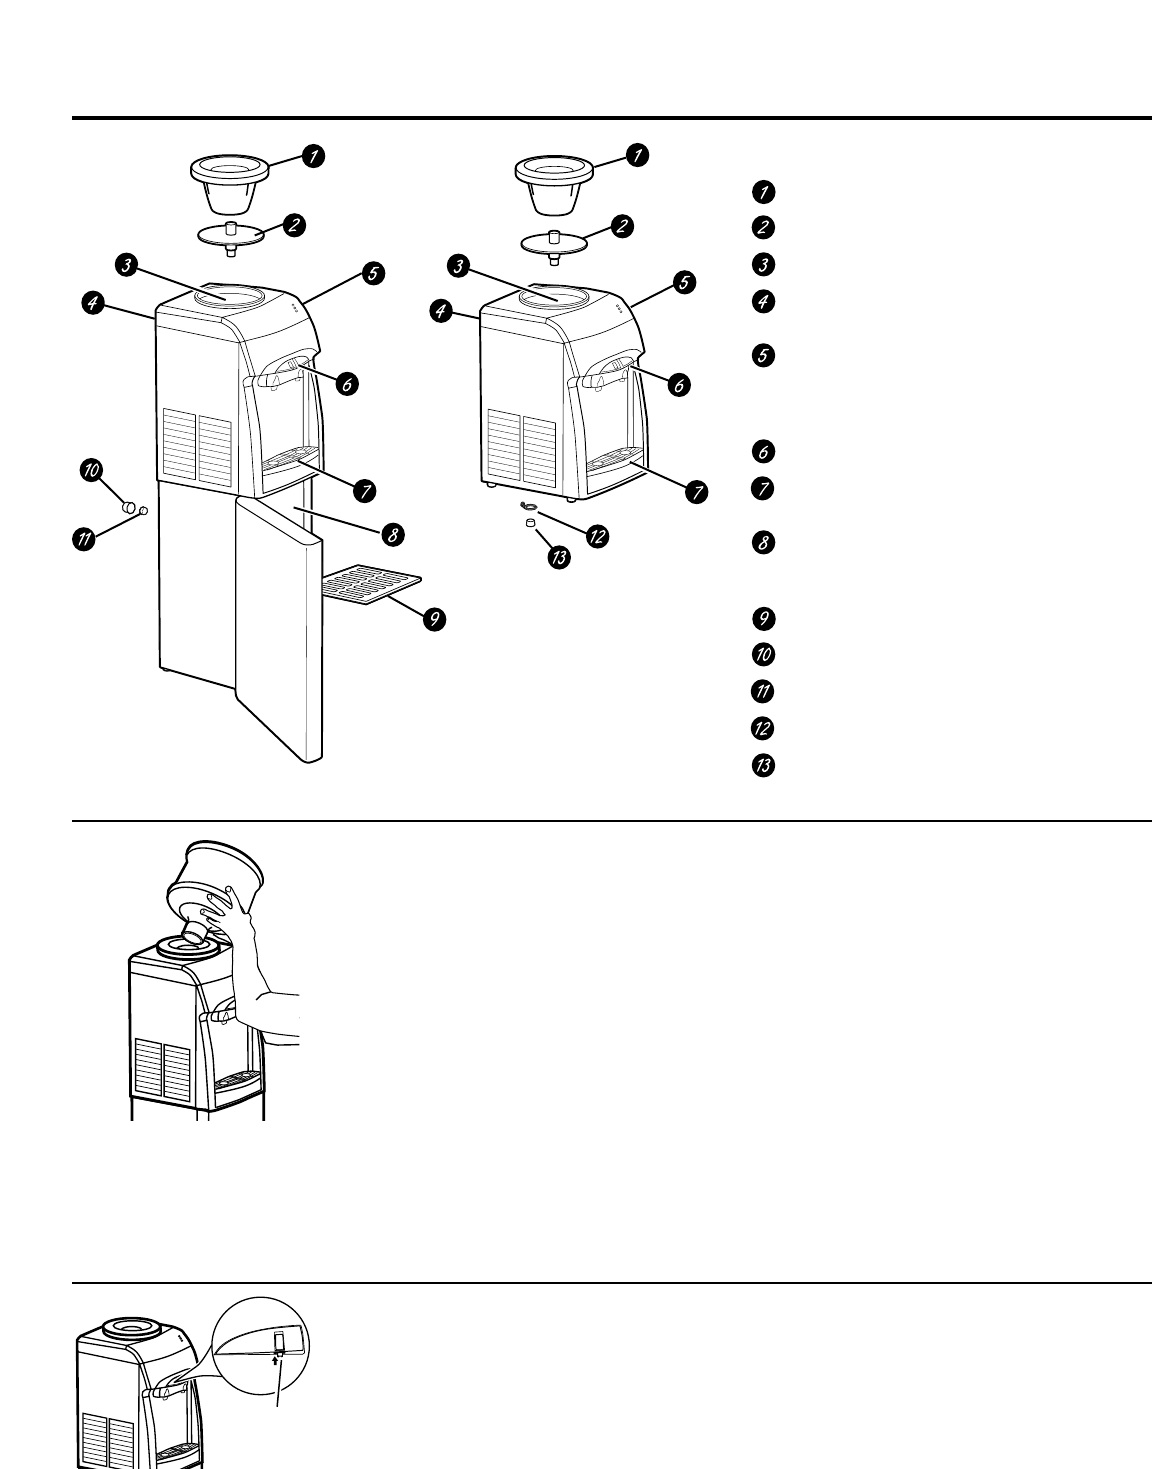
Cleaning the Splash Guard: The Hidden Mold Trap
That “spinning top-shaped barrier” near your faucets isn’t just decorative—it catches splashes but traps bacteria in its crevices. Most users miss this critical step:
1. Gently twist the clear plastic guard counterclockwise to release
2. Soak in 50/50 vinegar-water solution for 10 minutes
3. Use an old toothbrush to dislodge gunk from the central spindle
4. Air-dry completely on a clean towel before reinstalling
Warning: Forcing removal can crack the plastic—never yank straight up.
Deep Cleaning the Internal Reservoir: Fix Musty Water in 30 Minutes
When your GE cooler’s water tastes like wet cardboard, the reservoir is contaminated. This happens every 3-6 months depending on usage. For GXCF05D models, access requires removing the top storage compartment cover—no screws needed. Skip this step, and mold returns within weeks.
Step-by-Step Reservoir Sanitization
Why bleach concentration matters for GE coolers
Too little won’t kill mold; too much leaves toxic residue. Use this precise ratio:
1. Unplug unit and drain all water through hot/cold taps
2. Mix 1 teaspoon unscented bleach per gallon of cold water in a bucket
3. Pour solution into reservoir until ¼ full (never fill completely)
4. Let sit 15 minutes—do not exceed 20 minutes to avoid plastic damage
5. Scrub interior with soft brush, focusing on bottom corners where slime collects
Critical mistake: Skipping the pressure release on hot tanks causes siphoning of contaminated water into lines.
Flushing GE Water Coolers: The 3-Rinse Rule
Residual cleaner causes chemical taste for days if not fully flushed. After draining the bleach solution:
1. Fill reservoir completely with cold water
2. Dispense all water through BOTH hot and cold taps into bucket
3. Repeat twice more with fresh water
Test for completion: Smell and taste dispensed water—any vinegar/bleach hint means repeat rinsing. First cup should taste neutral.
Vent and Exterior Maintenance: Boost Cooling Efficiency
Clogged vents force GE coolers to work 40% harder, raising energy bills. Dust on condenser coils is the #1 cause of lukewarm water complaints. This 5-minute task restores cold performance.
How to Clean Cooling Vents Without Damage

Why vacuuming beats brushing for GE models
Back-panel vents have delicate fins easily bent by brushes. For GXCF05D units:
1. Unplug cooler and move away from wall
2. Use vacuum crevice tool on LOW setting
3. Gently suction dust from horizontal vent slats
4. Wipe exterior vents with vinegar-dampened cloth
Pro Tip: Clean vents monthly if you have pets—their hair clogs vents 3x faster.
When to Deep Clean & Prevent Future Contamination
Don’t wait for pink slime to appear. These signs mean your GE water cooler needs immediate sanitizing:
– Water leaves a film on your tongue
– Drip tray develops white chalky rings (hard water scale)
– Cold water takes >60 seconds to chill
– Audible gurgling from reservoir
GE-Specific Maintenance Schedule
| Task | Frequency | Model-Specific Notes |
|---|---|---|
| Drip tray cleaning | Weekly | GXCF05D: Remove grille first |
| Reservoir deep clean | Every 3 months | Hot models: Release pressure first |
| Vent cleaning | Monthly | Critical for GXCF05D in dusty areas |
| Filter replacement | Every 6 months | Only if model has filter compartment |
Hard water hack: In areas with >7 grains/gallon hardness, add ½ cup vinegar to reservoir monthly and run through taps—this prevents scale on heating elements without full disassembly.
Troubleshooting Persistent Problems
If musty taste remains after cleaning:
You likely missed the faucet spouts. Remove the splash guard and:
1. Soak metal spouts in vinegar for 10 minutes
2. Use pipe cleaner to clear internal passages
3. Rinse while dispensing water
When to call GE support:
Contact 1-800-GE-CARES if you experience:
– Water leaking from base (indicates tank crack)
– Electrical buzzing after cleaning
– Hot water not reaching 185°F (heating element failure)
Final Checklist Before Plugging In
Never skip these critical reassembly steps:
1. Confirm drip tray is bone-dry (moisture causes mold in 48 hours)
2. Verify splash guard clicks securely into place
3. Wipe exterior with vinegar solution to prevent fingerprints
4. Dispense 2 cups of water to prime the system
Your GE water cooler should now deliver crisp, clean water for months. For GXCF05D owners, set a phone reminder for 90 days—this is the average time for mold to reestablish in humid climates. Remember: A 7-minute weekly wipe-down prevents 2-hour emergency cleans. If you smell mustiness after storage, run the deep clean protocol before first use—stagnant water breeds bacteria rapidly. Keep this guide handy; your next clean will take half the time.


