
That first sip of cool, refreshing water from your Sunbeam cooler on a hot day is pure bliss—until you notice an odd taste or see slimy buildup around the spout. If your Sunbeam water cooler has developed cloudy water, strange odors, or visible residue, it’s time for a thorough cleaning. How to clean a Sunbeam water cooler properly isn’t complicated, but skipping this essential maintenance task can lead to bacterial growth that affects both water quality and your health.
Water coolers operate in dark, moist environments—the perfect breeding ground for bacteria, mold, and mineral deposits. Even if your water looks clear, invisible contaminants can accumulate inside the reservoir, tubing, and dispensing mechanisms. Regular cleaning every 3-6 months ensures every glass you pour delivers the crisp, clean taste you expect from your Sunbeam appliance. In this guide, you’ll learn the exact steps to sanitize your cooler completely without damaging its components.
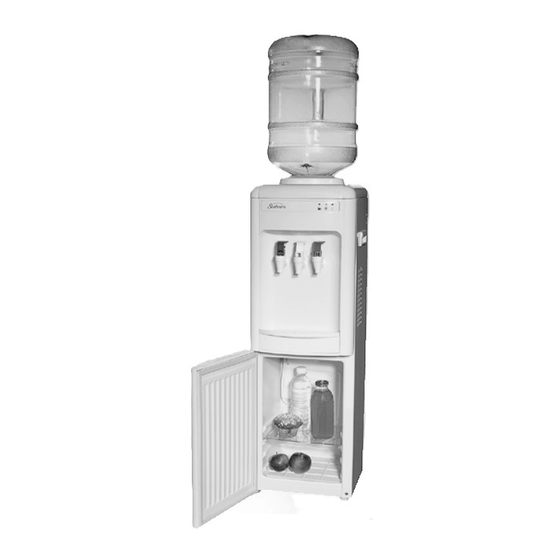
Unlike disposable bottle systems where you simply replace the container, your Sunbeam water cooler’s internal components need periodic attention to maintain optimal performance. Whether you own a traditional bottle-fed model or a modern direct-plumbed unit, these cleaning techniques apply universally. By following this comprehensive approach, you’ll extend your cooler’s lifespan and guarantee safe, great-tasting water for your household or office.
Essential Safety Steps Before Cleaning Your Sunbeam Water Cooler
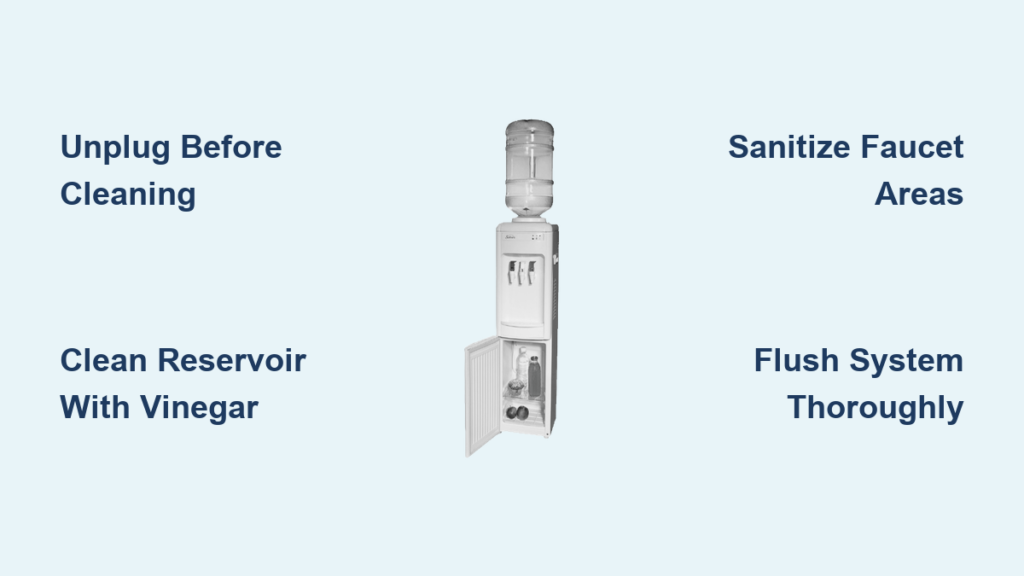
Before touching any cleaning solutions, complete these critical safety preparations to protect both you and your appliance. Unplug your Sunbeam cooler from the electrical outlet—never attempt cleaning while the unit remains powered. For bottle-fed models, carefully remove the water bottle and set it aside on a stable surface. If you have a direct-plumbed cooler, shut off the water supply valve completely and drain any remaining water from the system.
Gather these specific supplies to ensure an effective cleaning process: white vinegar (5% acidity), baking soda, soft microfiber cloths, a long-handled bottle brush with soft bristles, cotton swabs, and a clean bucket. Avoid common mistakes like using bleach, ammonia-based cleaners, or abrasive scrub pads that can damage plastic components and leave toxic residues in your drinking water. Position your cooler in an accessible location where spills won’t damage flooring—ideally near a sink for easy water access during the cleaning process.
Why Unplugging Is Non-Negotiable
Many users skip this critical step when cleaning how to clean a Sunbeam water cooler, risking electrical hazards. Water and electricity don’t mix, and even small spills during cleaning could cause short circuits or shocks if the unit remains plugged in. Wait at least 15 minutes after unplugging before starting your cleaning process to allow internal components to cool down completely.
Deep Cleaning the Internal Reservoir and Faucet System
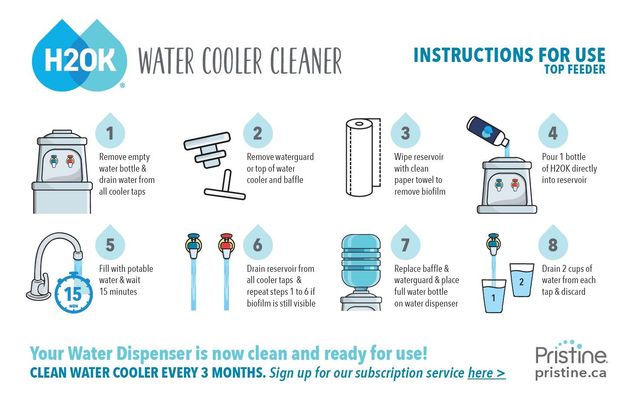
The internal reservoir is where most contamination occurs, so focus your cleaning efforts here. Remove the drip tray and splash guard to access the faucet area completely. For bottle-fed models, unscrew and remove the bottle collar assembly. Mix a cleaning solution of one part white vinegar to two parts warm water in your bucket—this ratio effectively breaks down biofilm without damaging plastic components.
Using your long-handled bottle brush, scrub the interior walls of the reservoir thoroughly, paying special attention to corners and seams where bacteria accumulate. For stubborn deposits, let the vinegar solution sit in the reservoir for 20 minutes before scrubbing. Never use metal brushes that could scratch surfaces and create new hiding places for bacteria. After scrubbing, drain the solution completely through the faucets to clean the dispensing lines as well.
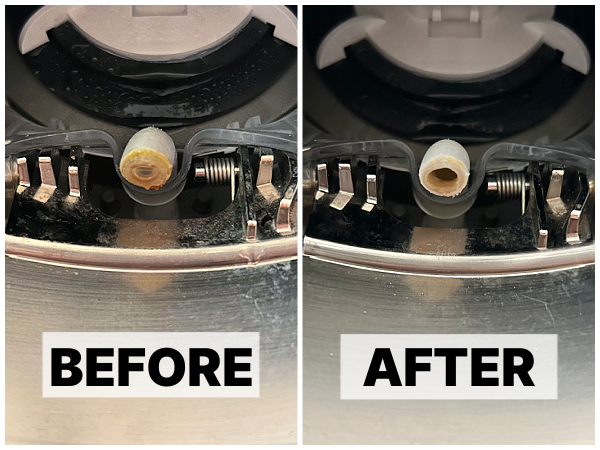
How to Clean Hard-to-Reach Areas Around the Faucets
The narrow spaces around faucet spouts harbor significant contamination. Dampen cotton swabs with your vinegar solution and carefully clean around the base of each faucet. For push-button models, remove the buttons if possible (consult your manual) and soak them in vinegar solution before scrubbing with a soft toothbrush. If your cooler has a child lock mechanism, disengage it during cleaning to access all crevices. This attention to detail prevents cross-contamination when you resume using the cooler.
Eliminating Mold and Residue from the Drip Tray and Splash Guard
The drip tray collects more than just occasional spills—it’s a prime location for mold growth that many users overlook when learning how to clean a Sunbeam water cooler. Remove the tray completely and soak it in hot, soapy water for 10 minutes. For persistent stains, create a paste of baking soda and water, apply it to the affected areas, and let it sit for 15 minutes before scrubbing with a soft sponge.
The splash guard (the plastic shield surrounding the faucets) requires equal attention. Soak it in your vinegar solution to loosen mineral deposits, then use an old toothbrush to clean grooves and crevices. Rinse both components thoroughly with clean water—any residual cleaning solution could affect your water’s taste. Allow them to air dry completely before reinstallation to prevent reintroducing moisture that encourages new bacterial growth.
Effective Descaling for Hard Water Areas
If you live in a hard water area, mineral deposits will gradually build up inside your cooler’s cooling coils and tubing, reducing efficiency and affecting water taste. When you notice slower water flow or a chalky residue, it’s time for descaling. Prepare a solution of one part white vinegar to three parts water, pour it into the empty reservoir, and let it circulate through the system for 30-60 minutes.
Run the solution through both hot and cold faucets to ensure complete coverage. For severe scaling, you may need to repeat the process or use a commercial descaling product specifically designed for water coolers (never use undiluted vinegar for extended periods). After descaling, flush the system with at least two full reservoirs of clean water to eliminate any vinegar taste or residue before resuming normal use.
Proper Exterior Cleaning Techniques for Different Finishes
The exterior of your Sunbeam cooler deserves attention too—fingerprints, dust, and splatters create an unprofessional appearance in office settings and can transfer contaminants. For standard plastic models, use a microfiber cloth dampened with mild dish soap and water. Never spray cleaners directly onto the unit—apply to your cloth first to prevent liquid from seeping into electrical components.
Stainless steel models require special care to maintain their appearance. Use a cleaner specifically formulated for stainless steel applied in the direction of the grain. Avoid abrasive pads that create fine scratches where bacteria can hide. Pay particular attention to the area around the faucets where mineral deposits accumulate from evaporated water droplets.
Creating a Maintenance Schedule for Long-Term Performance
Establishing a regular cleaning routine prevents the need for intensive deep cleaning sessions. Implement this simple schedule for optimal results:
- Daily: Wipe exterior surfaces with a damp cloth
- Weekly: Clean drip tray and splash guard
- Monthly: Sanitize faucets with vinegar solution
- Quarterly: Full internal cleaning and sanitizing
- Biannually: Deep descaling (more frequently in hard water areas)
For bottle-fed models, always inspect new water bottles for cracks or contamination before installation. Store spare bottles in a cool, dark place to prevent algae growth. Direct-plumbed models benefit from regular filter replacements according to the manufacturer’s schedule—typically every 6-12 months depending on usage.
Troubleshooting Common Post-Cleaning Issues
After completing how to clean a Sunbeam water cooler properly, you might encounter temporary issues. If water tastes slightly vinegary, continue flushing the system with clean water until the taste disappears—this usually takes 5-10 minutes of continuous dispensing. If water flow seems reduced, check that all components are properly reassembled and that no debris blocks the faucets.
Should cloudy water persist after cleaning, you may need to repeat the sanitizing process or investigate your water source for contamination. Never ignore unusual odors or discoloration—these indicate incomplete cleaning or potential component failure that requires professional attention.
Essential Tips for First-Time Cleaners
Save time during your first cleaning session by labeling components as you disassemble them—take photos with your phone to ensure correct reassembly. Keep a dedicated cleaning kit stored near your cooler so supplies are always available when needed. For bottle-fed models, clean the bottle collar assembly monthly to prevent biofilm buildup that transfers to new bottles.
Most importantly, set calendar reminders for your next cleaning session—consistency matters more than perfection when maintaining your Sunbeam water cooler. After each cleaning, note any observations about water quality or performance issues that might indicate emerging problems requiring professional service.
By following this comprehensive guide on how to clean a Sunbeam water cooler, you’ll ensure every glass delivers the pure, refreshing hydration you expect. Regular maintenance takes less than an hour of your time but provides months of clean, safe drinking water for your household or workplace. Start implementing these techniques today, and you’ll notice the difference in both water taste and your peace of mind knowing your cooler operates at peak performance.


