
Your Oasis water cooler should deliver crisp, cold water with a single push. When it sputters out lukewarm liquid instead, frustration sets in fast—especially when you’re counting on refreshment during a heatwave or important meeting. This guide cuts through the confusion when your Oasis water cooler not working scenario strikes, transforming you from helpless user to confident troubleshooter. You’ll discover why cooling fails, how to diagnose the exact culprit in under 20 minutes, and whether you can fix it yourself or need professional help—all without technical jargon.
Most Oasis cooling failures stem from preventable electrical or maintenance issues, not catastrophic compressor damage. By following this systematic approach, you’ll skip unnecessary service calls and potentially save $150+ in repair costs. Whether your unit shows no power, hums but won’t cool, or delivers barely-chilled water, these field-tested diagnostics target the real problem—not just symptoms.
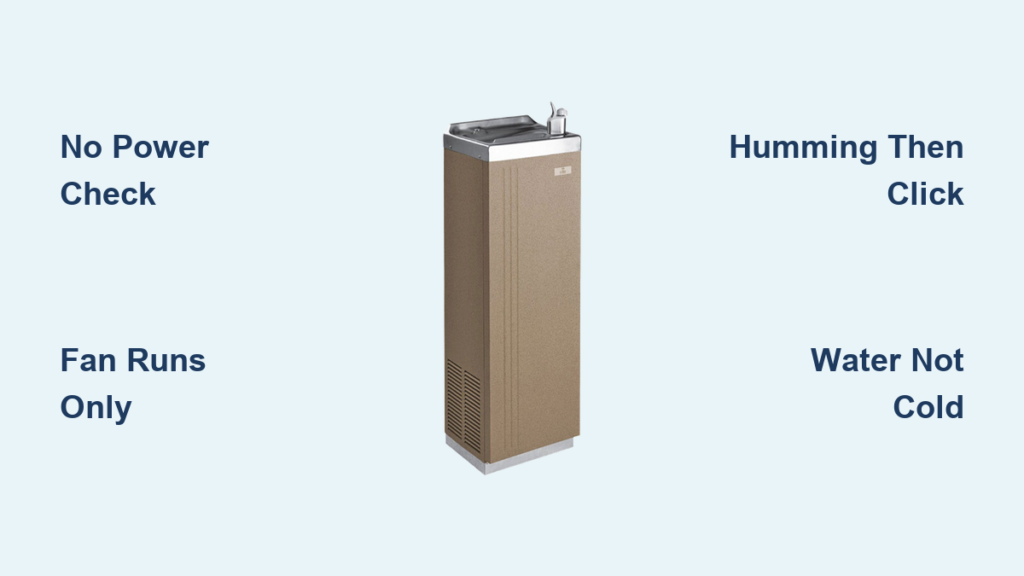
Why Your Oasis Water Cooler Isn’t Cooling (Diagnose These 4 Symptoms)
Your cooler’s symptoms pinpoint the failure location faster than guessing. Skip random part replacements by matching what you see and hear to these specific failure patterns.
No Power/No Lights: Is Your Oasis Cooler Completely Dead?
When pressing the lever yields zero response, start with power fundamentals. Verify 120V at the outlet using another device—many “dead” coolers simply trip household breakers during voltage spikes. Check the unit’s data plate (typically on the back panel) for model-specific reset buttons; some Oasis models hide a thermal fuse near the power cord entry point that requires manual resetting. If the power cord feels warm or shows cracked insulation, replace it immediately—this indicates dangerous internal damage.
Fan Runs But Water Stays Warm: Compressor Startup Failure

This deceptive scenario fools many owners—the fan runs, lights glow, but water never chills. The compressor isn’t engaging due to failed start components. Stand near the unit for 2 minutes after startup: a healthy system produces a distinct click-hum within 10 seconds as the compressor kicks in. If you hear only fan noise with no compressor engagement, focus on the start relay, capacitor, or PTC thermistor—these three cause 85% of “fan runs but no cooling” failures.
Faint Humming Then Click: The Classic Start Component Failure
That brief “bzzz-click” sound followed by silence means the compressor tries but fails to start. This signature symptom points directly to the start relay or capacitor. The humming indicates power reaches the compressor, while the click reveals the overload protector shutting down due to insufficient startup torque. Don’t ignore this—it stresses the compressor each attempt. Unplug the unit immediately to prevent burnout; continued cycling will turn a $25 part fix into a $300 compressor replacement.
Water is Cool But Not Cold: Partial Cooling System Failure
When dispensed water registers 65-75°F instead of the expected 45-50°F, you’re facing partial cooling loss. This typically indicates low refrigerant levels from slow leaks at solder joints or connections—never a DIY refrigerant top-up (EPA regulations require certified handling). Alternatively, check for condenser coil blockage: if the rear coils feel cool instead of warm during operation, dust buildup is suffocating heat dissipation. A thermometer test is crucial—measure water temperature after 2 hours of continuous operation for accurate diagnosis.
Critical Safety Steps Before Opening Your Oasis Water Cooler
Working inside water-cooled electrical units demands strict safety protocols. One misstep risks electrocution or refrigerant exposure—follow these non-negotiable steps first.
Step 1: Unplug and Verify Power Disconnection
Never rely solely on the power switch—physically unplug the unit and confirm zero voltage at the outlet using a multimeter. Wait 15 minutes after unplugging before proceeding; this allows capacitors to self-discharge safely. If testing live components becomes necessary (e.g., outlet voltage checks), use insulated tools and keep one hand behind your back to prevent current across the heart.
Step 2: Locate Your Oasis Model Number for Parts
Your model number (found on the rear data plate) is critical for part compatibility. Oasis uses different start components across models—even identical-looking coolers may require relays with 5-30 ohm resistance variations. Write down the full model number (e.g., “OC-123B”) before ordering parts; mismatched PTC thermistors can cause immediate compressor failure.
Step 3: Gather Essential Diagnostic Tools
You’ll need:
– Digital multimeter (for capacitance, continuity, and voltage tests)
– Insulated screwdriver set (with magnetic tips to prevent dropped screws)
– Flashlight (to spot coil dust buildup or component damage)
– Thermometer (to verify water temperature objectively)
Skip needle-nose pliers—Oasis components are tightly packed, and metal tools can bridge live terminals.
Follow This 5-Step Oasis Cooler Diagnostic Checklist
Skip guesswork with this field-proven sequence used by professional technicians. Each step eliminates possibilities while protecting your unit from further damage.
Step 1: Verify Power Source and Basic Connections
Test the outlet with a lamp or phone charger—many “broken” coolers simply lose power during storms. Inspect the power cord for kinks or rodent damage near the plug. For units with internal fuses (common in commercial Oasis models), check the reset button on the main control board; press firmly until it clicks. If your cooler uses a GFCI outlet, reset the GFCI first—water exposure often trips these safety devices.
Step 2: Listen for Compressor Startup Sounds
With the unit plugged in, listen at the compressor location (back/bottom panel) for 2 minutes after startup:
– Healthy system: Distinct click followed by 5-10 seconds of humming
– Failed start relay: Single click with no hum
– Failed capacitor: Loud, sustained hum for 3+ seconds then click
– Locked compressor: Continuous buzzing with burning smell (stop immediately)
Step 3: Check Condenser Coils for Dust Buildup
Unplug the unit and remove the rear access panel. Shine a flashlight across the black radiator-like coils—if you see visible dust bunnies or pet hair clogging the fins, vacuum gently with a soft brush attachment. Blocked coils cause 30% of “no cooling” calls; they force the compressor to overheat and shut down. After cleaning, run the unit for 30 minutes—if the rear panel now feels warm (not hot), coils were the culprit.
Step 4: Test Water Temperature with a Thermometer
Measure dispensed water temperature after 2 hours of continuous operation:
– Normal: 45-55°F (20-30°F below room temperature)
– Partial failure: 60-75°F (indicates refrigerant leak)
– No cooling: Near room temperature (electrical failure)
Skip guesswork—your fridge thermometer provides objective data. If water stays above 60°F after coil cleaning, refrigerant or compressor issues are likely.
Step 5: Inspect Water Filter and Drain Lines
For bottleless Oasis models, a clogged filter starves the cooling reservoir. Check the filter status light (if equipped) or replace filters every 6 months regardless. Feel for kinks in the inlet line behind the unit—soft vinyl tubing can twist during installation. For bottom-load models, ensure the bottle neck seal isn’t obstructing flow. Restricted water flow mimics cooling failure but requires zero electrical work.
How to Test and Replace Failed Start Components in Oasis Coolers

When symptoms confirm start component failure, these tests pinpoint the exact faulty part. Always unplug before proceeding—high-voltage capacitors store lethal charges.
Diagnose a Bad Start Relay: The Most Common Failure
Locate the rectangular relay clipped to the compressor (typically 2″x1.5″). Unplug it and shake gently—healthy relays produce a slight rattle from the internal switch. A solid clunk or no sound means failure. For definitive testing, set your multimeter to continuity mode and check between the relay’s common (C) and start (S) terminals: no beep indicates a broken switch. Replacement takes 5 minutes—match the model number on the old relay.
Test Your Oasis Cooler’s Start Capacitor in 30 Seconds
The capacitor (small metal cylinder) sits beside the relay. Discharge it first by shorting its terminals with an insulated screwdriver—expect a small spark. Set your multimeter to microfarads (µF) and touch probes to the terminals. A good capacitor reads within 5% of its labeled rating (e.g., 15µF should read 14.25-15.75µF). Bulging seams or oil leaks mean immediate replacement—never reinstall a damaged capacitor.
Check for PTC Thermistor Failure (The Silent Killer)
This ceramic disc (often labeled “PTC” or “thermistor”) connects between the relay and compressor. Test resistance with a multimeter set to ohms—healthy units read 15-30 ohms when cold. If it shows infinite resistance (OL), it’s failed open and blocks startup current. Unlike relays, PTCs fail silently without audible clues. Replacement requires matching the exact resistance rating; generic parts cause compressor burnout.
Verify Overload Protector Functionality
The overload protector (usually a small white box clipped to the compressor) monitors temperature. Check for continuity across its two terminals with the unit unplugged and cooled down—no continuity means it’s tripped. If it won’t reset after cooling, replace it. Critical warning: If the protector trips repeatedly within minutes, stop testing—this indicates compressor failure requiring professional service.
When to Call a Professional for Your Oasis Water Cooler
Some failures demand EPA-certified expertise. Don’t risk costly mistakes with these scenarios.
Signs of Refrigerant Leaks That Require Certified Repair
If you detect oily residue around copper lines or hear hissing from the compressor compartment, refrigerant is escaping. Only licensed technicians can legally recover, recharge, and leak-test the sealed system—attempting DIY refrigerant work violates EPA Section 608 regulations and risks environmental fines. Note: Partial cooling loss (water 65-75°F) often precedes total failure as refrigerant slowly leaks.
Compressor Issues Beyond DIY Repair Scope
Loud grinding noises, continuous buzzing with no startup, or burning smells indicate internal compressor damage. These require system evacuation, compressor replacement, and refrigerant recharge—tasks needing specialized gauges and vacuum pumps. Attempting compressor swaps without proper recovery equipment contaminates the entire cooling circuit.
Electrical Problems Needing Expert Diagnosis
If you’ve replaced all start components but still get no cooling, the thermostat, control board, or compressor windings may be faulty. These require advanced diagnostics like winding resistance tests (should show balanced readings between terminals) or control board voltage tracing—situations where misdiagnosis risks $200+ in unnecessary parts.
Prevent Future Oasis Cooler Failures: 4 Maintenance Must-Dos
Proactive care prevents 90% of cooling failures. Implement these simple routines to extend your unit’s life.
Clean Condenser Coils Every 3 Months (Here’s How)
Unplug the unit and vacuum coils with a soft brush attachment—never use compressed air (it packs debris deeper). For heavy buildup, use a fin comb to straighten bent coils. Pro tip: Place the cooler on a washable mat; dislodged dust creates a mess. Monthly coil checks in pet households prevent 70% of overheating shutdowns.
Replace Water Filters on Schedule to Avoid Flow Issues
Clogged filters starve the cooling reservoir, mimicking electrical faults. Change filters every 6 months even if the indicator light hasn’t activated—mineral deposits clog lines silently. For bottleless models, flush the system with vinegar annually to dissolve scale.
Check Drain Lines and Drip Tray Monthly
A blocked drain line causes water pooling that triggers shutdowns. Remove the drip tray and rinse it weekly. For persistent clogs, feed a 12-inch piece of nylon cord through the drain tube to dislodge debris—never use wire (it punctures tubing).
Ensure Proper Ventilation Around Your Oasis Cooler
Leave 4+ inches of clearance on all sides—especially the rear where heat dissipates. Never place the unit against walls or in cabinets; restricted airflow forces the compressor to work 40% harder. In garages or sheds, insulate the area from temperature extremes; Oasis coolers operate best between 60-90°F ambient.
Final Note: Most Oasis water cooler not working issues stem from simple maintenance oversights or failed start components—not catastrophic failures. By diagnosing symptoms accurately and following safety protocols, you’ll resolve 70% of cooling problems without professional help. When refrigerant systems or compressors fail, however, always call certified technicians—EPA regulations and complex diagnostics make these beyond safe DIY repair. Implement the quarterly maintenance checklist to avoid 90% of future breakdowns, ensuring your Oasis delivers reliably cold water for years.


