
Your CPU is running hot, fans are screaming at full speed, and you’re ready for a cooling solution that delivers both performance and silence. Installing a Corsair all-in-one liquid cooler solves these problems while giving your build a premium aesthetic. The good news? You don’t need engineering expertise to complete this upgrade—just careful attention to detail and this step-by-step guide. Thousands of PC builders successfully install Corsair AIO coolers each month, and with the right approach, you’ll join them with a properly functioning system that keeps your processor temperatures 10-20°C lower than stock coolers. This comprehensive walkthrough covers every critical step from unboxing to first boot, ensuring you avoid the most common installation pitfalls that could damage your components.
Preparing Your Workspace and Verifying Component Compatibility
Before touching any components, create an environment where you won’t accidentally damage sensitive electronics. Working on a bare wooden table with a grounded anti-static mat significantly reduces the risk of electrostatic discharge that could fry your motherboard or CPU. Remove all jewelry and ensure your hands are clean and dry—moisture combined with static electricity creates the perfect storm for component failure. Most importantly, completely power down your PC, unplug it from the wall, and hold the power button for 10 seconds to discharge residual electricity from the capacitors. This single step prevents countless “why won’t my PC turn on” scenarios after installation.
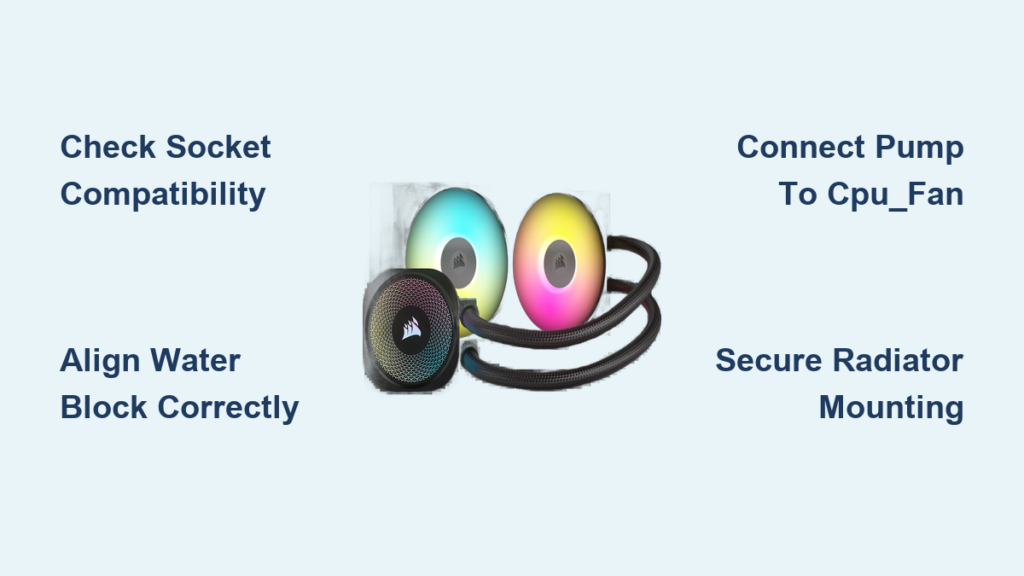
Confirming Your Motherboard and Case Support Your Corsair Cooler
Your Corsair AIO must physically fit both your CPU socket and your case’s radiator mounting points. Check three critical compatibility factors before proceeding: First, verify your CPU socket type (LGA 1700 for Intel 12th-14th gen, AM5 for Ryzen 7000 series) matches the mounting hardware included with your specific Corsair model. Second, measure your case’s available space—front radiator mounts typically require 25-30mm of clearance beyond the motherboard tray, while top mounts need sufficient height between the case top and your RAM modules. Third, confirm your case’s fan screw pattern matches standard 120mm or 140mm fan mounts if you’re installing the radiator separately. If you skip this verification step, you might discover too late that your $100 cooler won’t physically fit your build.
Essential Tools Checklist Before Opening the Cooler Box
Gather these items before unboxing your Corsair AIO to avoid mid-installation frustration: A #2 Phillips screwdriver (preferably magnetic-tipped for dropped screws), 90%+ isopropyl alcohol and microfiber cloths for thermal interface material cleanup, and optionally, a small ziplock bag to store removed screws. Crucially, check that your Corsair box contains all necessary mounting hardware—missing backplates or standoffs cause the most common installation delays. If anything appears missing, contact Corsair support immediately with your product’s serial number before proceeding. Never substitute non-Corsair mounting hardware as improper thread sizes can crack your motherboard or CPU socket.
Mounting the Radiator for Optimal Airflow Performance

The radiator’s position dramatically impacts cooling efficiency and system noise levels—get this wrong and your expensive liquid cooler performs worse than a mid-range air cooler. Top-mounted radiators generally provide the best thermal performance because hot air naturally rises, allowing the radiator to expel heated air directly out of the case. However, if your case has limited vertical space or tall RAM modules, front mounting becomes necessary despite potentially higher operating temperatures.
Installing Radiator Tubes in the Correct Orientation
Position the radiator so the pump housing sits at the lowest point when installed—this prevents air bubbles from accumulating in the pump chamber, which causes loud gurgling noises and reduces cooling capacity. For top-mounted configurations, orient the tubes toward the case’s rear. For front-mounted setups, position the tubes downward toward the case floor. Secure the radiator using all eight mounting points with the longest screws provided; uneven pressure can warp the radiator fins and create airflow restrictions that decrease cooling performance by up to 15%.
Securing Fans with Proper Airflow Direction
The arrow printed on each fan blade indicates airflow direction—mount fans so they push air through the radiator toward your case’s exhaust path. For top-mounted radiators, fans should blow upward (airflow arrows pointing up). For front-mounted radiators, fans should pull air inward (arrows pointing toward the motherboard). Use the included fan screws to attach fans directly to the radiator, tightening each screw just until resistance is felt—over-tightening can crack fan frames. If your Corsair model includes a lighting controller, connect fan cables to it before mounting the radiator for easier cable management.
Installing the CPU Water Block Without Damaging Components
This critical phase requires surgical precision—apply too much pressure and you’ll crack your CPU’s integrated heat spreader; too little and you’ll get poor thermal transfer. Start by removing your existing cooler and thoroughly cleaning the CPU surface with isopropyl alcohol until no thermal paste residue remains. The surface must be perfectly clean for optimal heat transfer—any leftover paste creates microscopic gaps that reduce cooling efficiency.
Applying Thermal Paste Like a Professional
Squeeze a single grain-of-rice-sized drop of thermal paste onto the exact center of your CPU’s heat spreader. Avoid the common mistake of applying too much paste—excess material squeezes out during installation, potentially causing electrical shorts on the motherboard. The water block’s pressure will naturally spread the paste into a thin, even layer during installation. Never spread the paste manually as this introduces air bubbles that reduce thermal conductivity.
Mounting the Water Block with Even Pressure
Align the Corsair water block precisely over your CPU, ensuring the mounting screws line up with the standoffs. Begin tightening screws in a diagonal pattern—top-left, then bottom-right, then top-right, then bottom-left—turning each screw only a quarter-turn before moving to the next. Repeat this cross-pattern tightening 3-4 times until all screws are snug but not fully tightened. Final tightening should require only light finger pressure—overtightening is the #1 cause of CPU damage during liquid cooler installation.
Connecting Power and Lighting Cables Correctly
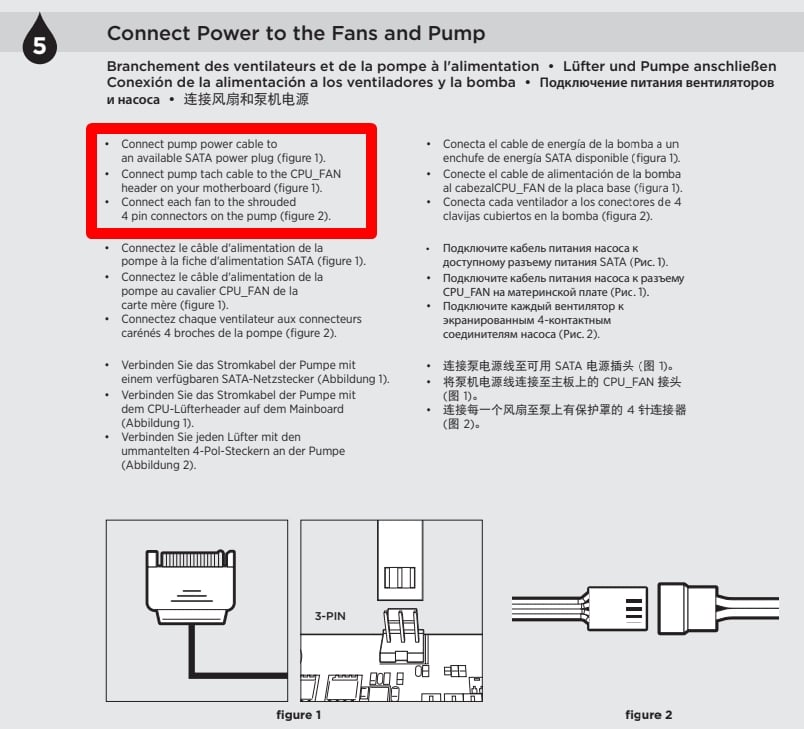
Improper cable connections cause 70% of “my PC won’t boot” scenarios after cooler installation. The pump must connect to the CPU_FAN or dedicated AIO_PUMP header on your motherboard—plugging it into a SYS_FAN header often prevents the system from POSTing. The pump connector is typically thicker than standard fan connectors; don’t force it into the wrong header.
Managing RGB and Fan Connections
Connect the pump’s RGB cable to your motherboard’s 3-pin ARGB header or Corsair’s Commander CORE if included. Radiator fans should connect to either a fan hub or directly to SYS_FAN headers—never chain more fans than your motherboard can power (usually 1-2 fans per header). Route all cables along the case’s built-in channels, securing them with zip ties at 2-inch intervals to prevent vibration noise and maintain clean airflow paths. Leave slight slack in tubing near connections to prevent strain that could cause leaks over time.
Performing Critical First Boot Tests
Before closing your case, verify your installation with these essential checks: Power on the system with the side panel removed and watch the pump LED (if equipped)—most Corsair pumps illuminate immediately upon power-up. Enter BIOS and confirm the CPU_FAN header shows 2000-2700 RPM (indicating pump operation). Check CPU temperature—it should read 30-45°C at idle. If temperatures exceed 50°C immediately after boot, power down and recheck water block mounting and thermal paste application.
Monitoring for Air Bubbles During Initial Operation
Expect some gurgling sounds during the first 24-48 hours as air bubbles work their way out of the system—this is normal. To accelerate the de-airing process, tilt your case gently in different directions while the system runs, allowing bubbles to rise to the highest point in the loop. Never exceed a 45-degree angle to prevent pump cavitation. If loud pump noises persist beyond 72 hours, power down and remount the radiator with the pump at the absolute lowest point in the loop.
Troubleshooting Common Installation Issues
When your PC fails to boot after installation, 9 times out of 10 it’s because the pump isn’t connected to the CPU_FAN header. Double-check this connection first before disassembling your entire build. If temperatures seem higher than expected, power down and remount the water block—uneven pressure from improper tightening creates hot spots on the CPU surface. For persistent air bubble noises, try running your system vertically (like a server) for 24 hours to help bubbles rise out of the pump chamber.
Preventing Long-Term Maintenance Problems
Schedule quarterly visual inspections of your tubing for cloudiness (indicating degraded coolant) and check all connections for tightness. Most Corsair AIO coolers last 3-5 years before thermal performance degrades significantly—don’t wait for failure to plan your next upgrade. Never remove the water block while the system is powered or even recently powered off; trapped heat can vaporize coolant and cause sudden pressure release when unmounted.
Following these precise steps ensures your Corsair liquid cooler delivers maximum cooling performance without risking component damage. The initial installation takes 45-60 minutes for first-time builders, but the payoff—lower temperatures, quieter operation, and enhanced system stability during intensive workloads—is well worth the effort. Always consult your specific Corsair model’s manual for any unique requirements before beginning your installation.


