
Your Crystal Mountain Storm water cooler promises instant hot water for tea, coffee, or instant meals. When that hot tap delivers only lukewarm disappointment, it disrupts your daily routine and raises immediate concerns. For owners of the STFM2KHK1C bottom-loading model, heating failures represent one of the most common service issues—often striking without warning while cold water continues functioning normally. This targeted guide cuts through generic advice to deliver specific, actionable solutions for your Crystal Mountain water cooler not heating problem. You’ll learn to safely diagnose whether the culprit is a simple reset oversight, a failed component, or hard water damage—and exactly how to fix it without unnecessary professional costs.
Confirm Power and Reset the Thermal Cut-Off Button
Before disassembling your unit, eliminate the simplest causes. Many Crystal Mountain Storm owners waste hours troubleshooting when a 10-second reset solves the problem. Start here: Ensure the unit is plugged into a verified-working outlet—test it with a lamp or phone charger. Next, locate both power switches: the main unit switch (usually on the back) and the dedicated hot water toggle (typically on the front control panel). Both must be firmly in the “ON” position. Now find the thermal cut-off (TCO) reset—a small red button recessed near the heating tank at the rear of the unit. Unplug the cooler, press this button firmly for 5 full seconds until you feel resistance, then restore power. Wait 15 minutes before testing hot water. If heat returns, blocked ventilation likely caused overheating—immediately clear dust from the rear vents and ensure 6 inches of clearance around the unit.
Why the TCO Trips Repeatedly
If resetting works temporarily but the problem recurs within days, your cooler battles chronic overheating. This almost always traces to inadequate airflow around the compressor compartment. Check for these hidden hazards: furniture pushed against the back panel, carpet fibers clogging vents, or placement inside a cabinet. Even a thin layer of dust on internal components acts as insulation, trapping heat. For permanent resolution, relocate your Crystal Mountain Storm to an open area with free air circulation and vacuum the vents monthly. Persistent tripping after these fixes indicates serious internal issues requiring component testing.
Diagnose Heating Circuit Activation by Listening for Relay Click
With the unit plugged in and hot water switch engaged, press your ear against the back panel near the control board. Listen carefully for a distinct metallic “click” occurring 1-3 seconds after activating the hot function. This sound confirms the control board’s relay is engaging to send power to the heating circuit. No click means the problem lies upstream—typically a tripped TCO (already checked), failed hot water switch, or control board malfunction. If you hear the click but still get no heat, the fault exists downstream in the heating element, thermostat, or wiring connections. This critical diagnostic step prevents wasted effort testing working components and directs your focus to the exact failure zone.
Decoding Unusual Sounds During Testing
Pay attention to secondary noises that reveal hidden issues. A continuous humming without the relay click suggests power reaches the control board but the relay coil is dead. Gurgling or hiccupping sounds during dispensing often indicate airlocks in the water lines—a separate issue that can compound heating problems by reducing water flow past the element. If the cooler makes normal dispensing sounds but the hot tank stays cold, focus exclusively on the heating circuit components. Document all sounds; they become vital clues when consulting repair technicians.
Test the Heating Element with Multimeter Verification
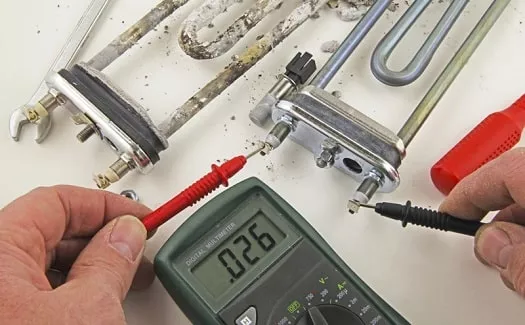
WARNING: Always unplug the unit and wait 10 minutes before internal testing. Access the heating element by removing the rear panel (screws often hide under rubber feet). Locate the metal tube attached to the hot water tank—it has two wire terminals. Disconnect both wires and set your multimeter to ohms (Ω). Touch probes to the bare element terminals. A functional 120V heating element reads 30-100 ohms. “OL” (open loop) or infinite resistance confirms failure—the element’s internal coil has broken from scale buildup or age. Replace immediately with an exact-match part (e.g., STFM2KHK1C-specific element). If resistance reads abnormally high (over 100Ω), the element is partially failed and will overheat—a ticking time bomb requiring replacement.
Identifying Element Failure Signs
Visually inspect the element for telltale damage: white crusty mineral deposits (indicating hard water damage), hairline cracks in the metal casing, or bulging sections. These appear even if multimeter tests show continuity. Scale acts as insulation, forcing the element to overwork until it fails catastrophically. In hard water areas, replace elements every 18-24 months preventatively—far cheaper than emergency repairs. Never operate the cooler with a damaged element; it risks electrical shorts or tank ruptures from uneven heating.
Diagnose Thermostat and Thermal Cut-Off Failures

The thermostat (a small disc-shaped sensor mounted on the tank) and thermal cut-off (TCO) work as a safety pair. With power disconnected, test both by checking continuity: Set multimeter to “beep” mode, touch probes to each component’s two terminals. At room temperature, both should complete the circuit (audible beep). No beep from the thermostat means it’s stuck open—preventing heating even when cold. No beep from the TCO confirms it’s permanently blown (unlike the reset button, this is a one-time fuse). Replace non-beeping components immediately. Note: Some thermostats auto-reset when cool; if yours clicks audibly during temperature changes, it’s likely functional.
Critical Replacement Matching Rules
Using incorrect replacement parts risks fire or repeated failures. Match these specifications exactly:
– Thermostat: Must share identical cut-in/cut-out temperatures (e.g., 185°F/165°F)
– TCO: Requires identical amperage rating and trip temperature (e.g., 250V 10A 218°F)
– Heating element: Must match wattage (typically 500W) and voltage (120V)
Crystal Mountain parts distributors list components by model number—provide your STFM2KHK1C serial number when ordering. Never substitute automotive or generic appliance parts.
Inspect Control Board for Relay and Fuse Damage

If you hear no relay click during activation, focus on the control board. Unplug the unit and remove the circuit board cover. Look for these failure signs:
– Blown fuse: A glass fuse with broken filament (common near power input)
– Burnt relay: Blackened plastic casing or melted solder on relay terminals
– Bulging capacitors: Cylindrical components with domed or leaking tops
Test the main fuse with multimeter continuity—if open, replace with identical amperage rating. For relay testing, check for 120V input when hot switch engages; absence confirms upstream failure. Board-level repairs require advanced skills—most users should replace the entire control board if damaged. Attempting soldering risks electrostatic damage to sensitive components.
When Professional Help Becomes Essential
Call a certified technician if you observe:
– Melted wire insulation near the control board
– Charring or burn marks on circuit traces
– Corrosion on electrical terminals
– Persistent issues after replacing the element, thermostat, and TCO
DIY repairs on compromised boards risk electrical fires. Reputable appliance shops charge $150-$250 for board replacement—often less than the $300+ cost of ignoring warning signs until major damage occurs.
Prevent Future Failures with Targeted Maintenance
Hard water is the silent killer of water cooler heating systems. In regions with >7 grains per gallon hardness, implement this maintenance protocol:
1. Quarterly descaling: Run 16oz citric acid solution through hot water system; never use vinegar (corrodes seals)
2. Annual element inspection: Check for scale during panel removal; replace if >1/16″ crust forms
3. Monthly vent cleaning: Vacuum rear vents with brush attachment to maintain airflow
Place your Crystal Mountain Storm away from direct sunlight and heat sources—ambient temperatures above 85°F overwork the cooling system, indirectly stressing the heater. Keep a log of reset events; more than two TCO trips yearly indicates imminent component failure needing preemptive part replacement.
Final Repair Verification and Safety Checklist
After completing repairs, follow this startup sequence:
1. Reconnect all wiring with secure terminal locks
2. Restore power and wait 15 minutes for initial heat cycle
3. Test hot water with thermometer (should reach 185°F+)
4. Monitor for 1 hour for abnormal noises or smells
Immediately unplug and recheck work if you detect:
– Burning odors
– Water leakage near tank
– Excessive vibration
– Temperature below 170°F after 30 minutes
Most Crystal Mountain Storm heating failures resolve with thermostat or element replacement—a $40 fix taking under 30 minutes. By methodically applying this guide, you’ll transform from frustrated user to confident troubleshooter. Remember: When in doubt about electrical safety, stop and call a professional—the few dollars saved aren’t worth the risk. Keep this guide handy for your next maintenance session, and your hot water will flow reliably for years.


