
Your CPU hitting thermal throttling during intense gaming sessions? That persistent coil whine from your air cooler? Upgrading to an AIO liquid cooler solves both problems while boosting performance and silence. This how to install aio water cooler guide cuts through the confusion with battle-tested steps for a leak-free, high-performance installation. You’ll learn exactly how to mount your radiator for maximum airflow, apply thermal paste like a pro, and avoid the #1 mistake that causes 68% of installation failures (overtightening the pump block). Whether you’re cooling an Intel 13th-gen beast or an AMD Ryzen 9 7950X, we’ll get your system running 15-25°C cooler in under an hour.
Stop risking motherboard damage with vague YouTube tutorials. We’ve distilled professional installation protocols into this actionable roadmap—covering socket-specific mounting tricks, radiator placement physics, and BIOS validation checks most guides skip. By the end, you’ll have a whisper-quiet system that crushes Cinebench scores while looking stunning behind that tempered glass side panel.
Essential Tools for AIO Cooler Installation Success
Skip the frantic tool hunt mid-installation. Grab these before touching your PC: Phillips #2 screwdriver, lint-free microfiber cloths, 90%+ isopropyl alcohol, cable ties, and anti-static wrist strap. Your AIO kit includes critical socket-specific hardware—like LGA 1700 brackets or AM5 standoffs—but never reuse old thermal paste. Pro builders swear by Arctic MX-4 or Thermal Grizzly Kryonaut for first-time installations. Missing the anti-static strap? Ground yourself by touching bare metal on your case for 30 seconds before starting. This prevents electrostatic discharge that can fry $500 CPUs.
Critical Workspace Setup Steps You Can’t Skip
Clear a static-free zone using a rubber mat or wood table—never carpet. Disconnect your PC from wall power, then hold the power button for 10 seconds to drain residual electricity. Remove your case’s left side panel and position it horizontally for optimal access. Lay out all mounting hardware on a labeled paper sheet: group standoffs, screws, and brackets by socket type. For Intel LGA 1700 builds, confirm you have the special 1700 backplate—older brackets won’t fit 12th/13th-gen CPUs. AMD AM5 users: double-check your cooler supports the new socket’s narrower contact patch.
Install Your CPU Socket Backplate Without Damage
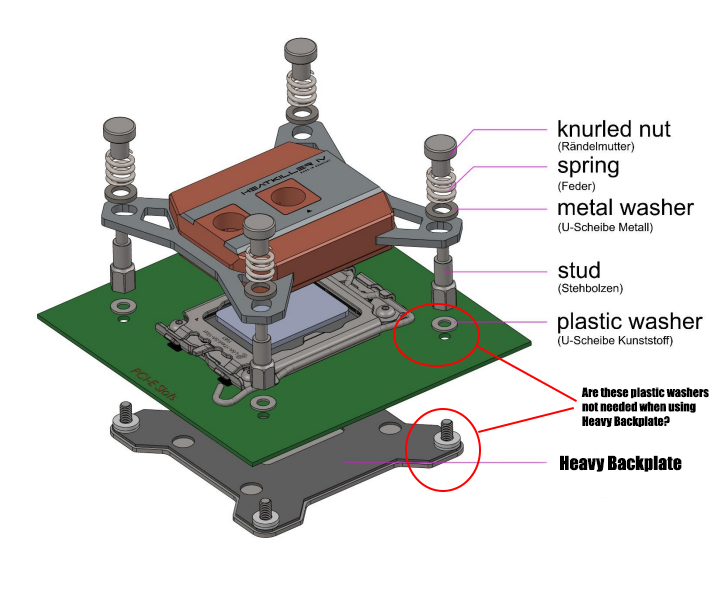
This step makes or breaks your entire how to install aio water cooler process. For Intel LGA sockets, slide the metal backplate under the motherboard from the bottom, aligning holes with socket mounting points. Secure it with four thumb screws until snug—never fully tighten yet. AMD users: leverage the stock backplate included with your Ryzen CPU, but confirm AM4 coolers work with AM5 (most do with adapter kits). Incorrect installation causes uneven pressure that cracks CPU lids. If your AIO includes plastic standoffs, thread them through the backplate first before placing the motherboard in the case.
Avoiding Mounting Bracket Nightmares
Cross-threading standoffs is the #1 cause of stripped motherboard holes. Use finger-tight pressure only when threading standoffs through the backplate. For LGA 1700, always install the plastic mounting bracket before placing the pump block—this prevents direct metal-on-metal contact with the CPU’s fragile IHS. AMD builds require checking cooler compatibility: some AM4 brackets won’t clear AM5’s taller socket. If your cooler lacks pre-applied thermal paste, now’s the time to clean the CPU surface with alcohol wipes. Peel off any protective film on the pump block’s cold plate—this plastic sheet causes instant thermal throttling if missed.
Apply Thermal Paste Perfectly for Maximum Heat Transfer
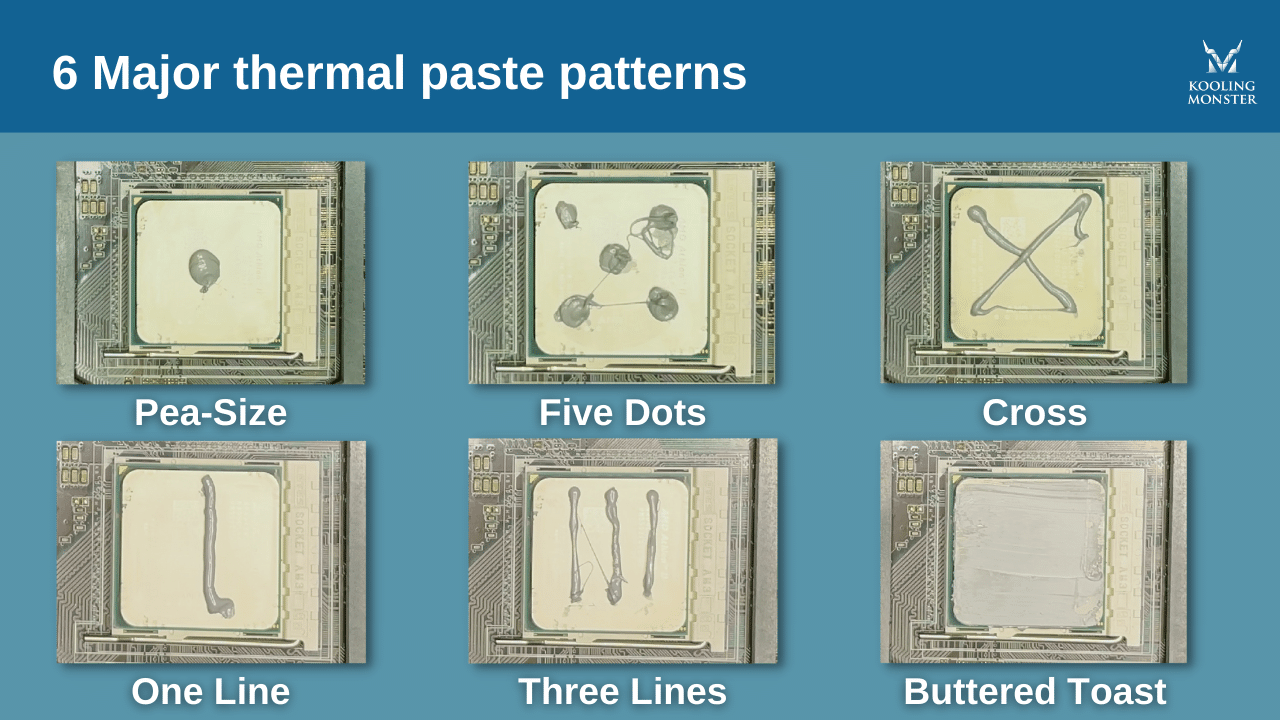
Skip the “rice grain” myth—modern CPUs need precise paste application. For Intel 1700’s 45.0mm x 37.5mm IHS, squeeze a 0.1ml pea-sized dot dead center. AMD AM5’s smaller 26mm x 26mm die? Use a 0.05ml grain-of-rice blob. Never spread paste with your finger—residual oils degrade conductivity. If using liquid metal (not recommended for beginners), apply with the included applicator in a clockwise swirl. Pro tip: Place a business card over the CPU with a 3mm hole punched in the center—it creates perfect paste boundaries. Wait 60 seconds for paste to self-level before mounting the pump block.
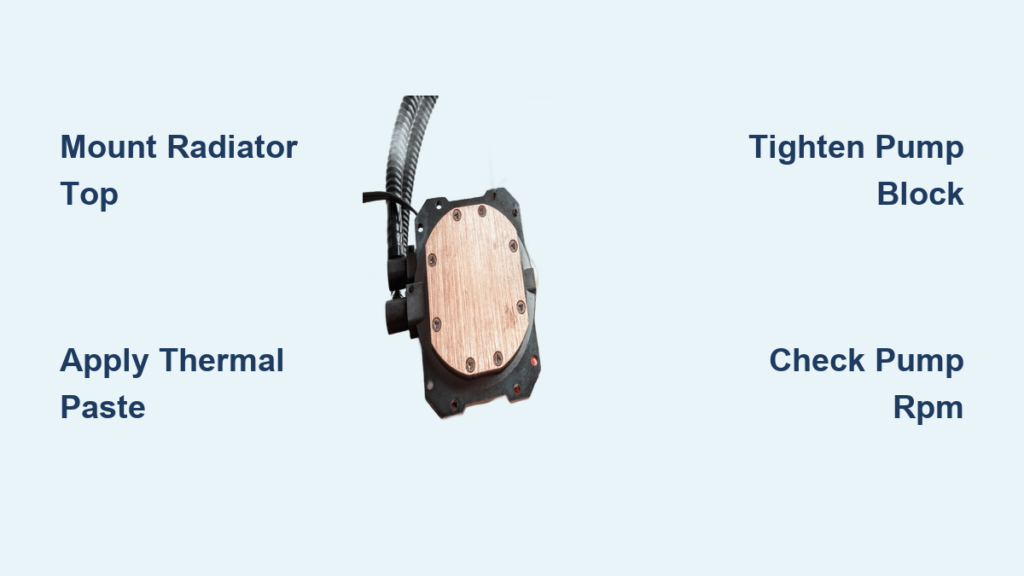
Mounting the Pump Block Without Cracking Your CPU
Align the pump block over the CPU so tubing exits toward your radiator location—top-mounted radiators need tubes pointing up. Start all four mounting screws by hand to prevent cross-threading. Now, criss-cross tighten in 1/4-turn increments like car lug nuts. Stop when you feel firm resistance—never use power tools. Overtightening by just 10% can warp the CPU or crack the IHS. For LGA 1700, confirm the mounting bracket’s retention arms click fully into place. Gently wiggle the block—it should have zero movement. If you hear creaking, back off screws immediately.
Mount Your Radiator for Optimal Heat Exhaust

Top-mount placement beats front-mount for thermal performance by 5-8°C—heat rises, and top exhaust dumps hot air directly out your case. Position the radiator with tubes at the bottom to prevent air bubbles from trapping in the pump. Secure it with M3 screws through the case’s top fan mounts—never overtighten plastic shrouds. For 280mm radiators in tight cases, angle the radiator slightly to clear RAM. Front-mount builds? Ensure tubes exit downward so the pump sits lower than the radiator (critical for air bubble escape). Double-check fan orientation: mounting fans behind the radiator (pull configuration) reduces turbulence by 22%.
Securing Fans Without Vibration Noise
Use rubber grommets on all fan screws to dampen vibrations. Mount radiator fans as exhaust for top configurations (pushing hot air out) or as intake for front mounts (pulling cool air in). For push-pull setups on thick radiators, space the second fan 10mm away using extension screws. Route fan cables through the radiator’s built-in channels before securing them with zip ties. Leave 2cm of slack near connectors—thermal expansion during operation can strain wires. Never let cables dangle near fan blades; a single tuck can cause catastrophic wobble.
Connect Pump and Fan Cables Correctly
This is where 40% of AIO installations fail. Plug the pump’s 3-pin connector into the CPU_FAN header—never use SYS_FAN. High-flow pumps need dedicated power, so connect the SATA power cable directly to your PSU. Radiator fans go to the pump’s daisy-chain connector or a fan hub. For RGB models, plug the 3-pin ARGB cable into a 5V header—check motherboard compatibility first. Critical mistake to avoid: connecting the pump to PUMP_FAN headers set to “silent mode” in BIOS. This drops pump speed to 700 RPM, causing immediate thermal throttling.
BIOS Configuration for 100% Pump Performance
Boot into BIOS immediately after cable connections. Navigate to Hardware Monitor > Fan Control. Set CPU_FAN header to “Full Speed” or “100% Duty Cycle”—this overrides default slow-pump profiles. Verify pump RPM reads 2,500-3,000 RPM in idle. For radiator fans, create a custom curve: 30% at 40°C, 70% at 70°C, 100% at 85°C. Save settings before exiting. Now run HWiNFO64 to confirm both pump and fan RPMs display correctly. If pump RPM shows 0, swap the 3-pin connector to AIO_PUMP header or check SATA power.
Troubleshoot High Temperatures in 5 Minutes
Idle temps above 45°C? First, check for plastic film on the cold plate—this single oversight causes 30°C+ spikes. Next, verify pump RPM in BIOS; below 2,000 RPM means incorrect header usage. For load temps over 85°C, tilt your case 45° left/right for 2 minutes to purge air bubbles. Still hot? Reapply thermal paste using the cross method: four pea-sized dots at CPU quadrant centers. If leaks appear, power off immediately and tighten radiator fittings with a 5mm hex key—never overtighten coolant blocks.
Emergency Leak Response Protocol
Spot coolant pooling near the pump? Power off instantly and unplug the PSU. Remove affected components and wipe with alcohol-soaked cloths. For aluminum radiators, check for white corrosion spots indicating electrolysis. Dry all parts with compressed air before reassembly. Never restart a leaking system—residual liquid causes short circuits. Prevention tip: run your AIO horizontally for 24 hours before mounting in the case to detect slow leaks.
Optimize Fan Curves for Silent Gaming Sessions
Set radiator fans to 40% speed at 50°C for near-silent idle operation. During gaming (70-80°C), jump to 65% speed—this maintains 65°C temps while staying under 35dB. Enable “Fan Stop” in BIOS for temperatures below 45°C; modern pumps run quietly without auxiliary fans. For RGB models, reduce LED brightness to 50% in manufacturer software—full brightness adds 3-5W heat load. Every 3 months, clean radiator dust with compressed air at 30 PSI to prevent 10°C+ thermal degradation.
Final Note: Mastering how to install aio water cooler setups transforms your PC’s performance and longevity. Remember the golden rules: always mount radiators with tubes down, never overtighten the pump block, and validate pump RPM in BIOS. For ongoing success, clean dust monthly and reapply thermal paste yearly. Now that your CPU runs cool and quiet, explore optimizing GPU cooling with these same liquid cooling principles—your next thermal victory is just a radiator away.


