
You’ve probably tried using a flimsy store-bought step stool that wobbled under your weight or worse—collapsed completely. Building your own wooden step ladder isn’t just about saving money; it’s about creating a tool that safely supports your weight for years to come. This guide will show you exactly how to build a wooden step ladder that won’t fail when you need it most, following structural principles professional builders use. You’ll learn why most DIY ladders fail and the specific techniques that transform ordinary lumber into a rock-solid, reliable step ladder.
Why Your DIY Wooden Step Ladder Failed to Support Weight (And How to Fix It)
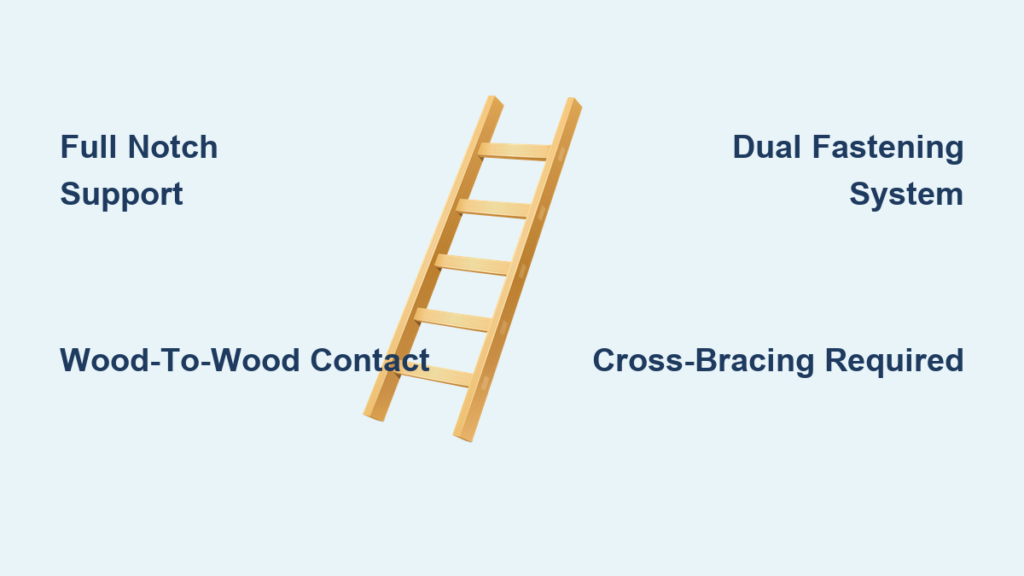
Most homemade step ladders fail because they rely on screws to carry the load rather than proper wood-to-wood contact. When you step on a tread, the force needs a direct path to the ground, not through fasteners that can shear under pressure. The critical mistake 90% of DIYers make is using butt joints where two pieces simply meet end-to-end, held only by screws in shear—that’s like trusting a paperclip to hold your car together.
The solution is simple but non-negotiable: Every tread must sit fully within notches cut into the side rails, creating wood-to-wood contact that transfers weight directly downward. Screws and bolts serve only to clamp the pieces together, not to bear your weight. For a 4-step ladder that reaches 4 feet high, this means cutting precise notches that completely support each tread along its entire length.
Your ladder’s structural integrity depends on this single principle. Without proper notching, even the highest-quality lumber and strongest fasteners will eventually fail under repeated use. When building your wooden step ladder, always ask: “How does this weight get to the ground?” If the answer involves screws bearing tension, you’ve created a dangerous failure point.
The 3 Structural Rules That Prevent Wooden Step Ladder Collapse
Wood-to-Wood Contact Must Carry the Load, Not Fasteners
Your wooden step ladder must transfer weight through direct wood contact, not through screws alone. For every tread, cut a full notch that allows the tread to sit completely within the side rail. The notch depth should equal half the tread thickness—typically 1.25 inches for standard 2×4 lumber. This creates a bearing surface that transfers your weight directly downward through the wood, not through the shear strength of screws.
Visual cue: When properly notched, you shouldn’t see the tread ends protruding beyond the side rail. The top surface of the tread should be flush with the top edge of the side rail, creating a continuous walking surface.
Continuous Load Path from Top to Ground
Every component must create an unbroken path for weight to travel from the top platform to solid ground. This means no cantilevered treads (where part of the tread extends beyond support) and no single-point failures. For a 4-step ladder, this requires:
– Twin 2×4 uprights for legs (not single)
– Continuous stringers that run from top to bottom
– Center support for treads wider than 24 inches
Pro tip: Test your design by tracing a finger from the top platform down to the ground. If your finger ever “falls off” the structure, you’ve got a dangerous gap in your load path.
Dual Fastening System for Critical Joints
Critical connections require at least two independent fastening methods. For tread-to-rail joints, this means:
1. Wood-to-wood contact through proper notching
2. Structural screws (minimum 3″) driven through the rail into the tread end
3. Optional but recommended: Wooden or metal brackets underneath for heavy-duty ladders
Warning: Never rely on a single fastening method for load-bearing connections. This is the difference between a ladder that lasts decades and one that fails catastrophically.
Required Lumber Types and Dimensions for a 4-Step Wooden Ladder
Uprights and Legs: The Foundation of Your Step Ladder
For a 4-step wooden step ladder reaching approximately 4 feet high, use these specifications:
– Leg construction: Twin 2×4 uprights connected with cross-bracing (never single 2x4s)
– Lumber grade: No. 2 or better pressure-treated pine (KDAT – Kiln Dried After Treatment)
– Moisture content: Less than 19% to prevent warping after construction
– Critical check: Reject any boards with large knots within 6 inches of connection points
Time estimate: Allow 30 minutes to carefully select and inspect lumber at the home center. Your wooden step ladder’s safety depends entirely on starting with quality materials.
Treads and Stringers: The Critical Walking Surface
For safe treads that won’t flex or break:
– Tread material: 2×4 or 2×6 construction-grade lumber (actual dimensions 1.5″ x 3.5″ or 1.5″ x 5.5″)
– Stringer requirements: 2×6 lumber with precisely cut notches for each tread
– Tread spacing: 7-8 inches vertical rise between steps (measured from top to top)
– Platform depth: Minimum 12 inches for top platform (16 inches recommended)
Visual cue: When holding your stringer upright, the notches should form a continuous “staircase” with no gaps where the tread could shift under weight.
10 Must-Have Tools for Building a Sturdy Wooden Step Ladder
Cutting and Measuring Essentials
- Tape measure with locking mechanism (25-foot minimum)
- Framing square for precise 90-degree marking
- Speed square for marking consistent tread positions
- Circular saw with carbide-tipped blade (minimum 50 teeth)
- Jigsaw for cutting precise notches in stringers
Fastening and Safety Equipment
- Power drill/driver with torque control
- 3″ structural deck screws (not drywall screws!)
- 3/8″ drill bit for pre-drilling to prevent splitting
- Socket set for lag bolts on critical connections
- Safety glasses, hearing protection, and dust mask
Pro tip: Invest in a 3″ deck screw driver bit—it saves hours of frustration and prevents stripped screw heads during construction of your wooden step ladder.
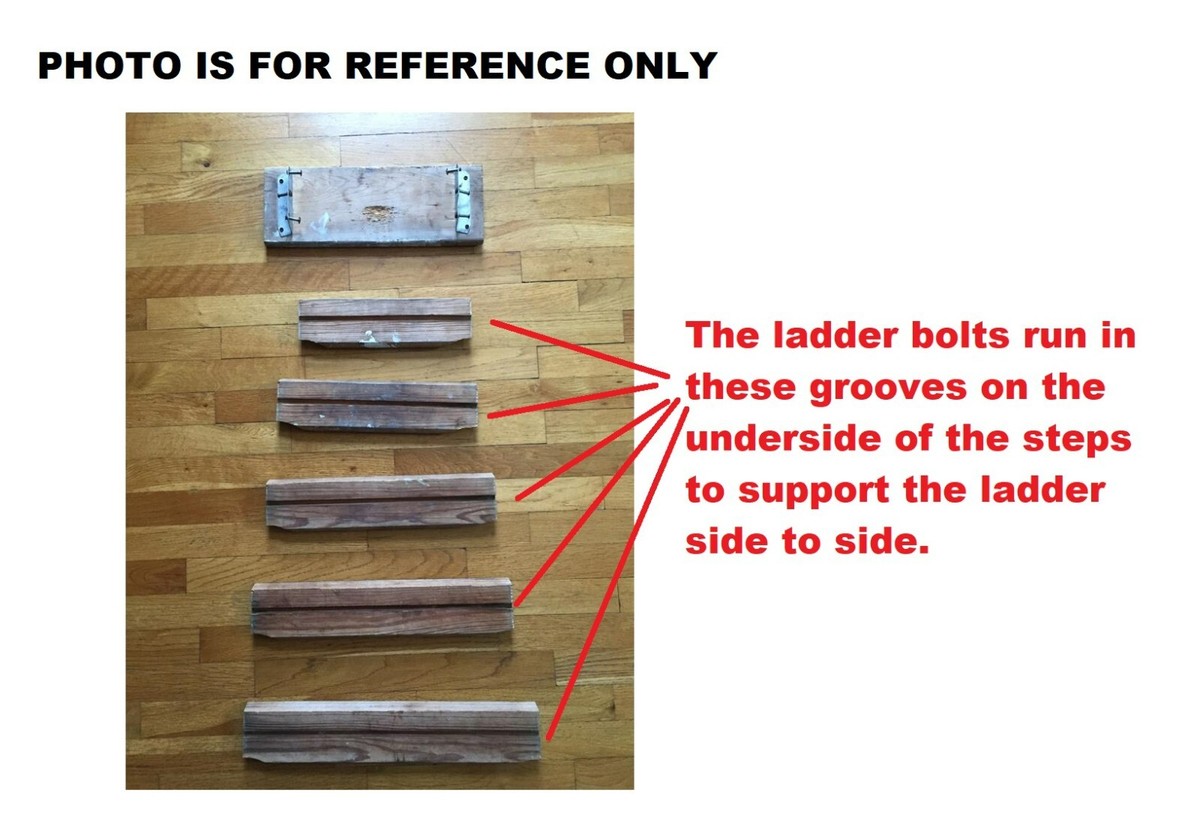
How to Cut Side Rails with Proper Tread Notches for Maximum Load Capacity
Measuring and Marking Tread Positions
- Establish your baseline: Mark a horizontal line across both ends of your stringer board
- Set your rise: Using a framing square, mark the first tread position 7.5 inches up from the bottom
- Step the square: Slide the square up by the same measurement for each subsequent tread
- Mark the notches: Use the square to draw perpendicular lines for the front and back of each notch
Critical detail: The notch depth must equal half the tread thickness. For 2×4 treads (1.5″ actual thickness), cut a 0.75″ deep notch. This ensures the tread sits flush with the stringer’s top edge.
Cutting Perfect Tread Notches
- Make parallel cuts: With your circular saw set to the notch depth, make cuts along both sides of each notch
- Remove waste material: Use a chisel or jigsaw to remove the wood between your parallel cuts
- Test fit each tread: The tread should slide into the notch with snug pressure—no gaps
- Adjust as needed: Sand or chisel for perfect fit before final assembly
Warning: Never cut notches deeper than half the stringer thickness—that weakens the structural integrity of your wooden step ladder. A 2×6 stringer (1.5″ actual thickness) should never have notches deeper than 0.75″.
Why Butt Joints Cause Step Ladder Collapse (And the Proper Joint Techniques)
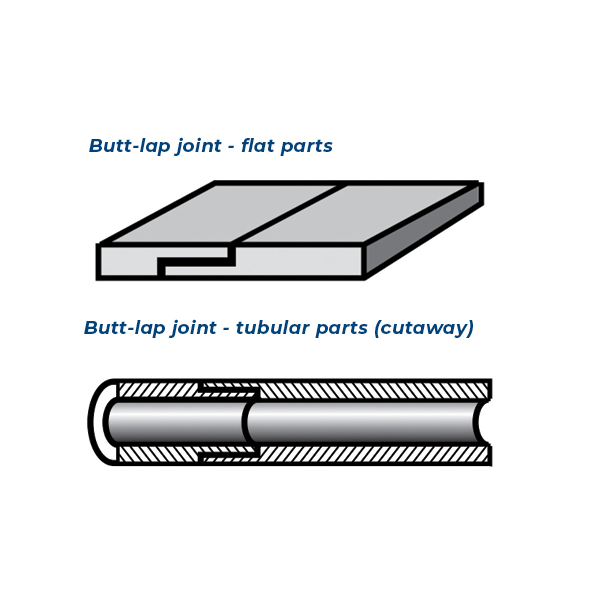
The Fatal Flaw of Butt Joints
When you simply butt a tread against a stringer and secure it with screws, you’ve created a single-shear joint where the screws must resist your entire body weight. Under load, these joints inevitably fail as the wood crushes around the screw holes or the screws themselves shear. This is why so many DIY step ladders collapse after minimal use.
Visual evidence: Examine any failed step ladder—you’ll find crushed wood fibers around the screw holes where the tread connected to the stringer. The wood failed, not the screws.
Proper Joint Techniques for Permanent Strength
Full Lap Joint (Recommended for All Treads)
- Cut a notch in the stringer equal to half the tread thickness
- The tread sits fully within this notch, bearing weight through wood contact
- Add 2-3 structural screws through the stringer into the tread end
- Strength advantage: Transfers 90% of load through wood contact, not fasteners
Through-Tenon at Critical Connections
- For the top platform connection, extend the rail through the upright
- Secure with a 3/8″ bolt and washer on both sides
- Strength advantage: Creates a mechanical lock that prevents racking
Pro tip: For heavy-duty ladders, add a small wooden wedge in the tread notch before securing with screws. This creates additional compression that prevents any movement under load.
Step-by-Step Assembly: Building a Wobble-Free Wooden Step Ladder Frame
Critical Pre-Assembly Checklist
- All notches cut and tested for proper tread fit
- All lumber sanded smooth, especially edges
- All screw holes pre-drilled to prevent splitting
- Work surface perfectly level for assembly
Time estimate: Allow 2 hours for careful assembly of a 4-step wooden step ladder. Rushing this process creates weak points that compromise safety.
Frame Assembly Sequence
- Lay out both side assemblies: Place stringers face down on a flat surface
- Install bottom tread first: Apply wood glue to notches, insert tread, secure with screws
- Work upward: Install treads from bottom to top to maintain alignment
- Check for square: Measure diagonally across the assembly—both measurements must match
- Add cross-bracing: Install diagonal brace between side assemblies before final assembly
Visual cue: As you add each tread, run your hand along the top edge—you should feel a perfectly continuous walking surface with no bumps or gaps between treads and stringers.
7 Non-Negotiable Safety Features for Your DIY Wooden Step Ladder
Anti-Slip Tread Surfaces
- Minimum requirement: 1/8″ grooves cut across each tread
- Professional option: Apply non-slip tape to the front 2 inches of each tread
- Critical check: Test with wet shoes before first use
Proper Top Platform Design
- Never create a “step” at the top: The platform must be a continuation of the steps
- Minimum platform size: 12″x12″ (16″x16″ recommended for safety)
- Overhang rule: Platform should extend at least 2 inches beyond the front edge
Critical Stability Features
- Diagonal cross-bracing to prevent side-to-side wobble
- Pivoting spreaders that lock securely when opened
- Leveling feet for uneven surfaces
- Handrails at 34″-38″ height for safe access
Warning: A wooden step ladder without proper cross-bracing will rack (twist) under load, creating dangerous instability. This single feature prevents most common ladder failures.
The 5-Minute Load Test That Could Save Your Life Before Using a New Step Ladder
Progressive Load Testing Protocol
- Start with 50% of expected weight: Apply pressure to each tread individually
- Listen for creaks or cracks: Any unusual sound indicates a weak point
- Check for movement: Place a level on each tread—no more than 1/8″ deflection allowed
- Apply full weight slowly: Shift your weight side-to-side to test stability
- Final inspection: Tighten all fasteners after initial load testing
Critical step: Never skip this test. A properly built wooden step ladder should show zero movement under your full body weight. If you feel any flex or hear any sounds, disassemble and reinforce the weak points before proceeding.
Top 5 Wooden Step Ladder Construction Mistakes That Create Dangerous Failures
Mistake #1: Using Drywall Screws Instead of Structural Fasteners
- Why it fails: Drywall screws lack the shear strength for structural connections
- Safe alternative: 3″ structural deck screws or 1/2″ lag bolts for critical joints
- Visual identification: Drywall screws have smooth shanks; structural screws have full threads
Mistake #2: Skipping the Center Support on Wide Ladders
- Why it fails: Treads wider than 24 inches will sag and eventually break without center support
- Safe alternative: Add a center stringer for ladders wider than 24 inches
- Pro tip: For a 24-inch wide ladder, the center support should be offset 1 inch to avoid splitting
Mistake #3: Ignoring End Grain Sealing
- Why it fails: Unsealed end grain absorbs moisture, causing rot at critical connection points
- Safe alternative: Apply two coats of end grain sealer to all cut ends before assembly
- Time investment: Adds only 15 minutes but doubles outdoor ladder lifespan
Expert note: The difference between a ladder that lasts 2 years versus 10+ years comes down to these seemingly small details. Your wooden step ladder deserves the same attention to detail as a professional builder would provide.
How to Finish and Maintain Your Wooden Step Ladder for 10+ Years of Safe Use
Proper Initial Finishing
- Sand all surfaces to 120-grit smoothness
- Round all edges slightly to prevent splinters
- Apply wood preservative to all surfaces, especially end grain
- Finish with exterior-grade sealant (3 coats for outdoor use)
Annual maintenance checklist:
– Tighten all fasteners
– Inspect for cracks or rot, especially at ground contact points
– Reapply sealant to worn areas
– Perform load test with 150% of expected weight
– Check spreader mechanism for smooth operation
Final safety tip: Before each use, perform a 30-second inspection—check for loose fasteners, cracks, and ensure the ladder sits level on the ground. Your wooden step ladder is only as safe as its last inspection.
Final Note: A properly built wooden step ladder following these structural principles will support 300+ pounds safely for decades. Remember: wood carries the load, not fasteners. When you’ve finished your ladder, ask yourself the professional builder’s test: “Would I let my children use this unsupervised?” If the answer is yes, you’ve built a step ladder worthy of trust. Always prioritize safety over speed—your life depends on it.


