
Your table saw sled sits unused in the corner because you’re stuck on the most critical question: how big should a table saw sled be? This isn’t just about measurements—it’s about whether your next crosscut will be perfectly square or dangerously inaccurate. A poorly sized sled forces you to wrestle with unstable panels, compromises safety when cutting small parts, and wastes precious shop space. After building dozens of sleds, I’ve seen woodworkers waste weeks on oversized jigs that dominate their workspace or dangerously undersized ones that can’t handle basic cabinet panels. The solution isn’t guesswork—it’s matching your sled dimensions to your specific saw, projects, and shop constraints. By the end of this guide, you’ll know exactly how to size your sled for flawless results on furniture builds, sheet goods, and delicate joinery.
Measure Your Saw First: Non-Negotiable Sizing Limits
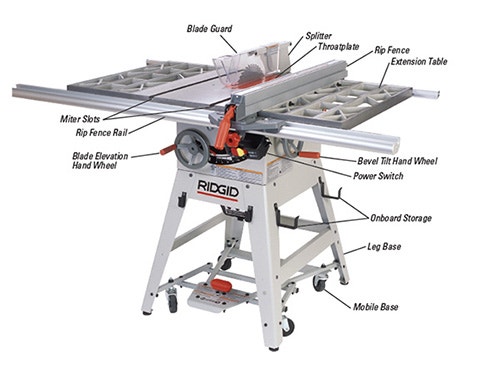
Your table saw’s physical dimensions dictate the absolute boundaries for your sled. Ignoring these leads to unusable jigs that bind in miter slots or overhang dangerously. Start with these measurements before cutting a single piece of plywood.
Calculate Your Maximum Sled Footprint
Your saw’s rip capacity and table depth create hard limits that many woodworkers overlook. Measure from the blade to your saw’s right extension edge—this determines your sled’s maximum width. For example, a saw with 24″ rip capacity allows a sled up to 24″ wide from blade center to right runner. Crucially, add 4-6″ beyond your maximum workpiece width for safety clearance. If you cut 18″ wide panels, build for 22-24″ capacity. Similarly, table depth dictates sled depth: measure from front to back of your saw table. A common 26″ deep Craftsman table with 12″ extension gives you 38″ maximum depth—but remember the blade must fully clear the front and rear fences. Skimp here, and you’ll face chip-out or blade binding.
Avoid the Blade Proximity Trap
Many woodworkers position fences too close to the blade, creating dead zones where small parts can kick back. Your front fence must sit at least 1.5x your blade diameter ahead of the blade—typically 10-12″ for standard 10″ blades. This creates a stable reference surface while keeping hands clear. For rear fences, maintain 8-10″ clearance behind the blade to prevent workpiece binding during exit. I’ve seen countless sleds fail because builders copied online plans without adjusting for their specific blade position. Measure your saw’s blade-to-front-edge distance first—this single number prevents dangerous design flaws.
Match Sled Size to Your Actual Projects (Not “Someday” Dreams)

Building a sled for theoretical future projects creates storage nightmares. Your most frequent workpieces—not rare exceptions—should drive sizing decisions. Analyze your last 10 projects to avoid over-engineering.
Furniture Builders: The 24×36″ Goldilocks Zone
If you build tables, cabinets, or case goods, a 24″ deep x 36″ wide sled handles 95% of tasks without becoming unwieldy. This size accommodates full 24″ cabinet sides from 4×8 sheet goods while remaining light enough to handle solo. The 24″ depth provides critical stability when crosscutting 3/4″ plywood—less depth risks panel flexing, leading to inaccurate cuts. When building my Shaker table last month, this size squared 2-inch-thick maple legs perfectly while leaving room for my push stick. Crucially, it stores vertically on French cleats in my 10×12 shop—unlike the 48″ panel sled I tried first that dominated my workspace.
Cabinetmakers: When You Need 30″+ Depth
For shops focused on casework and large panels, a dedicated 30-36″ deep sled becomes essential. Standard 24″ deep sleds can’t fully support 24-30″ cabinet panels, causing tear-out on the unsupported side. One cabinetmaker I worked with switched from a general sled to a 32″ deep x 40″ wide panel sled and eliminated 70% of his plywood splintering issues. Key tip: Build this sled from 1/2″ MDF in a torsion box design—adding a perimeter frame with 1/4″ plywood skin cuts weight by 40% while maintaining rigidity. Don’t try to use this for small parts; its size makes delicate work impossible.
Box Makers: The 6×24″ Safety Sled Secret
If you craft small boxes or intricate joinery, a tiny 6″ deep x 24″ wide sled is non-negotiable for safety. This shallow depth keeps hands 10+ inches from the blade during small-part crosscuts—critical when working with expensive exotic woods. A box maker friend nearly lost a finger using a full-sized sled for 2″ x 2″ pieces; his switch to this miniature jig eliminated close calls. The narrow 6″ depth also prevents workpiece tipping during thin-stock cuts. Build it from 3/4″ Baltic birch with a front fence for maximum control—this isn’t about capacity but precision and protection.
Build Smart: Avoid These Sizing Mistakes That Ruin Accuracy
Even perfectly sized sleds fail when construction ignores critical design factors. These oversights turn your precision jig into a dangerous liability.
Fence Placement Determines Safety and Function
Front fences (between you and the blade) are mandatory for small-part work—they provide longer reference surfaces and prevent kickback by trapping workpieces against the fence. For general use, rear fences work but require extreme caution with pieces under 6″ wide. Whichever you choose, both fences must be perfectly parallel to the miter slots—a 0.002″ error creates cumulative inaccuracies. During calibration, I check fence alignment with a dial indicator at three points: near the blade, front edge, and rear edge. If your 5-cut method shows errors, misaligned fences—not runner issues—are usually the culprit.
Runner Fit: The Accuracy Killers Hiding in Plain Sight
Runners that are too loose cause blade wandering; too tight creates binding. Test fit runners by sliding the sled blindfolded—it should move with consistent, light pressure across its entire travel. For 3/4″ miter slots, start with 11/16″ maple runners sanded to 0.003″ clearance. A professional cabinetmaker taught me this trick: rub chalk on runners, make a test cut, and check for rub marks revealing high spots. Never force runners into slots—that warps your entire sled base. I keep a dedicated sanding block for final runner adjustments—it’s saved three sleds from the scrap pile.
One Sled or Many? The Storage-Savvy Woodworker’s Strategy
Forget “one perfect size”—your shop needs specialized sleds. The real question is how many your space and workflow can support without creating clutter.
The Two-Sled Sweet Spot for 90% of Shops
Most woodworkers thrive with just two sleds: a 24×36″ general sled and a 6×24″ small-part sled. This combination covers everything from breaking down sheet goods to cutting box joints while minimizing storage footprint. My shop uses this setup: the general sled handles 90% of work, while the mini sled lives on a wall hook above my bench for instant access during delicate tasks. Crucially, build both with identical runner thickness so they share miter slots without adjustment. Add T-track to both for stop blocks—this eliminates the need for a third “calibration sled” since you can verify squareness on the general sled.
When to Add a Panel Sled (And How to Store It)
Only build a 30″+ deep panel sled if you break down full sheets weekly. For occasional panel work, clamp a sacrificial fence to your general sled instead. If you do need one, design it for vertical storage from day one: add 2″ x 2″ cleats along the top edge and store it on wall-mounted French cleats. A production woodworker I consulted uses a rolling cart with vertical slots—his three sleds store in 2 sq ft of floor space. Never let a panel sled sit flat; the weight distorts runners over time.
Final Decision: How to Size Your First Sled Today
Stop overcomplicating how big should a table saw sled be. Measure your two most common workpieces right now—chances are they’re under 24″ wide. Build a 24″ deep x 30″ wide general sled using 1/2″ Baltic birch, with runners precisely fitted to your miter slots. Make the front fence 10″ tall for small-part safety and incorporate T-track for stop blocks. This size fits most table saws, handles cabinet parts and furniture components, and stores vertically. After building 15+ sleds, I’ve learned the perfect sled isn’t the largest possible—it’s the one that disappears into your workflow. Start here, then add specialized sleds only when your projects demand it. Your first crosscut on a properly sized sled will prove why this measurement matters more than any other in your shop.


