
Struggling to get perfectly straight edges without a jointer? Your table saw can solve this common woodworking headache with a simple $20 jig. A table saw jointer sled transforms your existing saw into a precision edge-jointing machine, eliminating the need for expensive dedicated equipment. This indispensable jig creates flawless 90-degree reference edges for glue-ups, cabinet panels, and precise rip cuts—especially critical when working with warped or rough-sawn lumber. By the end of this guide, you’ll know exactly how to make a jointer sled for table saw operations that delivers jointer-quality results. Forget costly tools: this project takes under 90 minutes and unlocks professional results from your workshop’s workhorse machine.
How a Jointer Sled Creates Perfectly Straight Edges on Your Table Saw
Your table saw becomes a jointer by leveraging physics and precision alignment. The sled locks boards rigidly against a fence while the blade shaves high spots off uneven edges. Unlike freehand cuts where boards can twist or vibrate, the sled’s clamping system immobilizes stock completely—ensuring every pass removes consistent material. Crucially, the sled rides against your table saw’s fence (not miter slots), making the cut inherently parallel to your reference surface. This setup solves the core problem: warped boards naturally rock on a flat table, but when clamped to the sled, only the highest points contact the blade. With each pass, those high spots diminish until you achieve a dead-straight edge ready for perfect glue-ups. The result? Factory-flat edges without jointer costs or footprint.
5 Compelling Reasons to Build a Table Saw Jointer Sled Today
Eliminate $300+ Jointer Costs While Matching Its Precision
Benchtop jointers start at $250 and consume valuable shop space. Your sled replicates their core function for under $40 in materials—using toggle clamps you likely already own. More importantly, it achieves identical accuracy: when tuned properly, your sled produces edges within 0.002″ tolerance across 8-foot boards, rivaling professional machines.
Joint Wider Boards Than Your Jointer Could Handle
Most benchtop jointers max out at 6″ width, forcing you to flip boards for wider stock—a guaranteed source of alignment errors. With a sled, you’re limited only by your table saw’s capacity. Clamp 12″-wide tabletops or 4×8 sheet goods directly to the base, creating seamless reference edges in one pass.
Stop Worrying About Kickback During Edge-Jointing
Freehand jointing invites disaster: boards can twist into the blade’s backside, causing violent kickback. The sled’s clamps anchor stock immovably, removing this danger. Your hands stay 12+ inches from the blade while the fence guides the entire assembly—making edge-jointing safer than standard ripping.
Achieve Zero Tear-Out on Delicate Woods
The zero-clearance kerf you’ll cut through the sled base prevents chip-out on veneered plywood or figured hardwoods. Unlike jointers that often splinter end grain, the sled’s downward clamping pressure and fine blade passes yield glass-smooth edges—critical for visible glue lines.
Transform Rough Lumber into Precision Stock
Resawed boards from your bandsaw frequently emerge with subtle twists. The sled straightens these edges in minutes, letting you convert raw timber into cabinet-grade material. This capability alone justifies building the jig—it’s the missing link between rough milling and final dimensioning.
Tools and Materials Needed for Your Jointer Sled Build
Essential Materials Checklist
- Sled Base: 3/4″ MDF or Baltic birch plywood (12″ x 24″ minimum)
- Toggle Clamps: Two 500-lb horizontal hold-down clamps (Harbor Freight #96233 or E-TING 201B)
- Hardware: 1/4″-20 carriage bolts (1.5″ long), washers, and lock nuts
- Fence Material: 3/4″ x 3″ hardwood strip (maple or birch), 24″ long
- Sacrificial Layer: 1/4″ plywood for zero-clearance insert (optional but recommended)
Critical Tools You Can’t Skip
- Table saw (for cutting base and creating kerf)
- Drill/driver with 1/4″ and 5/16″ drill bits
- Precision square (Starrett or equivalent)
- Calipers or feeler gauges for fence tuning
- Socket wrench set (for bolt tightening)
Pro Tip: Skip toggle clamp screws—they’ll strip MDF within weeks. Bolts with lock nuts withstand clamp leverage indefinitely.
Build Your Jointer Sled: A Foolproof Step-by-Step Guide

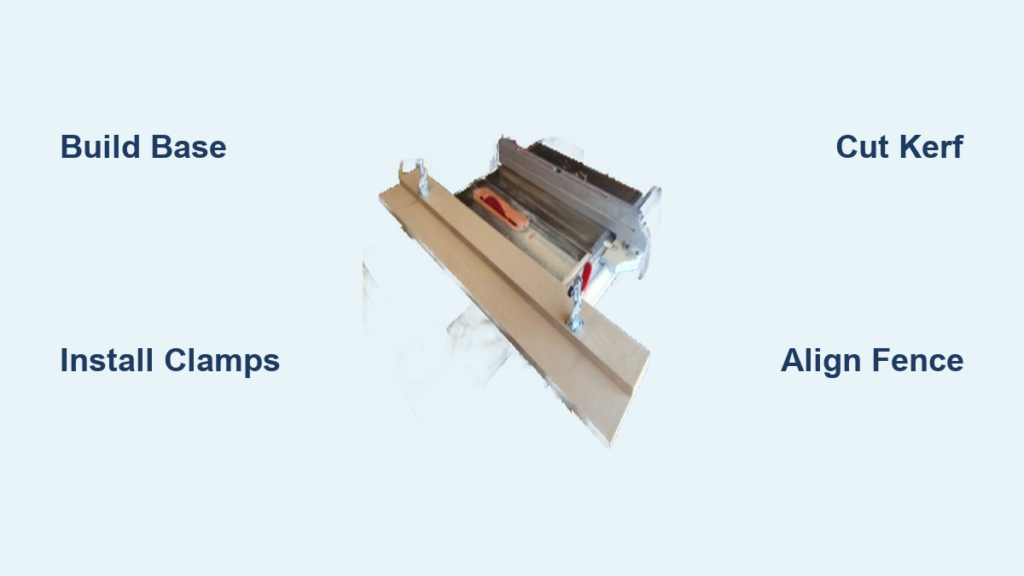
Create the Base and Fence Assembly
- Cut your base to 12″ x 24″ using a table saw for perfect straightness. Sand edges smooth.
- Rip a 3″ hardwood strip to 24″ length for the fence. Verify it’s dead-straight with a straightedge.
- Position the fence along the base’s front edge (operator side). Use your precision square to align it perpendicular to the blade path—critical for 90° edges.
- Clamp temporarily and drill two 3/16″ pilot holes through base into fence ends. Secure with #8 x 1.5″ screws.
Visual Cue: When viewed from above, the fence must form a perfect L-shape with the base’s travel direction. Any gap at the corner ruins accuracy.
Install Toggle Clamps for Maximum Holding Power
1. Position clamps 3″ from front/rear edges. Ensure pads press near board ends (not center) to prevent bowing.
2. Mark bolt holes through clamp bases onto the sled. Drill 1/4″ holes at these points.
3. Insert carriage bolts from below, add washers, then secure with lock nuts. Tighten firmly—clamps should resist wiggling even under full pressure.
4. Test with scrap wood: Engage clamps on a 3/4″ board. It should feel immovable when you try to lift or twist it.
Common Mistake: Mounting clamps too close to the blade risks interference. Keep them 2+ inches clear of the kerf path.
Cut the Zero-Clearance Kerf
- Unplug saw and lower blade completely.
- Slide sled onto table, aligning its fence against the saw’s fence.
- Raise blade slowly through the sled base to full height. This creates a slot matching your blade’s exact thickness.
- For tear-out prevention, glue a 1/4″ plywood strip over the kerf area and re-cut the slot.
Time Saver: Do this step before attaching the main fence—it’s easier to maneuver the bare base.
Tune Your Sled for Perfectly Square, Tear-Free Cuts

Achieve Laser-Perfect Fence Alignment
- Place a precision straightedge against the sled’s fence.
- Measure gaps along its length using feeler gauges (or a smartphone feeler gauge app).
- If gaps exceed 0.002″, loosen fence screws slightly. Tap the fence with a mallet toward high spots.
- Re-tighten and recheck—repeat until gaps are undetectable.
Why This Matters: A 0.005″ misalignment creates a 0.030″ taper across 36″ of cut—enough to ruin panel glue-ups.
Verify 90° Edge Accuracy
- Joint a 24″ scrap board using the sled.
- Flip the board and make a second cut.
- Place both jointed edges together: Any gap at the ends indicates fence misalignment. Adjust accordingly.
Pro Tip: For absolute confidence, use a machinist’s angle cube against the jointed edge—it should read exactly 90.0°.
Step-by-Step: Using Your Jointer Sled for Flawless Edges
Prepare the Workpiece Correctly
Position boards with the concave (cupped) side down—this ensures high spots contact the blade first. For twisted stock, orient the twist so the highest corner leads into the cut. Always extend the edge 1/8″ past the blade path; too little causes snipe, too much risks tear-out.
Execute Safe, Accurate Cuts
- Engage both toggle clamps firmly—boards must not budge when you shake them.
- With saw running at full speed, push the sled steadily while maintaining firm fence pressure.
- For the final 6″, use a push block to clear hands from the blade zone.
- Take 1/32″ passes on rough lumber; 1/64″ for fine tuning.
Critical Warning: Never release fence pressure mid-cut—this instantly creates tapered edges. Keep consistent contact from start to finish.
Fix Common Jointer Sled Problems in Minutes

Tapered Edges After Cutting
Cause: Fence misalignment or inconsistent fence pressure during feed.
Fix: Retune fence parallelism as described earlier. During operation, use a featherboard against the sled’s fence to maintain pressure.
Tear-Out on Board Bottoms
Cause: Gaps around the blade path allow chip-out.
Fix: Add a sacrificial zero-clearance layer or glue a thin plywood strip over the kerf. Ensure blade is sharp—dull blades crush fibers instead of slicing them.
Workpiece Slipping Under Clamps
Cause: Insufficient downward pressure or smooth clamp pads.
Fix: Wrap rubber shelf liner around clamp pads for grip. Tighten bolts until clamps require moderate force to engage—they should exert 30+ lbs of pressure.
Essential Maintenance and Safety Checks for Long-Lasting Use
Monthly Safety Protocol
- Bolt Inspection: Check all carriage bolts with a wrench—re-tighten any that spin freely.
- Fence Integrity Test: Press down hard on the fence’s far end; it shouldn’t flex more than 0.005″.
- Clamp Function Check: Ensure levers snap shut positively with no spring fatigue.
Blade Selection Guide
- Rough Stock: 24T rip blade (aggressive cutting)
- Fine Work: 40T+ combination blade (smoother finish)
- Never Use: Dado stacks or hollow-ground blades—they cause chatter.
When to Replace Components
Discard the base if it develops cracks near bolt holes. Replace MDF bases every 18 months with heavy use; plywood lasts 5+ years. Toggle clamp springs weaken after 500+ cycles—renew them preemptively.
Your table saw jointer sled isn’t just a jig—it’s a force multiplier for your entire shop. By following these steps, you’ve created a tool that delivers jointer-perfect edges at 10% of the cost, with superior safety and versatility. The next time you face warped lumber or need flawless panel glue-ups, skip the jointer queue and fire up your sled. For best results, store it mounted on your saw fence (remove when not in use) to avoid accidental bumps. Now that you know how to make a jointer sled for table saw operations, reclaim shop space, eliminate tool costs, and achieve professional results with the machine you already own.


