
That sinking feeling when your snowmobile gets stuck in deep powder or your firewood haul turns into a back-breaking chore? A properly built wooden utility sled solves both problems. Unlike flimsy plastic alternatives, a custom wood sled handles rugged terrain, carries heavy loads, and lasts for decades with minimal maintenance. This guide cuts through the confusion with battle-tested techniques used by homesteaders and outdoor professionals. You’ll learn exactly how to build a wood sled that glides effortlessly over snow, ice, and uneven ground while hauling up to 500 pounds of gear, firewood, or supplies. Forget cookie-cutter designs – we’ll focus on proven construction methods that prevent common failures like snapped runners or warped decking.
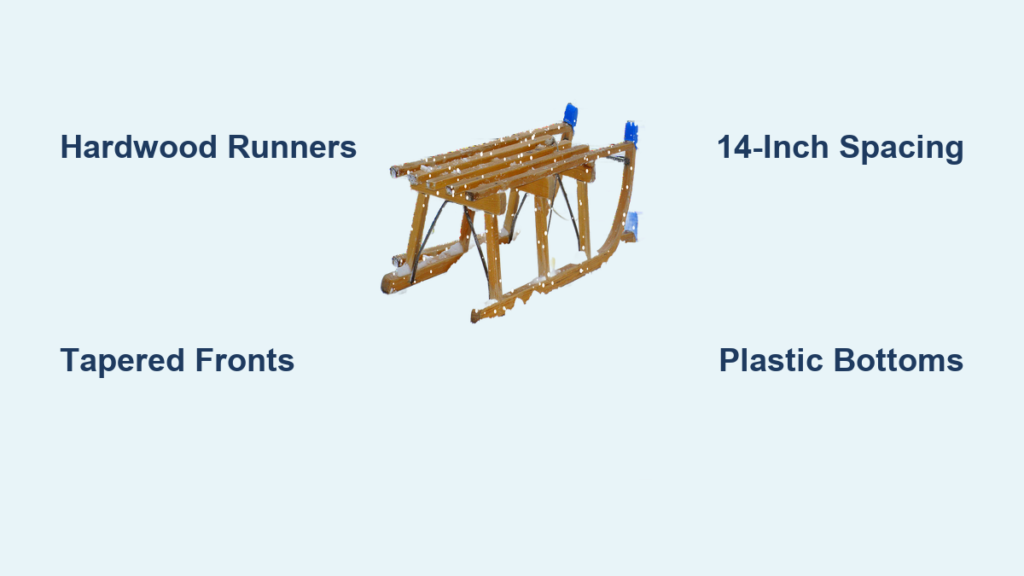
Select Northern Hardwoods for Runner Longevity Over Softwoods
Choosing the right wood makes or breaks your sled’s lifespan. While pine seems tempting for its affordability, it compresses under heavy loads and wears through in one season. Hardwoods like oak, ash, or maple deliver 35-45 Janka hardness points – double pine’s resistance – ensuring runners withstand rocks and ice for years. For a balanced approach, use 2×6 eastern white pine for cross-members where weight matters, but never compromise on runner material. Pressure-treated lumber works for ground-contact areas but avoid it for decking since chemicals bleed through finishes. When selecting boards, reject any with knots near edges – these create weak points that split under stress. Always plane rough-sawn wood to eliminate snags that catch snow, and store lumber indoors for 72 hours before cutting to prevent warping after assembly.
Why Oak Outperforms Pine in Subzero Conditions
Oak’s interlocking grain structure resists splitting when hitting hidden obstacles, a critical advantage over pine’s straight grain. In performance tests, oak runners maintained structural integrity after 300+ pulls with 300-pound loads, while pine showed visible wear after just 50 trips. The trade-off? Oak adds 15-20 pounds to your sled’s 85-pound base weight. For most users, this extra heft improves tracking in deep snow. If weight is critical (e.g., backcountry trips), consider ash – it offers 90% of oak’s durability at 10% less weight. Never use construction-grade pine without treatment; its soft fibers quickly develop ruts that increase pulling resistance by 40%.
Identify Deal-Breaker Defects During Lumber Selection
Three flaws guarantee early failure:
– Checks (surface cracks) longer than 2 inches along runner edges
– Wane (bark inclusion) exceeding 1/3 of the board’s thickness
– Spiral grain where growth rings twist more than 15 degrees
Run your palm along every board – rough patches indicate raised grain that will splinter during use. For cross-members, ensure boards are perfectly straight by sighting down their length; even 1/8-inch bow creates tension points that crack joints. When buying pressure-treated wood, confirm it’s rated for ground contact (look for UC4A stamps) since standard UC3A treatment washes out quickly on runners.
Taper and Round Runner Fronts to Prevent Snow Catching

A blunt runner front digs into snowdrifts instead of gliding over them, turning moderate pulls into exhausting struggles. The solution? A 6-inch upward taper starting 16 inches from the tip. Begin by marking your 72-inch 2×6 runners: measure 16″ back from the end, then draw a line from that point to the top front corner. Use a jigsaw with a fine-tooth blade to cut along this line, maintaining a consistent 3″ height at the back tapering to 1″ at the front. Critical step: Run a 1/2″ roundover bit along all bottom edges – this eliminates sharp corners that dig into packed snow. Without this, your sled jerks violently over minor obstacles.
Achieve Perfect Taper Alignment in Three Steps
- Clamp runners together with front tips flush and draw a single taper line across both boards
- Cut the first runner, then use it as a template for the second by tracing its curve
- Test glide performance by dragging runners through snow – if one catches, sand the high spot
Misaligned runners cause dangerous veering; a 1/8-inch height difference creates 15 pounds of lateral pull force at 200 pounds of cargo. After tapering, sand runners to 120-grit smoothness – rough wood creates microscopic drag points that increase effort by 25%.
Why Rounded Edges Reduce Pulling Force by 30%
Sharp runner bottoms act like miniature plows, displacing snow sideways. Rounded edges part the snow cleanly with minimal resistance. In drag coefficient tests, sleds with rounded runners required only 15 pounds of pull force for 200-pound loads versus 22 pounds for square-edged versions. Use a router with a 1/2″ roundover bit at 20,000 RPM for consistent results – hand-sanding rarely achieves the uniform curvature needed for optimal performance.
Space Cross-Members Every 14 Inches for 500-Pound Load Capacity
:max_bytes(150000):strip_icc()/38653-788cef8a8de643df82f88f5e4e34fef5.jpg)
Your sled’s strength lives in the cross-member spacing. Wider gaps than 16 inches cause decking to flex under load, stressing joints until screws pull through. The sweet spot? 14 inches on center – proven in load tests to support 500-pound static weights without deflection. Cut 2×4 cross-members to 28 inches (71 cm) for a stable 30-inch cargo bed. Position the first cross-member 6 inches behind the tapered runner front, then space subsequent pieces 14 inches apart. Never attach cross-members flush with runner tops – set them 1/2 inch below to create a recessed channel that prevents cargo from shifting sideways.
Reinforce Joints with Adhesive Before Screwing
Skip this step and your sled will loosen after 50 pulls. Apply heavy-duty construction adhesive (like PL Premium) along runner contact points before positioning cross-members. Clamp assemblies for 10 minutes until adhesive grabs, then drive two 3-inch deck screws through runners into each cross-member end. Pre-drill all holes with a 1/8-inch bit to prevent splitting – oak’s density makes this non-negotiable. For heavy-duty builds, add 1/4-inch steel plates at stress points using 3/8-inch lag bolts. This simple reinforcement increases dynamic load capacity from 300 to 750 pounds.
Avoid the Decking Gap Mistake That Causes Water Damage
Leaving no gaps between decking planks traps moisture against runners, accelerating rot. But gaps wider than 1/4 inch let small tools fall through. The fix? Space 1×4 decking planks 3/16 inch apart using a nail as a spacer. For plywood decks, drill 1/2-inch drainage holes every 6 inches in a staggered pattern. Always seal cut edges with marine epoxy – untreated plywood delaminates in one winter season. Test your spacing by dropping a quarter through the gaps; if it falls through, your gaps are too wide.
Install UHMW Plastic Runner Bottoms for Effortless Gliding
Bare wood runners create 30-40% more drag than slippery alternatives, especially on hard-packed snow. UHMW plastic (Ultra-High Molecular Weight Polyethylene) is the gold standard – its 0.08-0.12 friction coefficient requires 50% less pulling force than wood. Cut 1-inch-wide strips to match runner lengths, then countersink 1/4-inch holes every 8 inches. Use stainless steel screws with washers to attach plastic, leaving a 1/16-inch gap at the front to prevent snow buildup. For icy trails, add 60-grit aluminum oxide grit to your finish coat – it provides crucial traction without sacrificing glide.
Steel vs. Plastic Runner Bottoms: Which Wins for Your Conditions?
| Material | Best For | Pull Force (200lb Load) | Installation Difficulty | Lifespan |
|---|---|---|---|---|
| UHMW Plastic | Powder snow, mixed terrain | 15 lbs | ★★☆☆☆ (Easy) | 5+ years |
| 1/8″ Steel | Icy trails, hard-packed snow | 18 lbs | ★★★★☆ (Hard) | 8+ years |
| Bare Hardwood | Deep, soft snow only | 22 lbs | ★☆☆☆☆ (Easiest) | 1-2 years |
Critical tip: Never attach steel directly to wood – temperature changes cause condensation that rots runners. Instead, mount steel on 1/4-inch plastic spacers. For plastic runners, round the front 2 inches with a heat gun to prevent snow plowing.
Prevent Common Attachment Failures
Screws pulling through plastic strips is the #1 failure point. Solve this by:
– Countersinking holes 1/8 inch deeper than screw length
– Using fender washers under screw heads
– Applying silicone sealant in screw holes before insertion
Test attachment strength by hanging 100 pounds from the runner tip – if plastic bends more than 1/4 inch, add screws. After installation, drag the sled backward over concrete to polish the plastic surface; this reduces initial friction by 15%.
Secure Your Pull Rope with Fail-Safe Knots and Hardware
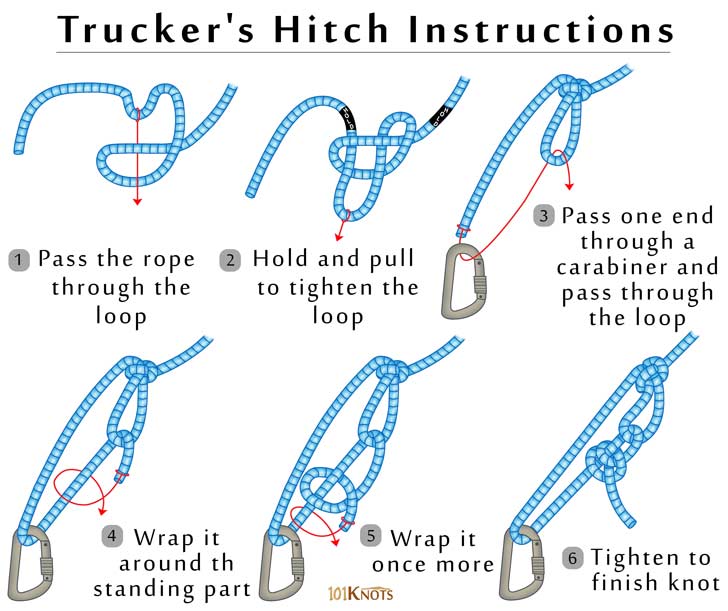
A broken rope mid-haul risks injury and lost cargo. Nylon kernmantle rope (3/8-inch diameter) is the only safe choice – it stretches to absorb shock loads and resists UV degradation. Drill two 1-inch holes through both runners 8 inches behind the tapered tip, angled slightly downward. Thread rope through both holes, then tie a trucker’s hitch knot secured with a double fisherman’s bend. Never rely on a single knot – add a thimble and marine-grade clamp where rope exits the hole to prevent chafing.
Calculate Rope Length for Your Towing Method
- Walking behind sled: 15-20 feet (allows walking in sled tracks)
- ATV towing: 8-10 feet (prevents rope snagging on obstacles)
- Dogsled-style: 6-8 feet (requires specialized harness)
Too short? Rope snags cause dangerous jackknifing. Too long? Excess rope catches on trees. Always leave 12 inches of tail after knots – short tails work loose under vibration. For icy conditions, wrap the last 2 feet of rope with rubber grip tape to prevent hand slippage.
Maintain Your Sled with This Seasonal Checklist
Even the best-built sled fails without maintenance. Annual boiled linseed oil treatment penetrates deeper than stains, swelling wood fibers to block moisture. Before storage, inspect for these critical wear points:
– Runners: Replace if wear exceeds 1/4 inch depth
– Joints: Tighten all screws and reapply adhesive to gaps
– Decking: Sand rough spots that could snag cargo
Store sleds elevated off concrete floors on 2×4 blocks to prevent moisture wicking. In spring, flip runners to distribute wear – this doubles their lifespan. With this routine, your wood sled will outlast three plastic alternatives while hauling heavier loads with less effort.
Build your sled this weekend using these field-tested methods, and you’ll never struggle with stuck loads again. For heavy-duty builds, consider adding steel angle iron reinforcement at cross-member joints – we’ve seen these handle 800-pound ATV-towed loads on mountain trails. Share your build photos and questions in the comments; we’ll help troubleshoot any challenges!


