
Dragging a standard plastic ice fishing sled through deep snow feels like wrestling an anchor across the ice. Your shoulders ache, progress slows to a crawl, and that “plowing effect” turns a short trip into an exhausting battle. But what if you could slash that effort by 90%? Learning how to make a smitty sled solves this exact problem by adding ski runners under your existing sled. This DIY modification lifts your gear off the snow, transforming grueling hauls into smooth glides over crusty ice and powder. In this guide, you’ll discover exactly how to build one using salvaged skis and basic lumber—no advanced tools needed.
Most ice anglers waste energy fighting their sleds instead of focusing on the fish. A Smitty sled eliminates this frustration by transferring your sled’s weight onto long ski runners that float over snow rather than digging into it. You’ll conserve energy for drilling holes and setting lines, protect delicate electronics from jarring impacts, and glide across conditions that would stop a standard Jet Sled dead in its tracks. Whether you’re hauling a shelter or just your tackle box, how to make a smitty sled is the single most effective upgrade for serious ice anglers.
Why Standard Sleds Fail in Snow and How Smitty Fixes It
Plastic tub sleds dig into snow like a bulldozer blade, creating massive drag that increases exponentially with depth. When snow exceeds 4 inches, standard sleds become nearly immovable without an ATV. A Smitty sled solves this by elevating the tub 8-18 inches above the ice, letting the ski runners distribute weight across the snow surface. This reduces pulling force from 30+ pounds down to just 3-5 pounds in deep powder. Crucially, the ski camber (slight upward curve) prevents the tips from diving into soft snow, while the smooth base glides over slush that would glue a plastic sled in place.
What Happens When Riser Height Is Wrong
- Too low (under 8 inches): Sled base contacts snow, creating plow effect even in 6″ of powder
- Too high (over 18 inches): Wind catches the elevated tub, causing dangerous tipping on exposed ice
- Sweet spot (10-12 inches): Clears 12″ of snow while keeping center of gravity low for stability
Find Free Skis for Your Smitty Sled Build
You don’t need new equipment—most functional skis cost $0-$10 if you know where to look. Resort rental shops discard damaged skis weekly during offseason; call asking for “unrentable demo skis” and offer to haul them away. Facebook Marketplace yields gems when searching “free skis” or “old skis” near ski towns. Prioritize downhill skis (6-8 feet long) over cross-country models—they’re wider for better snow flotation and sturdier for heavy loads. Avoid water skis; their flat bases lack camber and grip snow like sandpaper.
Critical Ski Inspection Checklist
- ✅ Bases intact: No deep gouges exposing wood core (minor scratches are fine)
- ✅ Bindings removed: Must be completely stripped for flat mounting surface
- ✅ No sidecut damage: Edges can be bent but not cracked or delaminated
- ❌ Avoid: Skis with base holes, cracked sidewalls, or “cap construction” topsheets
Cut Riser Blocks to Exact 10-12 Inch Height

Your riser height determines whether the sled glides or plows. For most Midwest ice conditions, 10-12 inches is the performance sweet spot—enough to clear packed snowdrifts but low enough to resist wind. Cut 2×6 lumber into four identical blocks (two per ski) using a miter saw. Measure twice: too short and snow jams the sled base; too tall and wind becomes a hazard. Always pre-drill 1/8″ pilot holes through the riser’s center to prevent splitting when screwing into skis.
Avoid These Riser Attachment Mistakes
- Mistake: Screwing through ski topsheet without countersinking → Result: Screw heads tear through thin plastic
- Fix: Countersink holes 1/4″ deep and use flat-head screws
- Mistake: Skipping marine sealant → Result: Moisture seeps into wood, causing rot in one season
- Fix: Apply 3M 5200 between ski and riser before screwing
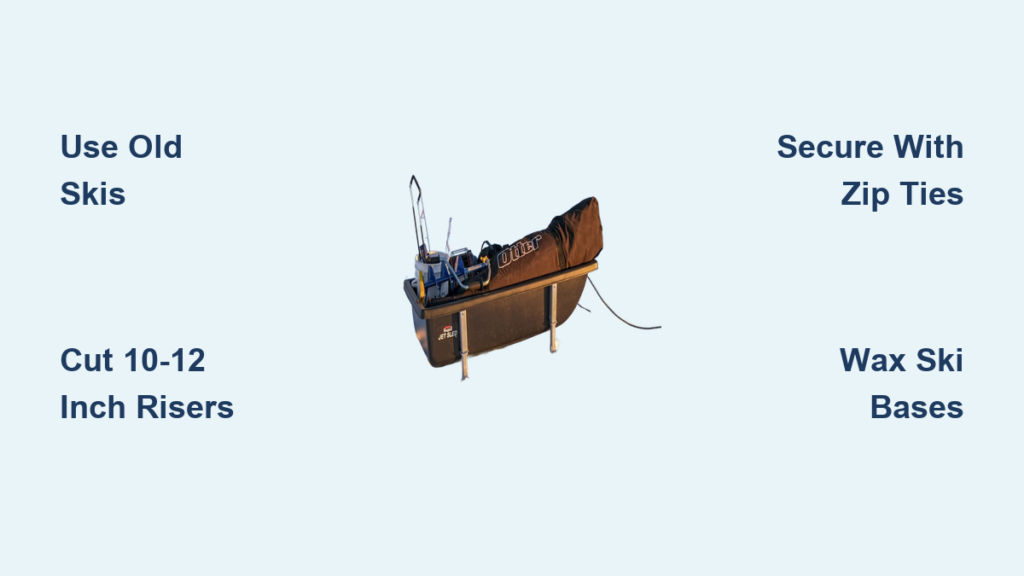
Mount Your Sled Tub Without Drilling Holes
Drilling into plastic sleds risks catastrophic cracks, but you don’t need to compromise security. Place your inverted sled on sawhorses and position the ski/riser assemblies underneath so risers sit 1/3 back from the front edge. Instead of drilling through the tub, wrap heavy-duty 500-lb zip ties around the riser blocks and through existing drain holes. Thread four ties per riser (front/back/sides), cinch tightly, and melt the excess tails. For shelter-sized loads, add a ratchet strap horizontally across the tub’s top for backup security.
When Drilling Is Actually Safer
If your sled lacks drain holes or carries >150 lbs:
1. Drill 3/8″ holes through tub lip and riser at 45-degree angles
2. Insert 1/4″ carriage bolts with oversized washers underneath
3. Tighten nuts until washer bites into plastic (don’t overtighten)
Pro Tip: Line holes with silicone sealant to prevent stress cracks
Balance Your Load for Deep Snow and Wind

How you pack determines whether your Smitty sled floats or founders. Place heaviest items (auger, batteries) low in the tub, centered between risers. For deep snow, shift 60% of weight just behind the front risers—this presses ski tips down to prevent “porpoising.” In high winds, lower your center of gravity by stacking gear flat rather than vertically. Never let loads extend beyond the tub’s rear; this lifts ski tails, causing the sled to dig in like a plow.
Weight Distribution Test Before Hitting Ice
- Lift front of sled 6 inches off ground
- If rear rises easily, add weight forward
- If front won’t lift, move heavy items backward
Visual cue: Ski tips should sit 1-2″ above snow when loaded
Prevent Ice Buildup on Ski Runners in Slush
Wet snow sticks to bare ski bases like glue, turning your Smitty sled into an anchor. Prevention starts before you leave the garage: Apply a high-fluorocarbon paste wax (like Swix CH-8) with a waxing iron set to 140°F. Let it cool overnight for maximum penetration. On the ice, carry a small scraper to knock off ice chunks—never let buildup exceed 1/4″ thick. In slushy conditions, rub candle wax along the ski edges; its hydrophobic properties repel water better than standard glide wax.
Emergency Ice Removal When Gliding Stops
- For light buildup: Kick firmly on ski tail to dislodge chunks
- For thick ice: Pour warm water (not hot!) over bases to melt bond
- Never: Scrape with metal tools—this damages bases
Reinforce Tow Points to Avoid Mid-Haul Tears
Factory tow points are the #1 failure point on Smitty sleds. Prevent disaster by reinforcing them before your first trip: Apply flexible urethane sealant (like Starbrite) around existing holes, then press heavy-duty nylon webbing through from inside the tub. For Jet Sleds, drill two new 1/2″ holes 2 inches forward of the original tow point and install marine-grade snap hooks. Always use a padded shoulder harness—not a hand rope—to distribute pull force evenly across your body.
Tow Rope Setup for Maximum Control
- Ideal length: 8-10 feet (shorter ropes amplify bumps)
- Critical check: Ensure rope attaches below sled’s center of gravity
- Wind hack: Add a 12″ bungee cord section to absorb gust shocks
Smitty Sled FAQs: Weight Limits and Ski Sourcing
Q: How much gear can my Smitty sled carry?
A: A 2×6-riser build handles 150 lbs reliably. Distribute weight evenly—never exceed 200 lbs even with downhill skis. Test with incremental weight increases before big trips.
Q: Can I build this without power tools?
A: Yes! Hand-saw risers and use screwdrivers, but pre-wax skis with rub-on wax instead of hot wax for simplicity.
Q: Why do some anglers use two sets of skis?
A: Only needed for shelter hauls over 200 lbs. For standard gear, single skis provide optimal glide-to-weight ratio.
Final Performance Tweaks Before Ice Season
Wax your ski bases with all-temperature universal wax (like Swix HF-0) 48 hours before your trip for deep penetration. Store the assembled sled vertically against a wall to prevent ski warping. Before each outing, check zip ties for UV damage and re-tighten U-bolts—vibration loosens them quickly. Most importantly, test your sled in a snow-covered parking lot first; adjust riser height if it plows or tips.
With your Smitty sled built, you’ll conquer snowdrifts that once halted your progress. That effortless glide isn’t just convenient—it means more fishing time, less fatigue, and gear that arrives intact. When wind howls and snow piles deep, your upgraded sled will be the envy of the ice. Now grab those old skis and make a smitty sled—your shoulders (and your catch count) will thank you.


