
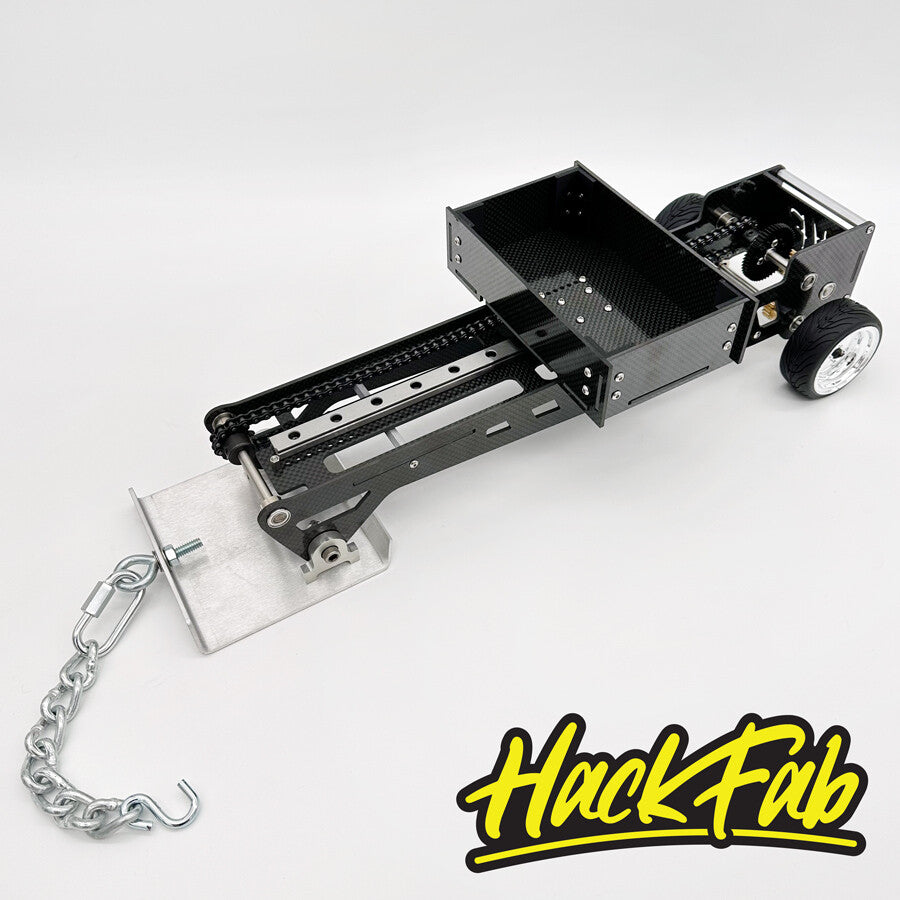
Your RC truck struggles to pull even modest weights because your makeshift sled keeps tipping over or jamming. This frustrating reality plagues countless RC enthusiasts who try to build pulling sleds without understanding the critical engineering principles. When your RC pulling sled tips on the first attempt or fails under load, you’re wasting time and money on fixes that address symptoms, not causes. The good news? You can build a competition-grade RC pulling sled that handles 170 pounds of weight and tracks perfectly every time—by following the same proven design principles that have kept sleds operational for over 30 years. In this guide, you’ll discover exactly how to construct a reliable RC pulling sled with proper weight distribution, mechanical advantage, and stability that will transform your truck’s performance.
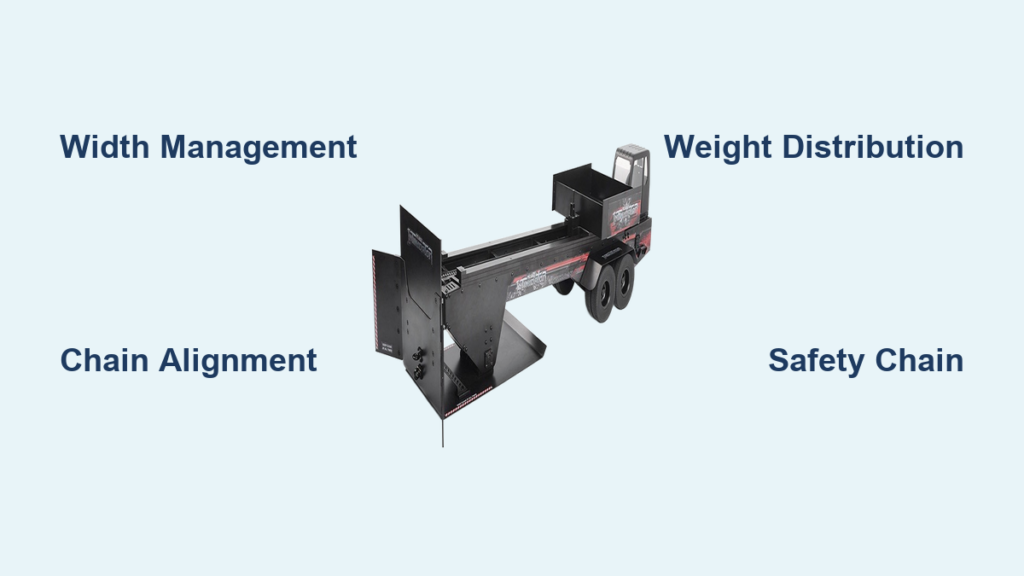
Why Width Management Determines Your RC Pulling Sled’s Success or Failure
The single most common reason RC pulling sleds fail is improper platform width. A sled that tips immediately after applying power almost always violates the fundamental width rule: your load platform must be 1-2 inches narrower than the inner clearance between your RC truck’s tires. This isn’t a suggestion—it’s a physics requirement. When the platform extends beyond the inner tire width, the center of gravity shifts outside the stability triangle, causing immediate tipping as soon as force is applied.
How to Measure Correct Platform Width for Your Specific RC Truck
Start by measuring the exact inner width between your RC vehicle’s tires with the tires mounted and inflated to operating pressure. Take this measurement at the point where the tires contact the ground—the narrowest point of the tire profile. Subtract 1.5 inches from this measurement to determine your maximum platform width. For example, if your RC truck’s inner tire width measures 12 inches, your platform must not exceed 10.5 inches. This critical dimension ensures the center of gravity remains within the stability triangle during operation.
Visual Verification Methods That Prevent Costly Mistakes
Before cutting any materials, perform a simple visual check: place your RC truck on the ground and position a straight edge between the inner edges of the tires. Any part of your sled platform extending beyond this line will cause instability. YouTube analysis of competition sleds confirms this universal design principle—watch professional sleds in action to see how they maintain proper width relative to the tires. This visual verification takes less than two minutes but saves hours of failed builds and wasted materials.
Constructing the Frame: Steel vs. Aluminum for Maximum Durability
Your RC pulling sled’s frame bears tremendous stress during operation, making material selection critical. Both steel and aluminum have proven successful in competition-grade builds, but each has specific advantages depending on your RC truck’s power and intended use.
Steel Frame Construction for High-Power RC Trucks
For 1/8 scale or larger trucks with significant power, 1×1 inch or 1.5×1.5 inch steel tubing provides the necessary rigidity. Weld all joints thoroughly using a MIG welder, ensuring complete penetration at every connection point. The frame must withstand forces equivalent to 3-5 times the maximum design load without flexing. For optimal strength-to-weight ratio, construct a rectangular perimeter frame with crossmembers spaced no more than 8 inches apart. Add gussets at all corners to prevent stress fractures—these small triangular reinforcements have prevented countless failures in 30+ year-old sleds still in operation today.
Aluminum Frame Options for Smaller RC Vehicles
If you’re building for a 1/10 scale truck or smaller, aluminum offers a lighter alternative without sacrificing strength. Use 6061-T6 aluminum tubing with minimum 0.125-inch wall thickness. Aluminum requires TIG welding for proper joints, but the reduced weight makes it ideal for lighter RC vehicles. Remember that aluminum frames need larger cross-sections than steel to achieve equivalent strength—consider using 1.5×1.5 inch tubing instead of 1×1 inch.
Pro Tip: Regardless of material, always reinforce the rear section of the frame where the safety chain attaches. This point experiences tremendous stress during emergency stops and requires additional gusseting.
Installing the Chain and Sprocket System for Proper Force Transfer
The mechanical advantage system transforms your RC truck’s rotational force into linear pulling resistance. This is where most DIY builds fail—improper sprocket ratios or chain tension cause slipping, binding, or catastrophic failure under load.
Setting Up the 5:1 Gear Reduction System
Competition-grade RC pulling sleds use a minimum 5:1 gear reduction to multiply the force required to move the weight platform. Here’s exactly how to set it up: mount a 12-tooth sprocket on your drive axle (connected directly to the sled wheels) and pair it with a 60-tooth sprocket on the driven shaft. This creates the essential mechanical advantage where the drive wheels must turn five times to move the weight platform just once. Use ANSI #40 or #50 roller chain with a tensioner mechanism to maintain proper chain tension as it wears.
Critical Alignment Techniques for Long Chain Life
Misaligned sprockets destroy chains within minutes of operation. Before final welding, assemble all sprockets and chain temporarily to verify perfect alignment. The drive and driven sprockets must sit in exactly the same plane—use a straight edge along the face of both sprockets to confirm. Even 1/8 inch of misalignment significantly reduces chain life. Once aligned, mark all positions before disassembly for welding. After welding, recheck alignment and adjust as needed.
Building the Weight Platform: Width Rules to Prevent Tipping
Your sled’s weight platform isn’t just a tray—it’s the heart of the resistance system. How you construct and position this component determines whether your sled tracks straight or tips uncontrollably.
Constructing a Competition-Grade Weight Platform
Weld a rectangular frame from 3/4 inch steel tubing, then attach expanded metal or 1/8 inch steel plate to create the surface. The platform must ride on precision rails—weld C-channel steel to the bottom that slides along matching rails on the main frame. Ensure the platform moves freely with minimal binding but without excessive play. The front attachment point for your drive chain must be reinforced with 1/4 inch steel plate to handle the tremendous forces involved.
Weight Distribution Secrets for Perfect Sled Tracking
For optimal tracking, your empty sled (without added weights) should weigh between 30-40 pounds with a 60/40 front-to-rear weight bias. Position the center of gravity approximately one-third of the sled’s length from the rear axle. When adding weight plates, distribute them evenly across the platform but concentrate slightly more toward the rear. This configuration ensures the sled tracks straight without fishtailing or veering during operation.
Warning: Never exceed a 25-degree tilt angle when loaded—this is the tipping threshold confirmed by decades of competition experience.
Safety Chain Installation: Preventing Runaway Sled Disasters
The primary connection between your RC truck and pulling sled will eventually fail under extreme loads—it’s not a question of if, but when. A properly installed safety chain prevents dangerous runaway sleds and protects your expensive RC vehicle.
Heavy-Duty Safety Chain Requirements
Use a minimum 1/4 inch aircraft cable or grade 70 transport chain rated for at least 3,000 pounds. Attach one end to a reinforced point on the rear of your RC truck’s chassis (not the hitch pin) and the other end to a dedicated safety loop on the sled’s frame. The chain must have enough slack to allow normal operation but prevent the sled from moving more than 6 inches if the primary connection fails. Use quick-disconnect links for easy attachment and removal.
Secondary Safety Features You Can’t Afford to Skip
Add a visual indicator to your safety chain—wrap bright tape around it every 6 inches. This makes it easier to spot during operation and provides a quick visual reference for chain stretch. Install chain guides to prevent the safety chain from snagging on obstacles during operation. Most importantly, inspect your safety chain before every use for signs of wear, kinking, or deformation.
Testing Your RC Pulling Sled: Calibration Methods That Work
A proper test protocol separates functional sleds from dangerous liabilities. Never skip these critical verification steps before subjecting your RC truck to full pulling loads.
Static Load Testing Procedure
Begin with a static load test at 150% of your intended maximum weight (for example, 255 pounds for a 170-pound capacity sled). Place the weight on the platform and let it sit for 24 hours. Check for frame flex, weld cracks, or deformation at critical stress points. Pay special attention to the chain attachment points and wheel mounts—these are common failure locations in poorly constructed sleds.
Dynamic Performance Calibration
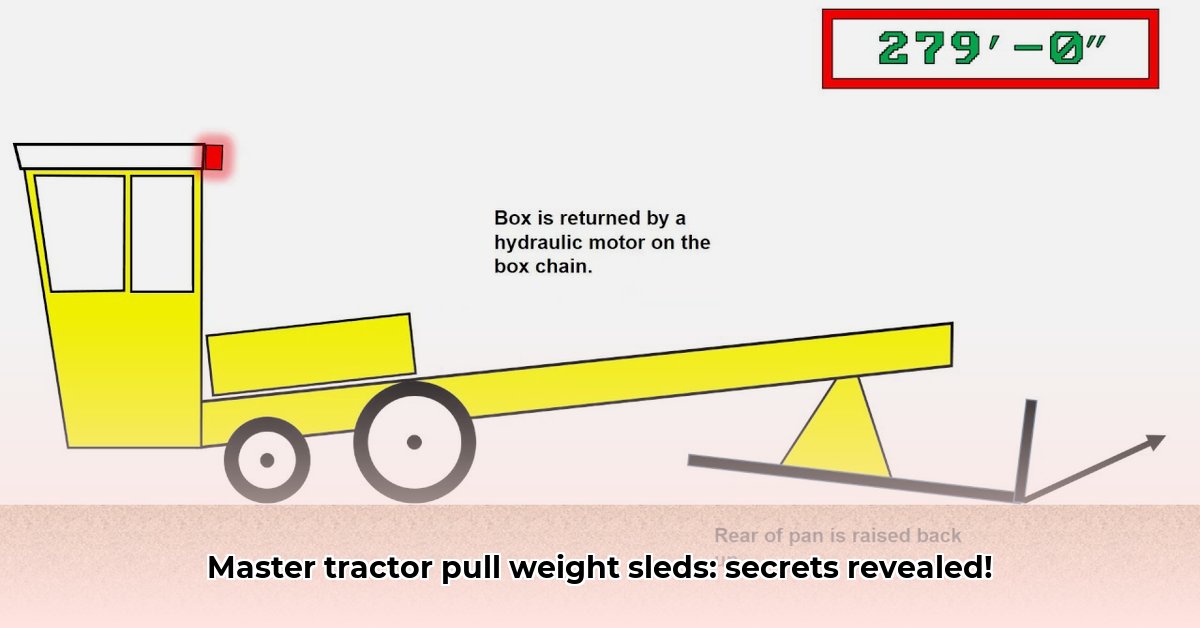
Start with light loads (20-30 pounds) and gradually increase weight while monitoring performance. Your RC truck should pull the sled smoothly without wheel spin or jerking motion. If the sled binds or jumps, check for misaligned rails or chain tension issues. Use a digital scale to measure the actual pulling force at different weight levels—you should see a smooth, consistent increase as the weight platform moves rearward. A properly calibrated sled will require increasing force throughout the pull, peaking as the platform reaches its rearmost position.
Maintenance Schedule to Keep Your Sled Operational for 30+ Years
The most impressive fact from decades of RC pulling competition is that well-built sleds remain operational for 30+ years with proper care. Follow this maintenance schedule to achieve similar longevity with your DIY creation.
Essential Maintenance Tasks and Intervals
- Chain lubrication: Every 10 hours of operation with high-quality roller chain lubricant
- Bushing inspection: Every 25 hours for wear at pivot points
- Structural inspection: Every 50 hours checking for stress cracks at weld points
- Full load testing: Every 100 hours or 6 months to verify safe operation
Pro Tip: Keep a maintenance log noting each service performed. This simple record has helped preserve functional sleds for multiple generations of RC enthusiasts.
Troubleshooting Common RC Pulling Sled Failures
Even with proper construction, you’ll encounter issues during operation. Knowing how to diagnose and fix these problems quickly keeps your pulling sessions productive.
Why Your Sled Won’t Track Straight
If your sled veers to one side during pulling, check three critical factors: wheel alignment, weight distribution, and rail binding. Verify all four wheels are perfectly parallel to the main frame rails—use a machinist’s square for precision. Confirm your weight distribution maintains the 60/40 front-to-rear bias. Finally, inspect the weight platform rails for binding or debris that might cause resistance on one side.
Chain Slippage Solutions for Maximum Power Transfer
Chain slippage typically indicates one of three problems: improper tension, worn sprockets, or misalignment. First, adjust your chain tensioner to achieve 1/2 inch of deflection when pressing on the chain midway between sprockets. If slippage continues, inspect sprocket teeth for wear—they should have sharp, square profiles without rounding. Finally, recheck sprocket alignment using the straight-edge method described earlier.
Final Note: Building a reliable RC pulling sled requires attention to specific engineering principles, not just assembling parts. By following these precise construction methods—especially the critical width management, proper gear reduction, and safety chain installation—you’ll create a sled that performs consistently and safely. Remember that the most successful builders treat their RC pulling sleds as precision engineering projects, not simple platforms. With proper construction and maintenance, your sled will deliver competition-level performance for decades, just like the 30-year-old designs still dominating pulling competitions today. Start with lighter weights to verify your build, then gradually increase resistance as you gain confidence in your creation’s reliability.


