
Your sled kite collapses the moment it leaves the ground. Or maybe it spirals violently before nose-diving into the dirt. If you’re struggling with how to fly a sled kite made from unconventional materials like plastic vinyl or silk, you’re facing the most common frustration for beginners. Unlike diamond kites, sled kites rely on precise tension and balance to maintain their rigid shape against wind pressure. When your kite folds inward mid-flight—especially with heavier materials like vinyl—it’s almost always fixable with targeted adjustments. This guide cuts through the confusion with battle-tested solutions from real builders, so you can stop battling collapsed sails and start enjoying smooth, stable flights.
The secret to mastering how to fly a sled kite lies in diagnosing exactly why it fails. Most problems stem from three culprits: incorrect bridle tension, insufficient stabilization, or mismatched materials for wind conditions. Whether you’re using wooden dowels (like our vinyl/silk builder) or planning fiberglass spars, these fixes work for any sled kite—including popular designs like the Frustrationless Flyer. Let’s transform your flailing kite into a reliable sky dancer.
Fix Collapsing Sled Kites Caused by Sail Slack

When your kite folds inward like a taco the second it lifts off, you’re dealing with inadequate sail tension. This is especially common with heavier materials like plastic vinyl that resist wind pressure. The sail isn’t pulled taut against the frame, causing it to crumple under aerodynamic forces. Don’t blame your design yet—this is almost always adjustable.
Eliminate Sail Collapse with Bridle Tweaks
Start by checking your bridle lines for slack. If they’re too long, the kite lacks the structural integrity to hold its shape. For how to fly a sled kite successfully with dense materials:
– Shorten the upper bridle lines incrementally (1/4 inch at a time)
– Ensure both sides are exactly equal in length—use a ruler to avoid asymmetry
– Test fly after each adjustment; the kite should feel “taut” when held against gentle wind
A builder using the Frustrationless Flyer template fixed identical folding issues by tightening bridle lines until the sail snapped rigid. Remember: Heavier materials like vinyl need shorter bridles than silk to compensate for reduced flexibility.
Reinforce Weak Spars Before Blaming Materials
Wooden dowels can flex or warp under wind load, worsening collapse. If your spars bend visibly during flight:
– Switch to fiberglass rods for critical vertical spars (they resist deformation)
– For temporary fixes, add splints: Tape thin carbon fiber strips along wooden spars
– Never skip pre-flight checks—roll each spar on a flat surface to spot warps
One kite maker solved constant folding by replacing flimsy 1/8″ dowels with 3/16″ fiberglass rods. His vinyl kite finally held its shape even in 15 mph gusts.
Stop Spinning & Veering With Precision Tail Solutions
If your sled kite corkscrews uncontrollably or veers sharply to one side, you need rotational stability. Tails aren’t just decorations—they’re aerodynamic anchors that counteract spin. This fix is critical for large kites (7+ feet) where minor imbalances magnify.
Build a Tube Tail That Actually Works
Flat streamers often fail for heavy or large sled kites. The breakthrough comes from tube tails, as proven by a builder with an 8-foot vinyl kite:
1. Cut a 20-25 foot tube from lightweight plastic (like a trash bag)
2. Seal one end and attach the open end to the kite’s bottom center
3. Add small weights (e.g., tied washers) every 3 feet to prevent flapping
This exact solution stopped “flopping and veering” in a massive sled kite. Why it works: The tube creates consistent drag along its entire length, damping side-to-side yaw that flat tails can’t control. For smaller kites (2-3 ft), start with a 10-foot crepe paper streamer before graduating to tubes.
Never Guess Tail Length: The 4x Rule
Aim for tail length 4-5 times your kite’s width. Too short? Spin continues. Too long? The kite struggles to climb. Adjust incrementally:
– For 2-foot kites: Start with 8-10 ft tails
– For 8-foot kites: Begin at 20 ft (like the successful case study)
– Add 2-foot extensions until spinning stops
Pro Tip: Fly your kite without a tail first. Note how many rotations it completes before crashing—that’s your baseline for measuring improvement.
Optimize Bridle Position for Your Wind Conditions
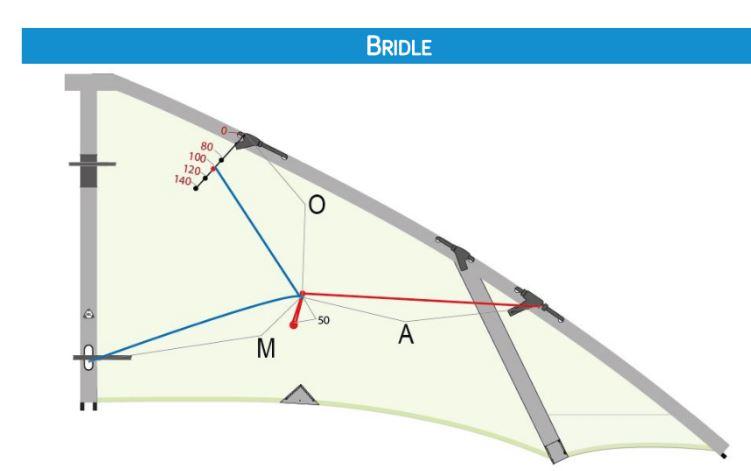
The tow point (where your flying line attaches to the bridle) dictates your kite’s angle of attack. Get this wrong, and your kite will dive or overfly regardless of tails. This is the #1 fix for how to fly a sled kite in variable winds.
Diagnose Tow Point Errors in 30 Seconds
Launch your kite and observe its initial climb:
– Dives immediately? Tow point is too far forward → Slide it back toward the tail
– Shoots straight up then stalls? Tow point is too far back → Slide it forward
– Flies sideways? Bridle lines are uneven → Measure and rebalance both sides
Move the tow point in 1/2 inch increments. After each adjustment, test fly in consistent wind. One builder fixed constant diving by shifting his tow point just 3/4 inch rearward—no tail needed.
Match Bridle Settings to Wind Speed Like a Pro
Your ideal tow point changes with wind conditions:
– Light winds (5-12 mph): Tow point forward for maximum lift (prevents stalling)
– Moderate winds (12-20 mph): Tow point centered for balanced control
– Gusty winds (20+ mph): Tow point slightly back to reduce pull and prevent looping
Never fly the same bridle setting across all conditions. Adjust before launching based on wind speed—your kite will respond instantly.
Solve Launch Failures and Dipping Dives
When your sled kite won’t leave the ground or dips erratically after launching, specific setup errors are sabotaging you. These fixes get you airborne fast.
Why Your Kite Won’t Launch (And How to Fix It)
If the kite shudders but refuses to rise:
– Check line weight: Heavy string (like cotton) creates drag. Switch to 20-50 lb test braided line
– Verify spar seating: Wooden dowels must click fully into sail pockets. Loose spars cause collapse
– Increase launch angle: Stand downwind of the kite and walk backward while reeling in slack
A silk kite maker solved chronic launch failures by switching from 100 lb test line to 30 lb braided line—halving line drag.
Stop Dipping Dives with One Bridle Adjustment
Dipping (where the kite climbs then suddenly dives) means your bridle is too aggressive:
– Shorten the lower bridle lines by 1/2 inch to reduce the nose angle
– If using wooden spars, add a slight bow (1-2 inch curve) to the horizontal spar for cushioning
This adjustment transformed a vinyl kite from “dipping every 10 seconds” to smooth 15-minute flights.
Advanced Fixes for Persistent Problems
Once airborne, refine your sled kite’s performance with these pro techniques.
Combat Gusts With Dynamic Line Control
In choppy winds:
– Shorten your line to 50-75 feet for better responsiveness
– Walk toward the kite when gusts hit to maintain line tension
– Add a “dampening” tail with intermittent weights (e.g., tied bottle caps every 5 ft)
Prevent Spar Flex Catastrophes
Fiberglass spars should bend slightly—it’s normal shock absorption. But excessive flex causes collapse. Fix it by:
– Using thicker rods for kites over 4 feet wide
– Adding a center support spar (run vertically through the kite’s middle)
– Avoiding overly flexible materials like bamboo for primary spars
One builder stabilized his large vinyl kite by installing a third vertical spar—eliminating mid-sail buckling.
Land Your Sled Kite Without Crashes
Many beginners ruin good flights with rough landings. To touch down gently:
1. Walk toward the kite while reeling in line
2. Keep tension consistent—never let the line go slack
3. As the kite descends below 10 feet, stop reeling and let it glide
Reeling against the wind causes stalls. Walking toward it maintains airflow over the sail for a soft landing.
Mastering how to fly a sled kite transforms frustrating failures into reliable joy. Start with these steps: First, fix collapsing sails by tightening bridles and reinforcing spars. Second, stop spinning with a properly sized tube tail (20+ feet for large kites). Third, dial in your tow point for current wind conditions. Remember the builder who conquered an 8-foot vinyl kite? His entire fix list was: fiberglass spars, 25-foot tube tail, and a 3/4-inch bridle adjustment.
For your next flight, pick one issue to solve—don’t overhaul everything at once. Test fly after each change. If you’re using unconventional materials, prioritize sail tension over all else; heavy vinyl demands shorter bridles and sturdier spars than silk. And if frustration hits, remember: even expert kite makers troubleshoot. What feels like a broken kite is usually just one slack line or missing tail away from soaring. Now grab your line, head to an open field, and get your sled kite flying right.


