
That golden-brown pumpkin roll fresh from the oven looks perfect—but if you rush the cooling process, you’ll end up with a crumbled mess instead of a showstopper dessert. The critical question every baker faces is exactly how long to cool pumpkin roll before filling to avoid cracks, sogginess, or collapse. Many home bakers skip this precise cooling sequence, only to watch their carefully baked cake tear apart when unrolled for filling. The truth is, timing isn’t just important—it’s the absolute make-or-break factor between bakery-quality results and kitchen disaster. You’ll discover why a narrow 5-10 minute window after baking determines your roll’s fate, and how strategic cooling phases transform fragile cake into a crack-resistant canvas for that creamy filling.
Most failed pumpkin rolls aren’t due to bad recipes—they’re cooling casualties. When you pull that thin cake layer from the oven, its delicate structure is still actively setting. Handle it too soon and it collapses; wait too long and it becomes brittle. This guide cuts through the confusion with science-backed timing you can trust. You’ll learn the exact cooling sequence that preserves flexibility while building strength, why skipping the towel roll step guarantees cracks, and how to time each phase for stress-free assembly. Whether you’re a first-time baker or a seasoned pro, mastering these cooling intervals ensures your pumpkin roll emerges picture-perfect every time.
Why Cooling Time Is Critical for a Flawless Pumpkin Roll
Your pumpkin roll’s structural integrity hinges entirely on how you manage residual heat after baking. That thin cake layer emerges from the oven with steam still actively cooking its interior. If you attempt to fill it while hot, the filling melts into a soggy disaster. But if you let it cool completely flat, the cake loses its pliability and cracks catastrophically when rolled. The ideal moment exists in a precise temperature range: warm enough to bend without resistance yet cool enough to hold its shape during transfer. This narrow window—typically 5-10 minutes post-oven—is when starches have set sufficiently to prevent collapse but haven’t cooled enough to become rigid. Miss this interval by even a few minutes, and you’ll battle cracks during filling.
The Science Behind Pumpkin Roll Cooling Times
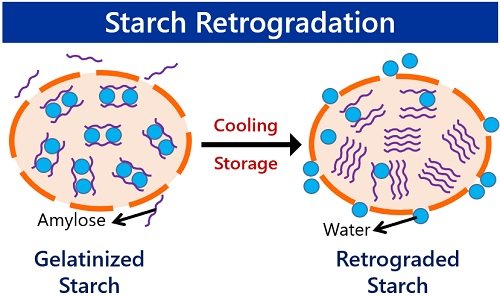
Understanding the physics of cooling explains why timing isn’t arbitrary. When pumpkin cake bakes, its proteins coagulate and starches gelatinize to form a delicate matrix. Fresh from the oven, this structure remains fluid enough to collapse under its own weight. As it cools for 5-10 minutes on the pan, starch retrogradation begins—the process where gelatinized starch molecules realign into a firmer, stable network. This creates just enough structural integrity for safe handling while retaining flexibility. Crucially, this phase allows surface moisture to evaporate, preventing a sticky top that would tear during rolling.
The towel roll step leverages trapped steam physics. When you immediately roll the warm cake in a powdered sugar-dusted towel, residual heat creates a humid microclimate inside the roll. This moisture prevents surface drying while the cake cools, maintaining pliability as it sets in its curved shape. Without this step, the outer layer dries out during cooling, creating a brittle surface that fractures when unrolled later. The subsequent 1-2 hour cooling period allows complete structural stabilization—like tempering metal—so the cake “remembers” its rolled form. Attempting to fill a cold, flat cake skips this essential memory-setting process, dooming you to cracks.
Step-by-Step: How Long to Cool Pumpkin Roll Before Filling
Follow this exact sequence for a roll that unrolls smoothly and holds its shape when sliced. Deviating from these intervals risks structural failure.
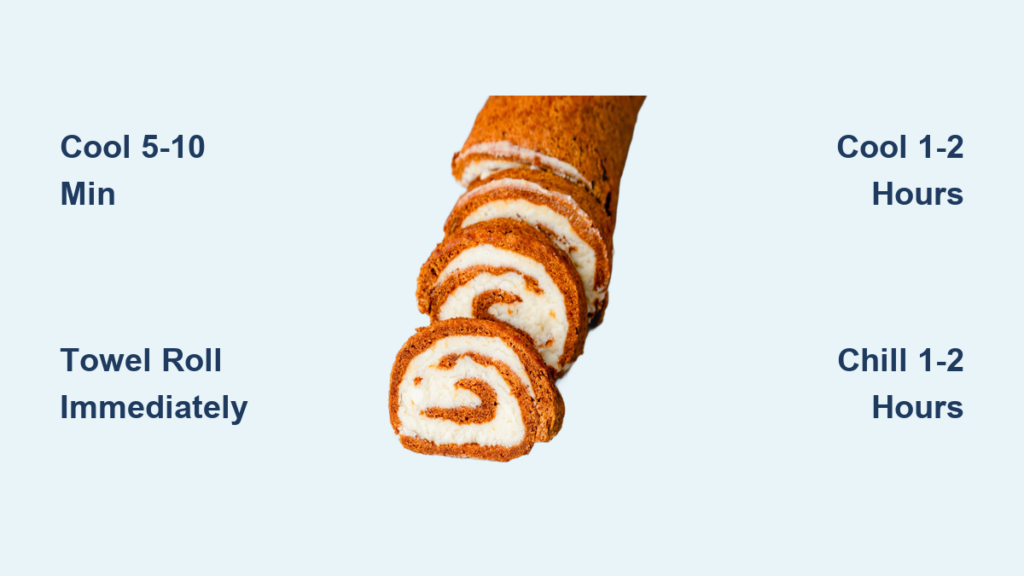
The Critical In-Pan Cool (5-10 Minutes)
Set your timer the moment the cake leaves the oven. Place the entire pan on a wire rack—never move or touch the cake during this phase. This brief rest allows three vital processes: surface moisture evaporates to prevent gumminess, internal steam dissipates gently to avoid collapse, and starch retrogradation begins to strengthen the structure. Watch for the cake to pull slightly from the pan edges—a visual cue it’s ready for transfer. Exceeding 10 minutes risks over-drying the surface, causing sticking or brittleness. Use this time to prepare your towel and filling.
The Towel Transfer & Warm Roll (Immediate Action)
After exactly 5-10 minutes, dust a thin kitchen towel (flour-sack style works best) generously with powdered sugar. Invert the cake onto the towel, then carefully peel off the parchment paper. Act immediately while the cake is still warm—this is your only pliability window. Starting at one short end, use the towel to gently lift and roll the cake into a spiral. The towel becomes part of the roll structure here, so ensure no wrinkles trap air bubbles. This “pre-roll” step is non-negotiable; it trains the cake fibers to bend without resistance during final filling.
The Shaping Cool (1-2 Hours at Room Temperature)
Place the towel-rolled cake seam-side down on a wire rack. This phase is where the magic happens: as the cake cools completely in its curved position, its structure permanently sets that shape. Rushing this step by refrigerating too soon causes condensation that makes filling slippery. Check readiness by gently touching the roll—it should feel cool and firm with no residual warmth. This complete cooling (typically 1.5 hours) creates the “muscle memory” that prevents cracks when you later unroll for filling.
The Fridge Set (1-2 Hours Before Filling)
Once fully cooled at room temperature, wrap the entire roll tightly in plastic wrap, covering all exposed towel surfaces. Refrigerate for 1-2 hours. This chills the cake thoroughly without drying it out, making it firm enough to handle during filling. The cold temperature also prevents your filling from melting on contact—a common cause of soggy layers. Never skip this step; a room-temperature cake will absorb filling unevenly and lose its shape.
Fill and Final Chill (Minimum 1 Hour After Filling)
Unwrap the chilled roll and gently unroll it over your prepared filling. Spread filling evenly, leaving a ½-inch border. Rewrap carefully using the towel as a guide, then place seam-side down on a serving platter. Wrap tightly in plastic and refrigerate at least 1 hour before slicing. This final set allows flavors to meld and the filling to stabilize. For clean slices, chill overnight—this transforms the roll from fragile to knife-friendly.
Pro Tips for Perfect Pumpkin Roll Cooling
- Powdered sugar > flour for towel dusting: It prevents sticking without altering taste or texture like raw flour can
- Lint-free towels are essential: Fluffier towels leave fibers that tear the cake surface during unrolling
- Set multiple timers: One for pan cooling, one for shaping cool, and one for final chill—distractions ruin timing
- Room matters: Cool rolls away from drafts or vents that create uneven drying and cause cracks
Common Mistakes That Ruin Pumpkin Roll Cooling
Overcooling in the pan (more than 12 minutes) is the top error. The cake surface dries out, sticking to parchment and tearing during transfer. You’ll know you’ve waited too long if the cake pulls away from the pan edges but feels stiff to the touch. Skipping the towel roll altogether guarantees cracks—cold, flat cake lacks the structural memory to bend smoothly. Rushing the final chill leads to filling oozing from slices because the roll hasn’t set. If your filling melts immediately upon contact, you skipped the crucial fridge set after shaping. Using thick towels creates uneven pressure points that cause cracks during rolling—opt for single-layer cotton instead.
The Perfect Pumpkin Roll Cooling Timeline
Your total cooling commitment is 3-5 hours, but every minute serves a purpose. Start counting when the cake leaves the oven:
| Cooling Phase | Time Required | Critical Purpose |
|---|---|---|
| In-pan cool | 5-10 minutes | Sets surface structure, prevents collapse |
| Towel roll | Immediate after pan cool | Creates shape memory, prevents cracks |
| Shaping cool | 1-2 hours at room temp | Permanently sets curved structure |
| Pre-filling chill | 1-2 hours refrigerated | Firms cake, prevents filling melt |
| Total before filling | 2.5-4.5 hours | Ready for filling |
| Final chill after filling | Minimum 1 hour | Allows clean slicing, flavor melding |
So, how long to cool pumpkin roll before filling? Allow 2.5-4.5 hours from oven removal to filling readiness, with the critical towel roll happening within 10 minutes of baking. This includes the essential 1-2 hour shaping cool where the cake sets its curve. The investment pays off with a roll that unrolls like silk, holds filling without seepage, and slices into perfect spirals. Remember: patience isn’t just a virtue in pumpkin roll making—it’s the structural engineer of your dessert. When you follow this precise cooling rhythm, you transform a notoriously tricky treat into a stress-free showpiece that wows every time. Your next pumpkin roll won’t just be good—it’ll be unreasonably perfect.


