
Your living room rug has seen better days. After months of foot traffic, spilled snacks, and pet accidents, that once-vibrant centerpiece now looks dull and feels gritty underfoot. Professional rug cleaning costs $100-$300 per rug, but you don’t need expensive services to restore your rug’s beauty. Knowing how to shampoo a rug properly at home saves money while protecting your investment. This guide delivers actionable steps for effective rug shampooing, whether you’re dealing with a small bedroom accent rug or a large living room centerpiece. By the end, you’ll confidently tackle rug cleaning yourself and extend your rug’s lifespan by years.
Identifying Your Rug Type Before Shampooing
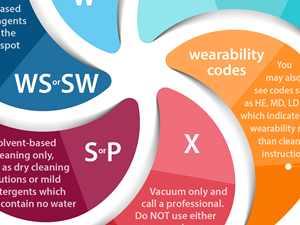
Not all rugs can handle the same shampooing process. Check for a manufacturer’s tag on the rug’s edge—most list cleaning codes that determine your approach. W means water-based cleaners are safe, S indicates solvent-only cleaning, and X means vacuum only (no liquids). If no tag exists, perform a discreet test: dab a hidden corner with water and check for color bleeding or texture changes after 15 minutes. Wool rugs require special pH-neutral cleaners to prevent shrinking, while synthetic fibers like nylon or polyester tolerate stronger solutions. Natural fiber rugs like jute or sisal can discolor when wet, so spot cleaning is often the only safe option. Never assume—using the wrong shampooing method can permanently damage your rug’s fibers and backing.
Essential Tools for Effective Rug Shampooing
Skip the guesswork with these must-have supplies for professional-quality results:
- Powerful vacuum with rotating brush roll (remove furniture first)
- Carpet shampooer (rent from hardware stores for $25-$40/day)
- Rug-specific cleaning solution (avoid household detergents that leave residue)
- White microfiber towels (colored towels may transfer dye)
- Soft-bristle brush for stubborn stains
- Spray bottle for pre-treatment
- Dehumidifier or fans (critical for proper drying)
Pro tip: Skip the bleach or ammonia-based cleaners—they degrade fibers over time. For wool rugs, use a specialized wool wash like Eucalan that doesn’t require rinsing. Always check your shampooer’s manual for solution-to-water ratios; too much detergent creates sticky residue that attracts more dirt.
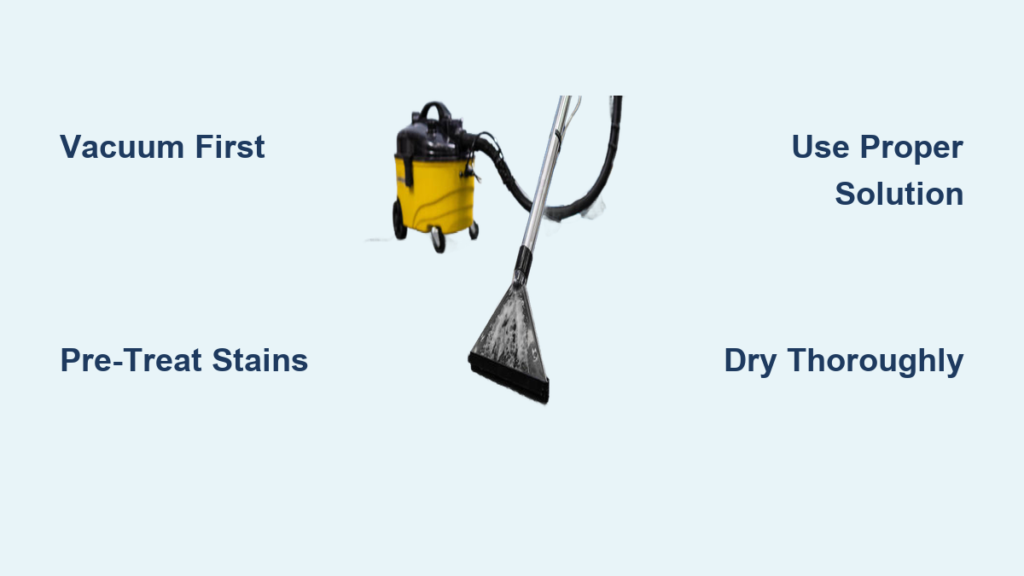
Step-by-Step: How to Shampoo a Rug with a Cleaning Machine
Vacuum Thoroughly Before Wet Cleaning
Start with a dry rug—vacuum slowly in multiple directions to lift embedded dirt. Pay extra attention to edges where debris accumulates. This prevents mud formation when moisture hits dry soil. Flip the rug over and vacuum the backing too; trapped dirt here causes premature wear. A high-traffic rug may require 2-3 vacuum passes to remove all loose particles. Never skip this step—even invisible dirt turns into grinding paste when mixed with water.
Pre-Treat Stains with Targeted Solutions
Address spots before full shampooing to prevent setting them deeper. For pet accidents, blot immediately with vinegar-water solution (1:1 ratio). Grease stains need dish soap dabbed gently with a white cloth. Red wine? Sprinkle salt first to absorb liquid, then apply club soda. Work from the stain’s edge inward to avoid spreading. Let solutions dwell 10 minutes but don’t dry—this breaks bonds between fibers and stains. Test all products in a hidden area first, especially on delicate rugs.
Operate the Shampooer Correctly for Deep Cleaning
Fill the machine with hot water and recommended solution—not straight from the tap, as cold water cleans poorly. Start at the farthest corner from your exit point to avoid walking on wet areas. Move the shampooer slowly (1 foot per 5 seconds) in overlapping vertical passes, then horizontal ones for thorough coverage. Focus extra passes on high-traffic zones near doorways. After the initial clean, run a second pass with clean water only to rinse out detergent residue—leftover soap becomes a dirt magnet within days.
How to Shampoo a Rug Without Special Equipment
Create a Safe Homemade Shampoo Solution
Mix 1 gallon lukewarm water with ¼ cup clear dish soap (like Dawn) and 1 cup white vinegar. The vinegar neutralizes odors while the soap lifts dirt—avoid colored soaps that may stain. For wool rugs, substitute dish soap with 2 tablespoons baby shampoo. Never use hot water, which can shrink natural fibers. Test the solution on a hidden corner first; wait 30 minutes to check for adverse reactions.
Hand-Scrub Rugs with Proper Technique
Dip a soft-bristle brush into your solution and work in 3×3 foot sections, following the rug’s pile direction. Apply gentle pressure—scrubbing too hard damages fibers. For thick rugs, use a clean mop with a microfiber head for even coverage. Immediately blot excess moisture with white towels; standing water seeps into the backing and causes mold. Change towels frequently as they become saturated. This method takes longer but gives you precise control over moisture levels.
Drying Your Rug Properly After Shampooing

Prevent Mold with Strategic Airflow
Lay the rug flat on plastic sheeting in a well-ventilated room—never on concrete which wicks moisture back into fibers. Elevate edges with wooden blocks to allow air circulation underneath. Place fans at 45-degree angles across the surface, not blowing directly down, to speed evaporation without disturbing fibers. Run a dehumidifier if humidity exceeds 50%. Flip the rug every 2 hours to dry both sides evenly. Most rugs need 6-12 hours to dry completely; walking on damp rugs creates new stains and compacts fibers.
Revive Flattened Pile with Final Touches
Once dry, vacuum against the pile direction to lift flattened fibers. For stubbornly matted areas, hold a hairdryer 6 inches away while brushing gently with a soft brush. Sprinkle baking soda over the surface, wait 15 minutes, then vacuum to absorb any lingering odors. This restores the rug’s original texture and appearance. Never use direct sunlight for drying—it fades colors and weakens fibers over time.
How Often Should You Shampoo Area Rugs?
High-traffic rugs need shampooing every 6-12 months, while low-traffic areas can go 12-18 months between deep cleans. Entryway rugs exposed to outdoor dirt require quarterly shampooing. Signs it’s time include:
– Visible soil even after vacuuming
– Persistent odors that won’t air out
– Stiff or gritty texture underfoot
– Allergy symptoms worsening indoors
Weekly vacuuming removes 80% of surface dirt but misses deep-set grime. Between shampoo sessions, sprinkle baking soda before vacuuming to absorb odors. Rotate rugs every 3 months to distribute wear evenly—this extends time between deep cleans.
When Professional Rug Shampooing Is Necessary
Call experts for these situations where DIY shampooing risks damage:
– Antique or valuable heirloom rugs (over 50 years old)
– Silk or other delicate fiber rugs
– Extensive water damage or mold growth
– Unknown fiber composition with no care labels
– Large area rugs over 9×12 feet (difficult to dry properly at home)
Professionals use truck-mounted equipment that extracts more moisture, reducing drying time significantly. They also have specialty solutions for rare fibers. For most standard synthetic or wool rugs under 8×10 feet, proper home shampooing delivers excellent results without the $150+ service fee.
By mastering how to shampoo a rug correctly, you’ll maintain cleaner indoor air (rugs trap 80% of household dust), extend your rug’s life by 5-10 years, and save hundreds in professional cleaning costs. The key is understanding your rug’s specific needs, using the right tools, and never rushing the drying process. Start with a small, inconspicuous area to perfect your technique before tackling the entire rug. With these methods, your freshly shampooed rug will look vibrant and feel plush underfoot—transforming your space without breaking the bank.


