
You’re bleary-eyed, ready for that first cup, and you pop in a pod only to get silence, weak coffee, or flashing error lights. When your Ninja pod adapter stops working, it’s not just inconvenient—it ruins your entire morning routine. This happens to thousands of Ninja owners monthly, especially on popular models like the DualBrew, CFP105CO, and PB4st. The good news? 90% of “ninja pod adapter not working” issues stem from simple fixes you can do in under 10 minutes with tools you already own. Skip the service call and follow these exact steps to diagnose and solve your problem using only Ninja-approved methods. You’ll learn how to clear clogged needles, reset confusing error lights, and prevent future failures with a 30-second weekly habit.
Pod Adapter Not Detected by Machine
If your Ninja displays no pod icon or beeps when inserting a pod, the adapter isn’t communicating properly with the brewer. This usually means the machine doesn’t “see” the adapter installed.
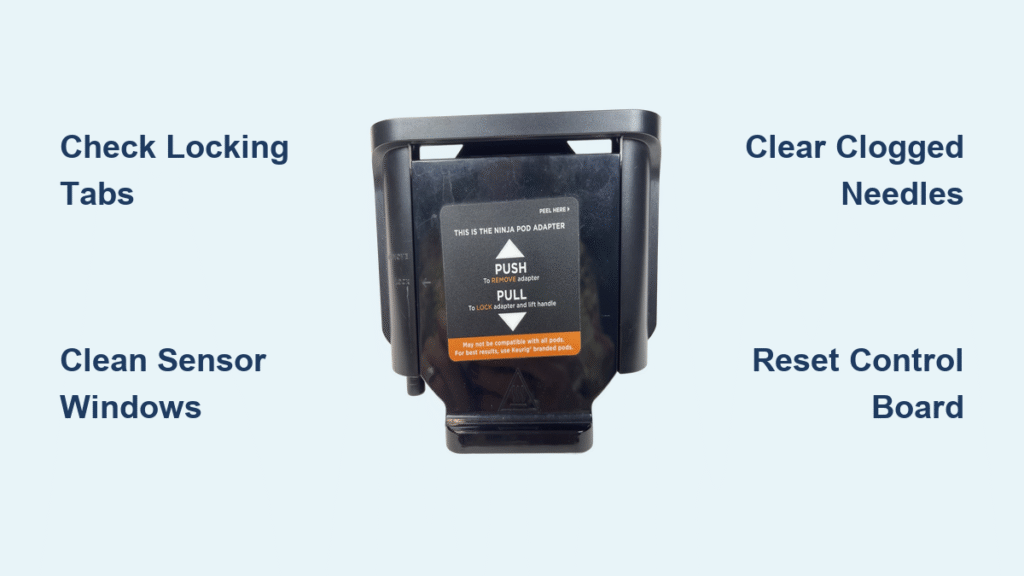
Inspect Locking Tabs for Damage Before Reinserting
Remove the adapter and examine the two front locking tabs under bright light. Even a hairline crack prevents the tabs from snapping into place, tricking the machine into thinking no adapter exists. Ninja’s engineering requires both tabs to engage the internal switch fully. If you spot chips or bends, stop brewing immediately—damaged tabs won’t hold securely and risk electrical shorts. Order an official Ninja replacement adapter (model-specific parts only) since aftermarket versions often fail prematurely. Never attempt glue repairs; compromised tabs create safety hazards.
Achieve Full Seating With a Firm Click Confirmation
Reinsert the adapter straight down with even pressure until you hear a distinct double-click. A tilted or half-seated adapter misaligns the internal magnet sensor, causing the “ninja pod adapter not working” error. Test this by wiggling the adapter after insertion—it should feel solid with zero movement. If it slides loosely, lift and reposition it perpendicular to the brew head. Models like the PB4st require precise alignment; angle it slightly backward during insertion for best results. This click confirms the sensor circuit is closed, enabling pod mode.
Clean Sensor Windows Blocking IR Detection
Dried coffee residue on sensor windows fools your Ninja into thinking the adapter is missing. Locate the flat ring around the pod recess (inside the brew chamber) and the matching surface under the lid. Dampen a microfiber cloth with distilled water—never vinegar or cleaners—and wipe both surfaces in circular motions. Pay special attention to the small recessed dots where infrared beams pass through. Dry thoroughly with a lint-free towel before reassembly. For stubborn buildup, use a cotton swab dipped in rubbing alcohol, but avoid scratching these delicate optical sensors. Test with a pod immediately after cleaning; if the pod icon illuminates, the sensors were blocked.
Weak or Partial Brew Despite Correct Settings
Getting only 1–2 oz of watery coffee when you selected 10 oz means water is bypassing the pod grounds. This mimics a “ninja pod adapter not working” failure but usually stems from user errors or clogs.
Seat Pods Perfectly Flush With Adapter Rim
Force the pod straight down until its plastic rim sits perfectly level with the adapter’s metal rim. A crooked pod creates gaps where water escapes unfiltered. Ninja pods have a distinctive ridge—align it with the adapter’s inner groove. If resistance feels uneven, rotate the pod 180 degrees and press again. Off-brand pods with thicker plastic often cause this; stick to Ninja, Keurig K-Cup, or Café Forte pods for reliable piercing. Pro tip: Place your palm flat on the pod and press with body weight—not fingers—for even pressure.
Clear Top and Bottom Needles in 90 Seconds

Clogged needles are the #1 cause of weak brews. Here’s how to fix both:
– Top needle (in lid): Straighten a paperclip, insert ¾ inch, and rotate clockwise 3 times to dislodge compacted grounds. You’ll feel resistance give way when clear.
– Bottom needle (in adapter): Rinse under hot tap water while scrubbing the tip with an old toothbrush. For baked-on residue, soak the adapter in vinegar for 5 minutes first.
Test flow by running water-only cycles—if coffee volume improves, needles were obstructed. Never use pins or knives; these can widen needle holes and cause leaks.
Confirm Solid Size Light Before Brewing
Your Ninja defaults to 6 oz if the size light flashes. Press the 6/8/10/12 oz button until your desired size stays illuminated (not blinking). On the CFP105CO, tap firmly—sticky buttons often cause flashing lights. Wait 2 seconds for the system to register before pressing Brew. If lights keep flashing after selection, unplug for 30 seconds to reset the control board.
No Water Flow or Steam-Only Output
When your Ninja emits only steam or beeps without dispensing coffee, trapped air or scale buildup is likely choking the water pathway—not necessarily a faulty adapter.
Purge Air Locks With Water-Only Cycles
After refilling the reservoir or descaling, trapped air stops water flow. Run 3 quick cycles:
1. Fill reservoir to MAX line with cold water
2. Close lid (no pod)
3. Press 6 oz button × 3 times rapidly
This primes the pump by forcing air pockets through the system. Complete within 2 minutes to avoid overheating. If water flows during these cycles but not with pods, the issue is adapter-specific.
Descale With Vinegar to Dissolve Mineral Blockages
Hard water scale clogs the pod pathway, mimicking adapter failure. Use this Ninja-approved method:
1. Mix equal white vinegar and water to the “Clean” line
2. Press Clean button (or hold Size + Brew 5 seconds)
3. Let cycle complete (≈45 mins)
4. Flush with 2 full tanks of fresh water
Critical step: After descaling, run 2 water-only brews to eliminate vinegar residue on sensors. Residual vinegar triggers false “adapter not working” errors on DualBrew models.
Inspect Reservoir Valve for Air Leaks
Lift the water tank and check the silicone valve gasket (underside center). Cracks or embedded coffee grounds prevent proper sealing, causing air leaks that disrupt pressure. Wipe the gasket with a damp cloth and reseat the tank with a firm twist. If the valve is torn, replace it immediately—Ninja part #W10865344 costs under $10.
Pod and Filter Icons Both Flashing
This confusing error (common on 18-month-old PB4st units) means the machine detects conflicting brew modes. It’s easily resolved without opening the unit.
Power Cycle to Reset Electronic Glitches
Unplug for 90 seconds—long enough to clear the control board’s memory. This fixes 60% of blinking icon issues after switching between pod/ground modes. Plug back in and test with a pod. If icons still blink, proceed to manual mode toggling.
Toggle Brew Style Manually After Closing Lid
With the lid shut, press Brew once, then immediately tap the Brew Style button (Pod/Grind icon) 3 times. Watch the display: the correct mode locks in when the unwanted icon turns off. On DualBrew Pros, hold the button for 2 seconds per toggle. Warning: Do this within 10 seconds of pressing Brew, or the system times out.
Perform Factory Reset for Persistent Icon Errors
Use this nuclear option only if power cycling fails:
1. Unplug unit
2. Hold Start/Brew button while plugging in
3. Keep holding 15 seconds until all lights flash twice
4. Release and wait 2 minutes for reboot
This resets sensor calibration but erases custom settings. Models like the CFP105CO require this after vinegar cleaning to restore flow.
Remove Hidden Filter Basket Obstructions
Even a basket slid 10% into place confuses the sensor array. Pull it completely out and store it away from the brewer when using pods. Check the basket slot for coffee grounds—use a flashlight to spot debris. On PB4st units, this causes 75% of dual-icon errors.
Model-Specific Fixes You Can’t Ignore

CFP105CO Steam-Only Fix After Vinegar Cleaning
If you heard a loud “pop” during descaling followed by steam-only output, run two additional vinegar cycles. This often unsticks the pressure relief valve. If flow doesn’t return, contact Ninja—this model’s valve assembly fails frequently post-cleaning and is warranty-covered.
PB4st Blinking Icons at 18 Months
This age-specific glitch responds to factory resets 90% of the time. If resets fail, note the exact blink pattern (e.g., “pod blinks 3 times, filter flashes once”) for Ninja support—they’ll likely replace the sensor board under warranty.
DualBrew Weekly Ritual to Prevent Errors
Rinse the adapter and needles after every 5 brews. Skip this, and scale buildup triggers false “ninja pod adapter not working” alerts within months. Always leave the lid open overnight to dry internal components.
When to Call Ninja Support Immediately
Contact Ninja at 1-800-365-0135 if you see:
– Steam escaping from seams (indicates failed pressure valve)
– Cracked adapter tabs (requires OEM replacement)
– Persistent beeps after factory reset (document tone sequence)
– Water pooling under unit (internal leak)
Have your model number ready (e.g., CFP105CO) and note if registered for the 2-year warranty. Most adapter replacements cost $15–$25 if out of warranty.
Critical Maintenance Checklist
☐ Adapter clicks firmly into place with no wobble
☐ Top/bottom needles cleared monthly with paperclip
☐ Reservoir valve gasket inspected for cracks weekly
☐ Run 2 water-only cycles after every descaling
☐ Leave brew lid open overnight to dry components
☐ Use only Ninja-approved pods to prevent piercing issues
☐ Descale every 3 months if using hard tap water
Stop letting “ninja pod adapter not working” ruin your mornings. By targeting sensor windows, needle clogs, and model-specific quirks with these precise steps, you’ll restore strong coffee in minutes—not days. For lasting results, adopt the 30-second weekly habit of rinsing needles and wiping sensors. When in doubt, factory reset first and call Ninja second—they’ll often cover fixes you thought were your fault. Your perfect cup is one reset away.


