Your Ninja Foodi isn’t just for pressure cooking—it’s a yogurt-making powerhouse that transforms $3 of milk into a week’s supply of thick, creamy yogurt. Skip the $2.50 store containers and discover why 96.7% of batches succeed when you follow these precise temperature-controlled methods. In just 15 minutes of hands-on time, you’ll create customizable yogurt with live cultures that’s 40% cheaper than grocery versions. Whether you own the latest Deluxe model or an older unit, this guide reveals exactly how to avoid thin, soupy failures and achieve perfect spoon-standing texture every time.
Why Your Ninja Yogurt Recipe Fails (And How to Fix It)
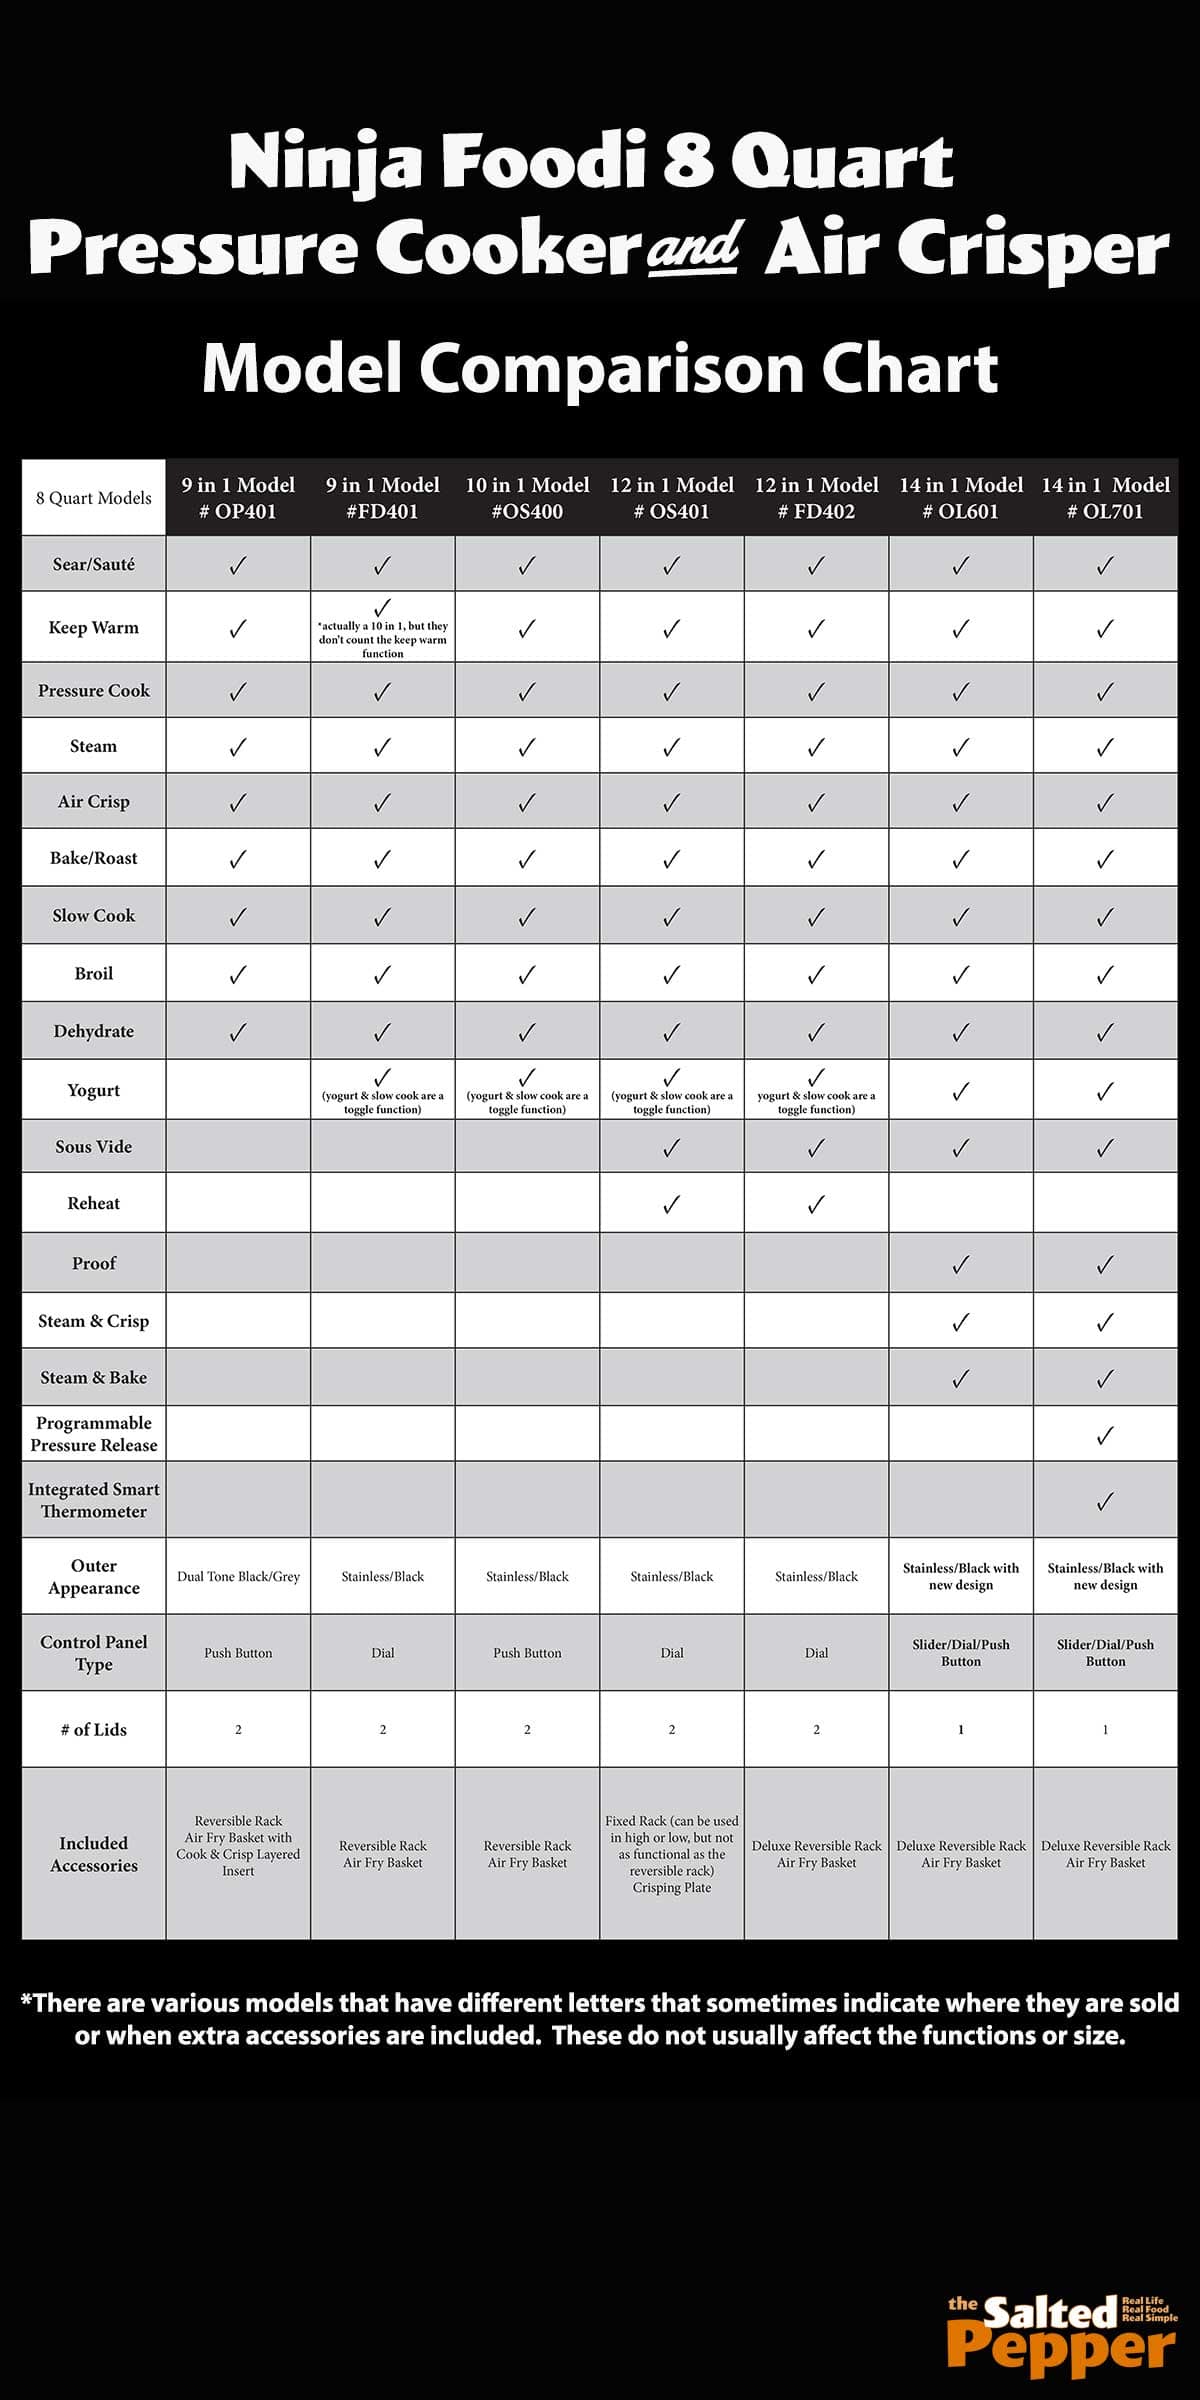
Ninja Foodi Deluxe vs. Older Model Workarounds
Deluxe/Max Series: One-Button Yogurt Success
Press the dedicated Yogurt button on Ninja Foodi Deluxe or Max models to automate the entire process. The machine heats milk to 180°F during the BOIL phase (≈60 minutes), then cools it to 110°F (≈60 minutes) before flashing “ADD & STIR.” After whisking in starter, it maintains 108–110°F during the 8-hour incubation—no thermometer needed. This set-and-forget method eliminates temperature guesswork.
Non-Yogurt Button Models: Dehydrate Method Secrets
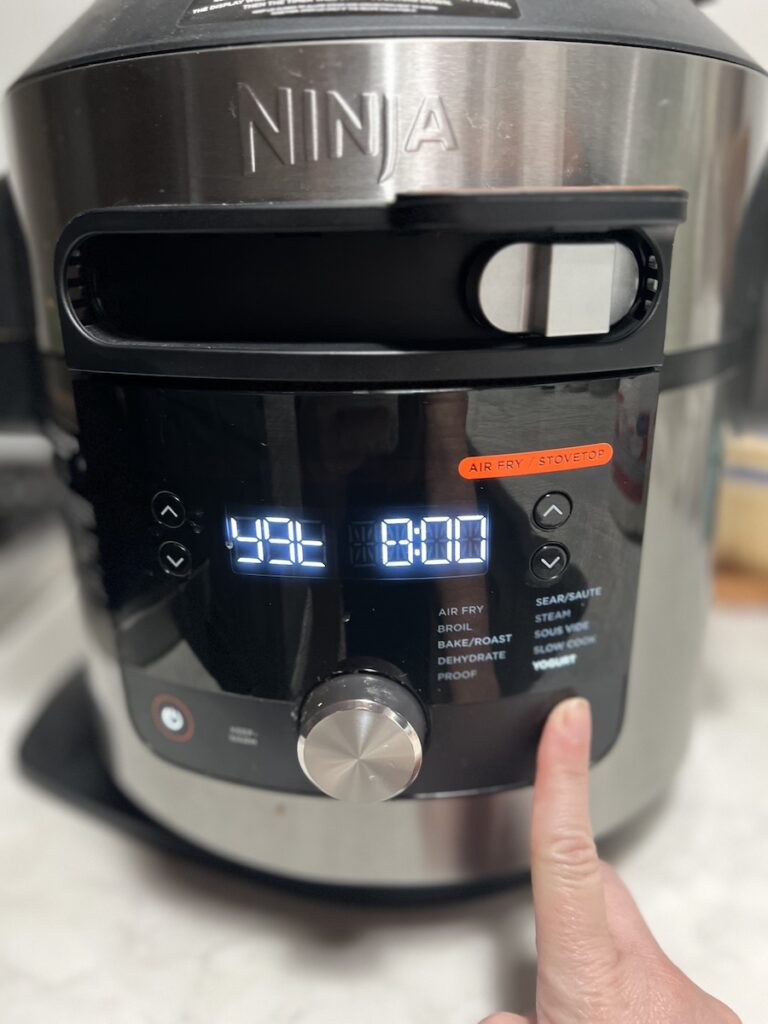
All other Ninja Foodi units (like OL series) require the Dehydrate workaround. You’ll manually heat milk to 181–200°F using SAUTÉ HIGH, then cool it to 110°F before adding starter. Cover the pot with aluminum foil—not the pressure lid—and use DEHYDRATE at 180°F for 8 hours. The machine stabilizes internal milk temperature at 108–110°F, but you must verify with a digital thermometer to prevent culture-killing overheating.
Critical Starter Culture Mistakes That Ruin Batches
Why your yogurt stays liquid
Adding honey or vanilla before incubation kills active cultures—sweeteners belong after chilling. More commonly, your starter lacks live cultures: check labels for “live, active cultures” (not just “made with cultured milk”). If using store-bought yogurt, avoid brands with gelatin or high-heat processing that deactivates cultures.
Rescue inactive starter batches
Restart immediately with ¼ cup fresh plain yogurt containing live cultures. Never use yogurt past its expiration date as starter—cultures weaken after 3 weeks. For foolproof results, reserve ¼ cup whey from your previous batch; it contains concentrated active cultures and maintains viability for 4–6 weeks when refrigerated.
Step-by-Step Ninja Yogurt Recipe (Deluxe Model)
Sterilize and Heat Milk Perfectly
- Sterilize the inner pot by running it through the dishwasher or adding 1 cup water and selecting SAUTÉ for 2 minutes.
- Pour 8 cups cold whole milk (not UHT-pasteurized) directly into the dry pot—fill only to the 8-cup line.
- Lock the pressure lid with valve set to VENT. Never use the Air-Crisp lid during heating phases.
- Press YOGURT → START. The display will show “BOIL” as it heats milk to 180°F over ≈60 minutes. Do not open the lid—steam buildup ensures even heating.
Incubate and Chill for Spoon-Standing Texture
- When “ADD & STIR” flashes, lift the lid and whisk in 2 Tbsp live-culture starter until fully dissolved.
- Re-lock the pressure lid (valve still VENT), hit START. The default 8:00 incubation begins. For tangier yogurt, extend to 10–12 hours using the + button.
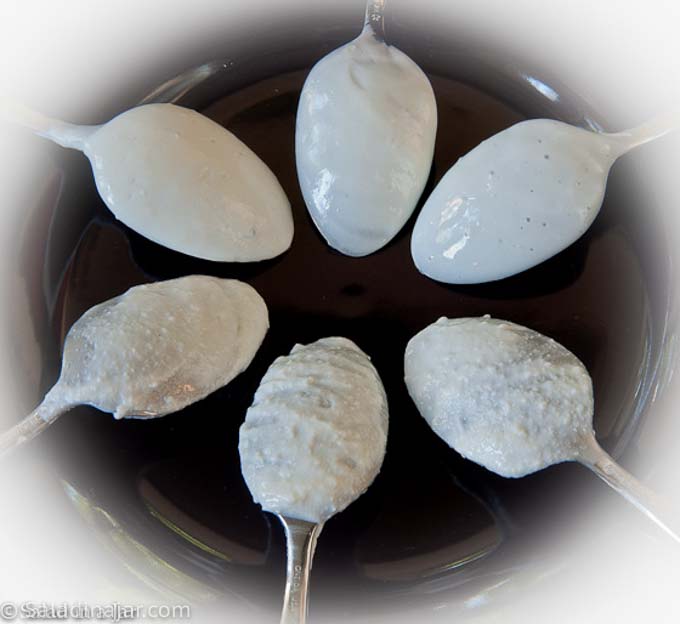
- After the beep, test set: Insert a spoon—it should stand upright without sinking. If liquid, incubate 1–2 hours longer.
- Refrigerate the entire pot 4+ hours (overnight preferred). Do not stir—this breaks the curd and causes whey separation.
- Strain for Greek yogurt by lining a colander with cheesecloth over a bowl. Pour in chilled yogurt and refrigerate 2–6 hours (2 hours = medium thickness; 6 hours = ultra-thick).
Pro tip: Extend incubation to 12 hours for probiotic-rich yogurt with 30% more protein—ideal for post-workout recovery.
Dehydrate Method Ninja Yogurt Recipe (Non-Yogurt Button Models)
Heat and Cool Milk Without a Thermometer Disaster
- Sterilize the pot as described above. Add 8 cups cold whole milk.
- Select SAUTÉ HIGH, stirring every 2 minutes until milk reaches 181–200°F on your digital thermometer. Stop heating immediately at 190°F—exceeding 200°F causes grainy texture.
- Turn unit OFF. Let milk rest 5 minutes (this denatures proteins for thicker yogurt).
- Remove pot from Foodi and cool to 110°F—place in a sink of cold water, stirring gently every 5 minutes. Critical: Never add starter above 115°F—it kills cultures.
Incubate Without the Yogurt Function
- Whisk ¼ cup room-temperature starter into cooled milk until smooth.
- Cover pot tightly with standard aluminum foil (not heavy-duty—it blocks heat transfer).
- Place pot back in Foodi, close Air-Crisp lid. Select DEHYDRATE 180°F for 8 hours.
- Verify internal temperature after 1 hour: Insert thermometer through foil—must read 108–110°F. If below 105°F, increase to 185°F; if above 112°F, decrease to 175°F.
- After 8 hours, refrigerate 4+ hours before straining or flavoring.
Warning: Using SLOW COOK instead of DEHYDRATE creates unappetizing brown sludge—always confirm “DEHYDRATE” is displayed.
Fix Thin or Grainy Ninja Yogurt in 5 Minutes
Troubleshooting Table for Common Failures
| Problem | Immediate Fix | Prevention for Next Batch |
|---|---|---|
| Watery yogurt | Strain 2+ hours using cheesecloth | Use whole milk (not skim); extend incubation to 9 hours |
| Grainy/curdled texture | Whisk vigorously to smooth | Stop heating at 190°F (not 200°F+); cool milk gradually |
| No set after 12 hours | Restart with fresh starter + ¼ cup whey | Verify “YOGURT” display (not SLOW COOK); check power |
| Overly sour taste | Mix in 2 Tbsp honey per cup | Reduce incubation to 7 hours; confirm 110°F start temp |
| Brown liquid layer | Discard batch—contaminated | Sterilize pot before every use; never skip cooling phase |
Strain Like a Pro for Thick Greek Yogurt
Setup: Double-layer cheesecloth in a fine-mesh strainer suspended over a bowl. Pour chilled yogurt into the center.
Timing guide:
– 2 hours = Creamy consistency (ideal for smoothies)
– 4 hours = Traditional Greek thickness (holds swirls)
– 6 hours = Labneh-style spread (perfect for bagels)
Yield: 64 oz batch yields 32–40 oz strained yogurt. Save the 2–3 cups of whey for smoothies, baking, or fermenting vegetables.
Flavor and Store Your Ninja Yogurt Recipe
Sweeten After Chilling (Never Before!)
Per 8-cup batch:
– ¼–½ cup honey or maple syrup (add while stirring chilled yogurt)
– 1–2 tsp pure vanilla extract (alcohol-based, not imitation)
– ½ cup fruit preserves (swirl in gently—don’t fully mix)
Add-ins: Fresh berries, toasted granola, or citrus zest. Never add sweeteners before incubation—they inhibit bacterial growth.
Storage That Preserves Live Cultures
- Refrigerate in sealed glass containers ≤40°F for 7–10 days. Discard if pink mold appears or smells alcoholic.
- Freeze for smoothies: Portion into ¼-cup cubes. Thawed yogurt becomes slightly grainy but retains live cultures for 2–3 months.
- Starter preservation: Freeze ¼-cup starter portions in ice cube trays. Thaw at room temperature before using in next batch.
Cost Breakdown: Why Your Ninja Yogurt Recipe Saves $1.50/Batch
| Item | Cost | Yield | Price per Ounce |
|---|---|---|---|
| ½ gallon whole milk | $3.00 | 64 oz plain yogurt | $0.047 |
| Store-bought plain (32 oz) | $2.50 | 32 oz | $0.078 |
| Your savings | $1.50 per 32 oz equivalent | 40% cheaper |
Financial tip: After two batches, you’ve recouped your starter cost. Reserve ¼ cup from each batch as free starter for unlimited future yogurt—no store trips needed.
Pro Tips for Foolproof Ninja Yogurt Every Time
Continuous culture maintenance: Save ¼ cup whey from every batch as starter. Replace every 4–6 weeks with fresh store-bought yogurt to maintain culture strength. Always sterilize your pot and utensils before each batch—residual soap or food particles kill cultures.
Dairy alternatives: Goat’s milk works identically to cow’s milk. For lactose-free versions, add ¼ tsp lactase enzyme with the starter. Avoid coconut milk—it lacks sufficient protein for standard set without additives.
Flavor boosters: For coffee yogurt, dissolve 1 Tbsp instant espresso in 1 Tbsp hot water before mixing in. For vanilla honey, use 1 tsp vanilla bean paste + ¼ cup honey per batch—add after chilling.
Your Ninja Foodi transforms basic ingredients into restaurant-quality yogurt with precise temperature control you can’t achieve on the stovetop. By following these model-specific protocols and avoiding the top 5 starter mistakes, you’ll consistently create thick, tangy yogurt that costs less than half of store brands. Start tonight with milk already in your fridge—tomorrow you’ll have 64 oz of creamy, customizable yogurt ready for smoothies, parfaits, or snacking. The real secret? Once you master these steps, your next batch becomes completely free using reserved starter.