
That sleek Ninja Master Prep blender sitting on your counter isn’t just another kitchen gadget—it’s your ticket to restaurant-quality results without the professional equipment. The top-mounted motor design completely changes how you approach food preparation, letting you switch between precise chopping and smooth blending with just a container swap. You’ll discover why thousands of home cooks have replaced their traditional blender and food processor with this versatile powerhouse, and exactly how to harness its dual-tier blade system for flawless results every time you use it.
Unlike conventional blenders with their single bottom blades that leave chunks or create mush, the Ninja Master Prep’s innovative two-tier blade configuration processes ingredients evenly from top to bottom. Those razor-sharp blades—capable of slicing through newspaper and cans without dulling—demand respect but reward you with perfect textures whether you’re making chunky salsa or creamy frozen drinks. In this guide, you’ll master the pulse technique that separates beginners from power users and learn the specific container choices that make this blender a true kitchen workhorse.
Choosing the Right Container for Your Task

Selecting between the Mini Master Prep and Master Prep Pitcher makes all the difference in your results. The Mini Master Prep’s compact size handles single servings and precision chopping tasks like garlic, cheese, and small salads with surgical accuracy. Its low-positioned bottom blade processes minimal quantities effectively—down to a single garlic clove. Meanwhile, the Master Prep Pitcher tackles frozen drinks, smoothies, and family-sized batches with ease, transforming ice cubes into convenience-store quality frozen treats.
Mini Master Prep: Small Batch Powerhouse
The Mini Master Prep shines when you need precise control over small quantities. Drop in a single garlic clove, pulse twice, and you’ll get evenly minced perfection without the tedious hand-chopping. When processing cheese, cut it into 1-inch chunks while keeping it refrigerated until the moment you’re ready to shred. For cold mozzarella, three to four quick pulses create shreds that melt beautifully in hot dishes—far superior to what traditional graters produce.
Master Prep Pitcher: Frozen Drink Specialist
For icy creations that rival your favorite convenience store treats, the Master Prep Pitcher is your go-to container. When making frozen drinks like a 7-Eleven Cherry Slurpee replica, fill the pitcher one-third full with ice cubes straight from the freezer. Pulse three to four times to break the initial cubes, then gradually add your liquid ingredients while continuing to pulse until you achieve that perfect creamy consistency. Never use slightly melted ice—it creates watery, weak frozen drinks that disappoint.
Mastering the Pulse Technique for Perfect Texture
The Ninja Master Prep rewards patience over brute force. Pressing the motor pod down in quick, controlled bursts gives you complete command over your final texture—whether you’re making chunky salsa or silky smooth purees. This pulse technique is the secret to avoiding the common pitfall of over-processing your ingredients into mush. Remember: you can always pulse more, but you can never undo over-processing.
Pulse Timing Guide for Different Textures
- 2 pulses: Creates coarsely chopped vegetables perfect for salsas or salads
- 4-6 pulses: Achieves finely shredded cheese or minced garlic with even consistency
- 8-10 pulses: Produces smooth drinks and purees ideal for sauces and dressings
- Continuous pulsing: Reserved for silky smooth purees and hot chocolate with foamy texture
Critical Safety Steps Before First Use
Those dual-tier blades mean serious business—they slice through newspaper and cans without dulling. One unfortunate user reported a deep heel laceration from stepping on a blade, so treat these like surgical instruments. The top-mounted motor design eliminates common leakage issues but demands extra caution during handling and cleaning.
Blade Safety Protocol You Must Follow
- Always handle blades by the plastic hub only—never grip the sharp edges
- Store blades in their original protective sleeves when not in use
- Never reach into containers blindly after processing—always verify blades have stopped
- Keep blades securely stored away from children and pets at all times
Operational Safety Checklist
- Confirm container is seated firmly on a stable counter surface
- Ensure motor pod locks securely into place with an audible click
- Keep hands and utensils completely clear of container opening during operation
- Start with short pulse bursts rather than continuous operation to assess progress
Ice Crushing Like a Professional Bartender
Transform ordinary ice cubes into convenience-store quality frozen drinks with the Ninja’s dual-tier blade system. The staggered blades keep ice circulating continuously during processing, preventing the dreaded bottom-layer ice chunks that plague traditional blenders. For perfect results every time, follow this proven method:
- Fill pitcher one-third full with ice cubes straight from the freezer (never use slightly melted ice)
- Pulse 3-4 times to break down the initial cubes into smaller pieces
- Gradually add your liquid ingredients while continuing to pulse
- Continue pulsing until reaching that creamy, spoonable consistency
Pro Tip: For authentic Slurpee texture, add your flavor syrup after the initial ice crushing phase. This prevents the syrup from sinking to the bottom and creates uniform flavor distribution throughout your frozen treat.
Cheese Processing Secrets Restaurants Don’t Share
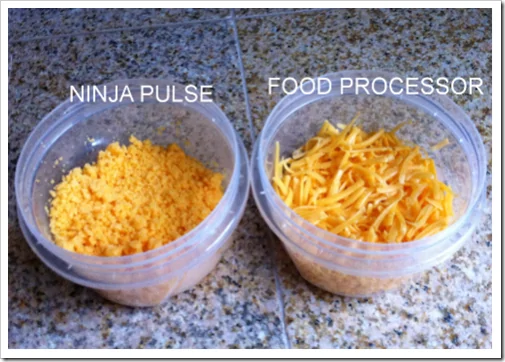
Cold cheese shreds beautifully in the Ninja Master Prep when you follow these temperature-sensitive techniques. The key is keeping your cheese refrigerated until the exact moment you process it—room temperature cheese turns gummy and clumps. For mozzarella, cut it into 1-inch chunks and pulse 3-4 times for perfect shreds that melt evenly in hot dishes.
The Muenster Miracle
Cold muenster cheese transforms into fluffy shreds you’ve never seen before when processed in the Ninja. The dual-tier blades create texture impossible with traditional box graters—light, airy shreds that melt instantly. Process immediately after shredding for best results, as the fine shreds can clump if left sitting.
Small Batch Mastery for Single-Serving Tasks
The Mini Master Prep’s low-positioned bottom blade handles minimal quantities with surgical precision. No more hand-mincing tiny amounts of garlic or herbs—just drop your ingredients in and pulse. For single garlic cloves:
- Drop peeled garlic into mini prep container
- Apply two quick pulses for perfectly minced garlic
- Scrape sides with a spatula if needed (rarely necessary)
- Transfer directly to your cooking pan for immediate use
This technique works equally well for small quantities of onions, herbs, or even nuts for garnishes—solving the age-old problem of underutilized food processors for single-serving tasks.
Salsa and Salad Perfection Without the Mush Factor
Achieve restaurant-quality consistency by layering ingredients strategically and controlling your pulse count. For chunky salsa that holds its texture:
- Process onions and peppers first with 2-3 pulses
- Add tomatoes last with just 1-2 pulses maximum
- Season immediately and serve for best flavor development
- Store extra in the refrigerator-ready container with lid
For quick chopped salads, layer hearty vegetables like carrots and celery first, then add delicate greens on top. Pulse 2-3 times for uniform pieces without turning your salad into puree—perfect for meal prep containers you can grab straight from the fridge.
Daily Maintenance That Extends Your Blender’s Life
Clean your Ninja Master Prep immediately after use—the sharp blades demand respect even during cleanup. Never put the motor pod in water; simply wipe it with a damp cloth. For the blades and containers:
- Carefully remove the blade assembly by gripping only the plastic hub
- Wash blades separately using a brush (never with bare hands)
- Place containers and lids in the dishwasher for thorough cleaning
- Air dry completely before storage to prevent moisture buildup
Critical Warning: Always disassemble completely before cleaning—never rinse the blade assembly while still attached to the container. This prevents accidental contact with the razor-sharp edges.
Long-Term Performance Tips for Daily Users
Heavy users report leaving the motor pod out for immediate access, but proper storage ensures longevity. Stack containers with lids for space efficiency, and always store blades in protective sleeves—not loose in drawers where they can cause injury or damage.
Weekly Deep Clean Protocol:
– Disassemble completely including motor pod components
– Soak blades in warm, soapy water for 10 minutes
– Clean motor pod contacts with a damp cloth (never submerge)
– Check blade sharpness—properly maintained blades stay sharp for years
Avoid thermal shock by never processing hot ingredients immediately after frozen ones. The $34.99-$39.99 price tag makes this blender an incredible value when you consider it replaces multiple kitchen tools—users report daily use for everything from morning smoothies to dinner prep, making it one of the best kitchen investments you’ll ever make.
Master your Ninja Master Prep by respecting those blades and embracing the pulse technique. Start with simple tasks like crushing ice or mincing garlic—within days, you’ll develop an instinct for exactly how many pulses create your perfect texture. The key is consistent practice; the Ninja rewards those who experiment while respecting its precision engineering. Before long, you’ll wonder how you ever cooked without this versatile powerhouse transforming your kitchen workflow one pulse at a time.


