
That stubborn garlic-onion-coffee smoothie smell clinging to your Ninja blender isn’t just unpleasant—it’s a breeding ground for bacteria that can compromise your next healthy drink. When your morning smoothie carries yesterday’s tuna salad aroma, you know it’s time for targeted odor elimination. This guide delivers specific solutions for every Ninja blender component, using methods proven to neutralize even the most stubborn odors without damaging your appliance.
The good news? Most Ninja blender smells respond well to proper cleaning techniques using household items you already own. You’ll discover exactly which method works best for different odor types, how to clean hard-to-reach areas where smells hide, and practical prevention strategies to keep your blender smelling fresh blend after blend.
Identify Exactly Where Smells Lurk in Your Ninja Blender

Pinpoint Problem Areas by Component
Your Ninja blender’s design creates multiple odor traps that standard washing misses. The pitcher walls absorb strong food oils from nuts, garlic, and spices, creating lingering smells that transfer to future blends. Blade assemblies collect microscopic food particles in their crevices, while rubber gaskets and seals harbor bacteria in their porous surfaces. Even the motor base can retain odors from spills that seep underneath the pitcher during use.
Conduct a Simple Smell Diagnostic Test
Run your clean, empty Ninja blender on high for 10 seconds with the lid off. If unpleasant odors emerge, the problem runs deeper than surface cleaning. Next, remove and separately smell each component—the pitcher, lid, blade assembly, and base. This isolates whether you’re dealing with surface smells (easily cleaned) or embedded odors requiring intensive treatment. Strong, sour smells typically indicate bacterial growth in rubber components.
Recognize When Replacement Beats Cleaning
Persistent sour or moldy odors after thorough cleaning suggest permanent absorption into plastic components. If your Ninja blender continues to smell after trying multiple cleaning methods and is over two years old, consider replacing specific parts rather than the entire unit. Pitchers that retain odors despite repeated cleaning have likely reached the end of their useful life and should be replaced ($20-40) rather than risking contaminated future blends.
Deep Clean Removable Parts Properly
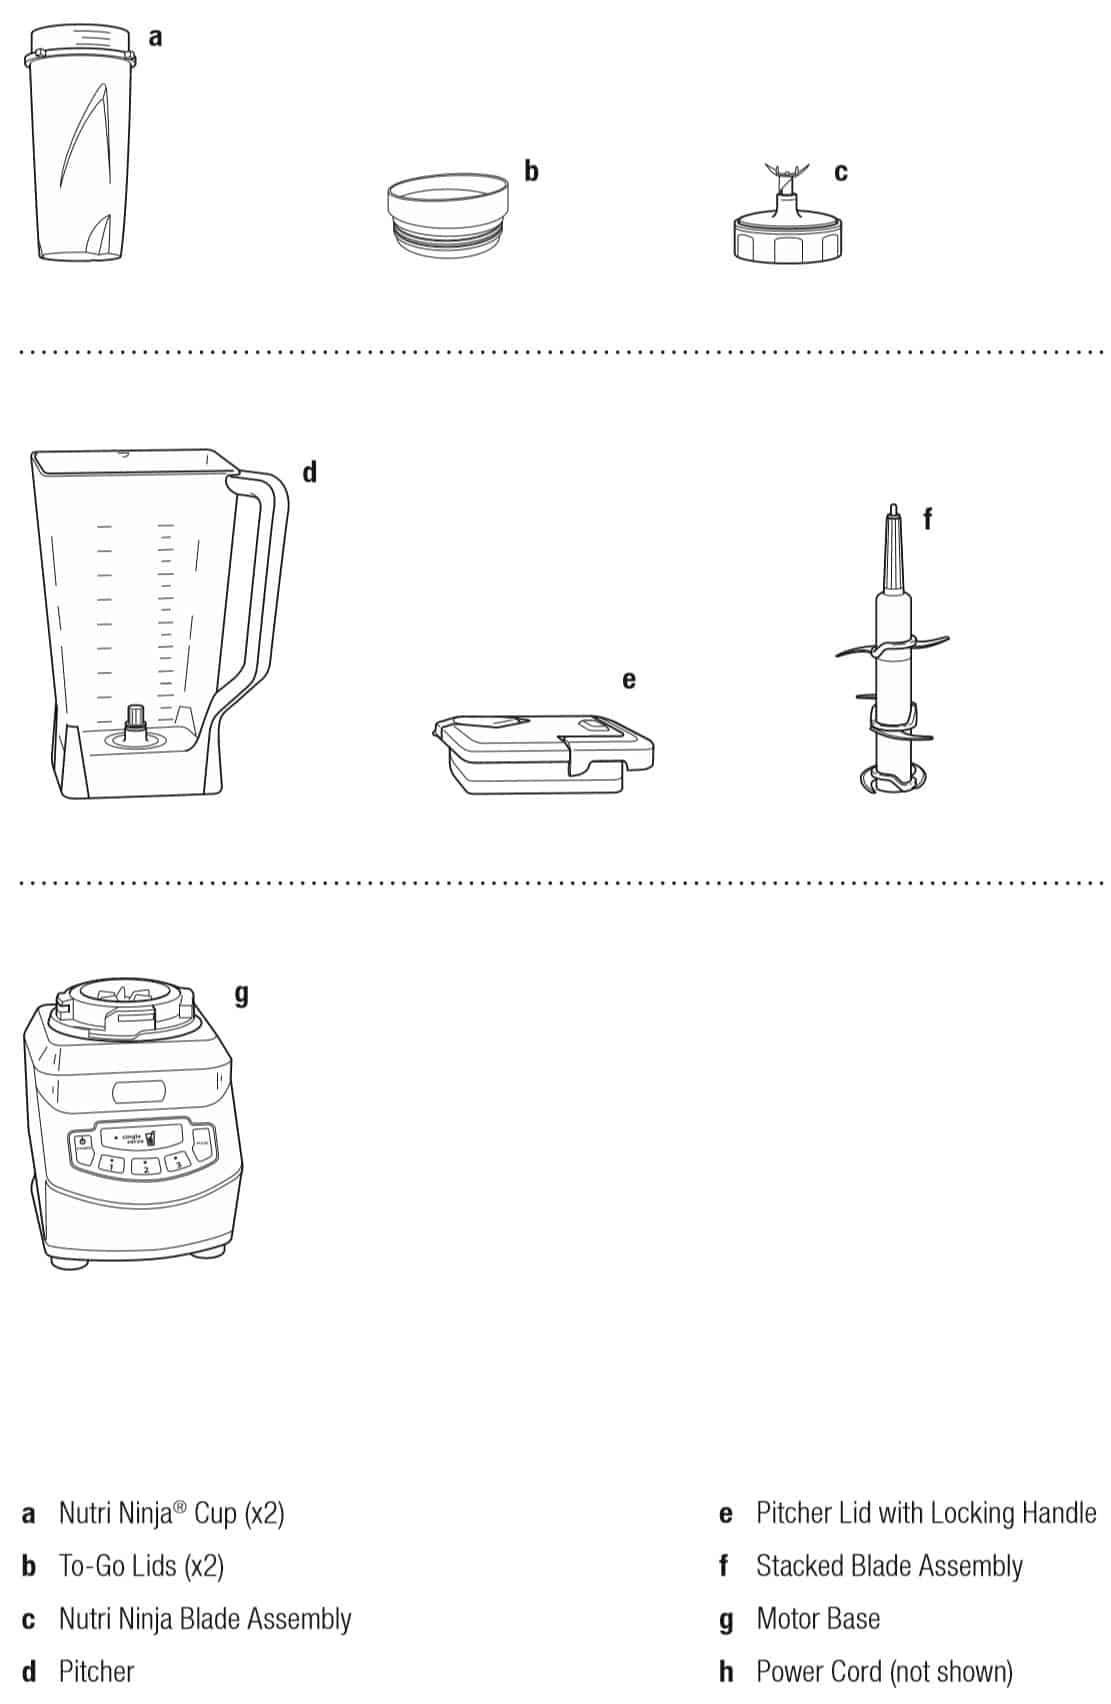
Complete Disassembly Before Cleaning
Remove the pitcher from the motor base, then unscrew the blade assembly from the pitcher bottom using a firm counter-clockwise twist. Carefully pop out the rubber gasket—this component often harbors the strongest odors. Take apart any additional accessories like the lid and single-serve cups. Each piece requires individual attention for complete odor removal, as smells hide in microscopic cracks invisible to the naked eye.
Blade Assembly Deep Cleaning Protocol
Fill your sink with hot water and 2 tablespoons of dish soap. Submerge the blade assembly for 15 minutes to loosen residue, then use a bottle brush to scrub between each blade. Pay special attention to the center post where food particles accumulate. Rinse thoroughly and perform a smell test—repeat the process if any odors remain. Never place blade assemblies in the dishwasher, as high heat can warp components and create new odor traps.
Gasket and Seal Revival Treatment
These rubber components absorb odors readily due to their porous nature. Remove gaskets from lids and blade assemblies completely. Soak them in 1 part white vinegar to 3 parts hot water for 30 minutes to break down odor molecules. Use a soft toothbrush to clean grooves thoroughly. Replace gaskets if they remain discolored or retain smells after two vinegar treatments, as damaged rubber cannot be fully restored.
Natural Odor Elimination Methods That Deliver Results

Baking Soda Power Paste Application
Mix 3 tablespoons baking soda with 1 tablespoon water to form a spreadable paste. Coat the inside of your pitcher thoroughly, focusing on stained or discolored areas where odors concentrate. Let sit for 2 hours (or overnight for severe smells). The alkaline properties neutralize acidic odor compounds at the molecular level. Rinse thoroughly and run a clean water cycle to remove all residue before next use.
Vinegar Steam Treatment Process
Fill your pitcher halfway with equal parts white vinegar and hot water. Secure the lid properly and blend on high for 30 seconds to create steam. Let the mixture sit for 1 hour—steam penetrates microscopic pores while vinegar breaks down odor molecules. Empty, rinse thoroughly, and repeat if needed for stubborn smells. This method works particularly well for protein-based odors like spoiled milk or egg residues.
Lemon Fresh Odor Neutralization
Quarter two fresh lemons and add them to your pitcher with hot water. Blend for 45 seconds, then let sit for 30 minutes. The citric acid cuts through grease while natural lemon oils provide deodorizing properties. This approach effectively eliminates coffee, garlic, and spice odors without leaving chemical residues. For extra strength, add one tablespoon of baking soda to the lemon mixture before blending.
Prevent Odors Before They Start
Immediate Post-Use Cleaning Protocol
Rinse your Ninja immediately after each use—never let residue dry on surfaces. For strong-smelling ingredients, blend warm water with a single drop of dish soap for 20 seconds before disassembling. This prevents oils from setting into plastic surfaces where they become harder to remove later. Always hand-wash components rather than using a dishwasher, which can bake odors deeper into materials.
Weekly Maintenance Schedule That Works
Every Sunday, perform a quick deodorizing cycle: fill pitcher with hot water, add 2 tablespoons baking soda, blend for 30 seconds. Let sit 10 minutes, then rinse thoroughly. This weekly ritual prevents gradual odor accumulation that becomes exponentially harder to remove over time. Consistent maintenance takes less than five minutes weekly but saves hours of intensive cleaning later.
Proper Storage Techniques for Long-Term Freshness
Store your Ninja with all parts completely dry and slightly separated—never snap components tightly together when storing. Leave the pitcher upside down on a drying rack to air out thoroughly. Keep the lid off or loosely placed to prevent moisture buildup. In humid climates, place a small packet of activated charcoal inside the stored pitcher to absorb any residual odors between uses.
Troubleshoot Stubborn Smells Effectively
Persistent Odor Decision Tree
Start with the vinegar steam method, then progress to baking soda paste if needed. If smells persist, move to enzyme cleaners specifically designed for kitchen appliances. Still problematic? Check for hidden residue under the blade assembly or in gasket grooves using a flashlight. Final step: replace rubber gaskets before considering new components, as these inexpensive parts ($5-10) often cause lingering odors.
Component Replacement Guidelines
Pitchers that remain smelly after multiple treatments likely have permanent odor absorption in the plastic. Replacement pitchers cost $20-40 versus $100+ for a new unit. Blade assemblies rarely retain smells if cleaned properly, but old gaskets should be replaced every 12-18 months as part of regular maintenance. Check Ninja’s website for genuine replacement parts that match your specific model.
When Professional Help Makes Sense
Local appliance repair shops often offer ultrasonic cleaning for small parts like blade assemblies. This vibration-based method removes microscopic residue traditional cleaning misses. Cost ranges $15-25—worth considering for expensive Ninja models before component replacement. Contact Ninja customer service first, as some models may have specific cleaning recommendations under warranty.
Quick Reference Smell Removal Chart
| Smell Type | First Try | Second Try | Nuclear Option |
|---|---|---|---|
| Coffee | Baking soda paste + overnight | Vinegar steam cycle | Enzyme cleaner |
| Garlic/Onion | Lemon water blend | Baking soda + vinegar | Replace gasket |
| Spoiled Milk | Vinegar soak 2 hours | Enzyme cleaner | New pitcher |
| Fish/Oils | Degreaser + hot water | Baking soda paste overnight | Professional clean |
| Mold/Musty | Bleach solution (5 min max) | Replace all rubber parts | Pitcher replacement |
Maintain Daily Freshness Without Extra Effort
Morning Freshness Check Routine
Before your first blend each day, give your Ninja a quick sniff test. If you detect yesterday’s smoothie, run a 20-second water and soap cycle first. This prevents flavor transfer and ensures your morning routine stays pleasant. A fresh-smelling blender indicates proper cleaning and maintenance, while lingering odors signal the need for deeper treatment.
Monthly Deep Clean Reminder System
Set a recurring phone reminder for the first Sunday of each month. This ensures you never go more than 30 days without a thorough cleaning, preventing the gradual buildup that creates stubborn odors. Consistent monthly maintenance takes less time than emergency deep cleaning sessions and extends your blender’s lifespan significantly.
Travel and Long-Term Storage Protocol
When traveling or storing your Ninja long-term, ensure all parts are completely dry—moisture causes odors to develop even when not in use. Place a paper towel inside the pitcher to absorb any residual moisture. Store blades separately in a sealed bag with a silica gel packet to prevent humidity damage. Never store components tightly assembled, as this traps moisture between surfaces.
Key Takeaway: Most Ninja blender odors disappear with consistent, targeted cleaning using natural methods. The secret lies in immediate attention to spills, weekly maintenance cycles, and knowing when to replace worn components. Your properly cleaned blender should smell completely neutral—not like lemons or vinegar—indicating successful odor elimination. For best results, combine immediate post-use rinsing with weekly baking soda treatments to keep your Ninja smelling fresh for years.


