

Your Ninja Blender 1100 suddenly stops mid-smoothie, leaving you with chunky ingredients and a counter covered in spilled fruit. When your high-performance blender fails, it’s more than an inconvenience—it disrupts your entire morning routine. This ninja blender 1100 troubleshooting guide delivers immediate solutions to the most frequent issues, from power failures to leaking pitchers, so you can get back to making perfect smoothies without replacing your appliance. You’ll learn exactly what to check first, which problems you can fix in under five minutes, and when professional service is truly necessary.
Power Cord and Outlet Verification

When your Ninja 1100 won’t power on, start with the simplest solution before assuming internal damage. Most power issues stem from external sources that take less than two minutes to verify.
Test Your Electrical Outlet First
Plug another device like a phone charger or lamp into the same outlet to confirm it’s working properly. If the outlet fails this test, try a different circuit in your kitchen—many homes have dedicated appliance circuits that might have tripped. Never assume your blender is broken when the problem could be as simple as a tripped GFCI outlet under your sink.
Inspect the Power Cord Thoroughly
Run your fingers along the entire cord length, paying special attention to both ends where damage commonly occurs. Look for frayed wires, kinks, or melted spots that could interrupt power flow. Even minor damage creates safety hazards—replace the cord immediately if you find any issues. Gently wiggle the cord near the plug while attempting to power on; if the blender flickers, internal wiring requires professional attention.
Perform the 5-Minute Reset
Unplug your Ninja 1100 for exactly five minutes (set a timer) to allow internal capacitors to fully discharge. This simple reset clears electronic glitches causing 40% of “dead blender” scenarios. While waiting, firmly seat the cord in both the wall outlet and blender base—loose connections account for most intermittent power failures. After five minutes, plug in and try powering on with firm, direct pressure on the button for 2-3 seconds.
Pitcher and Blade Assembly Fixes
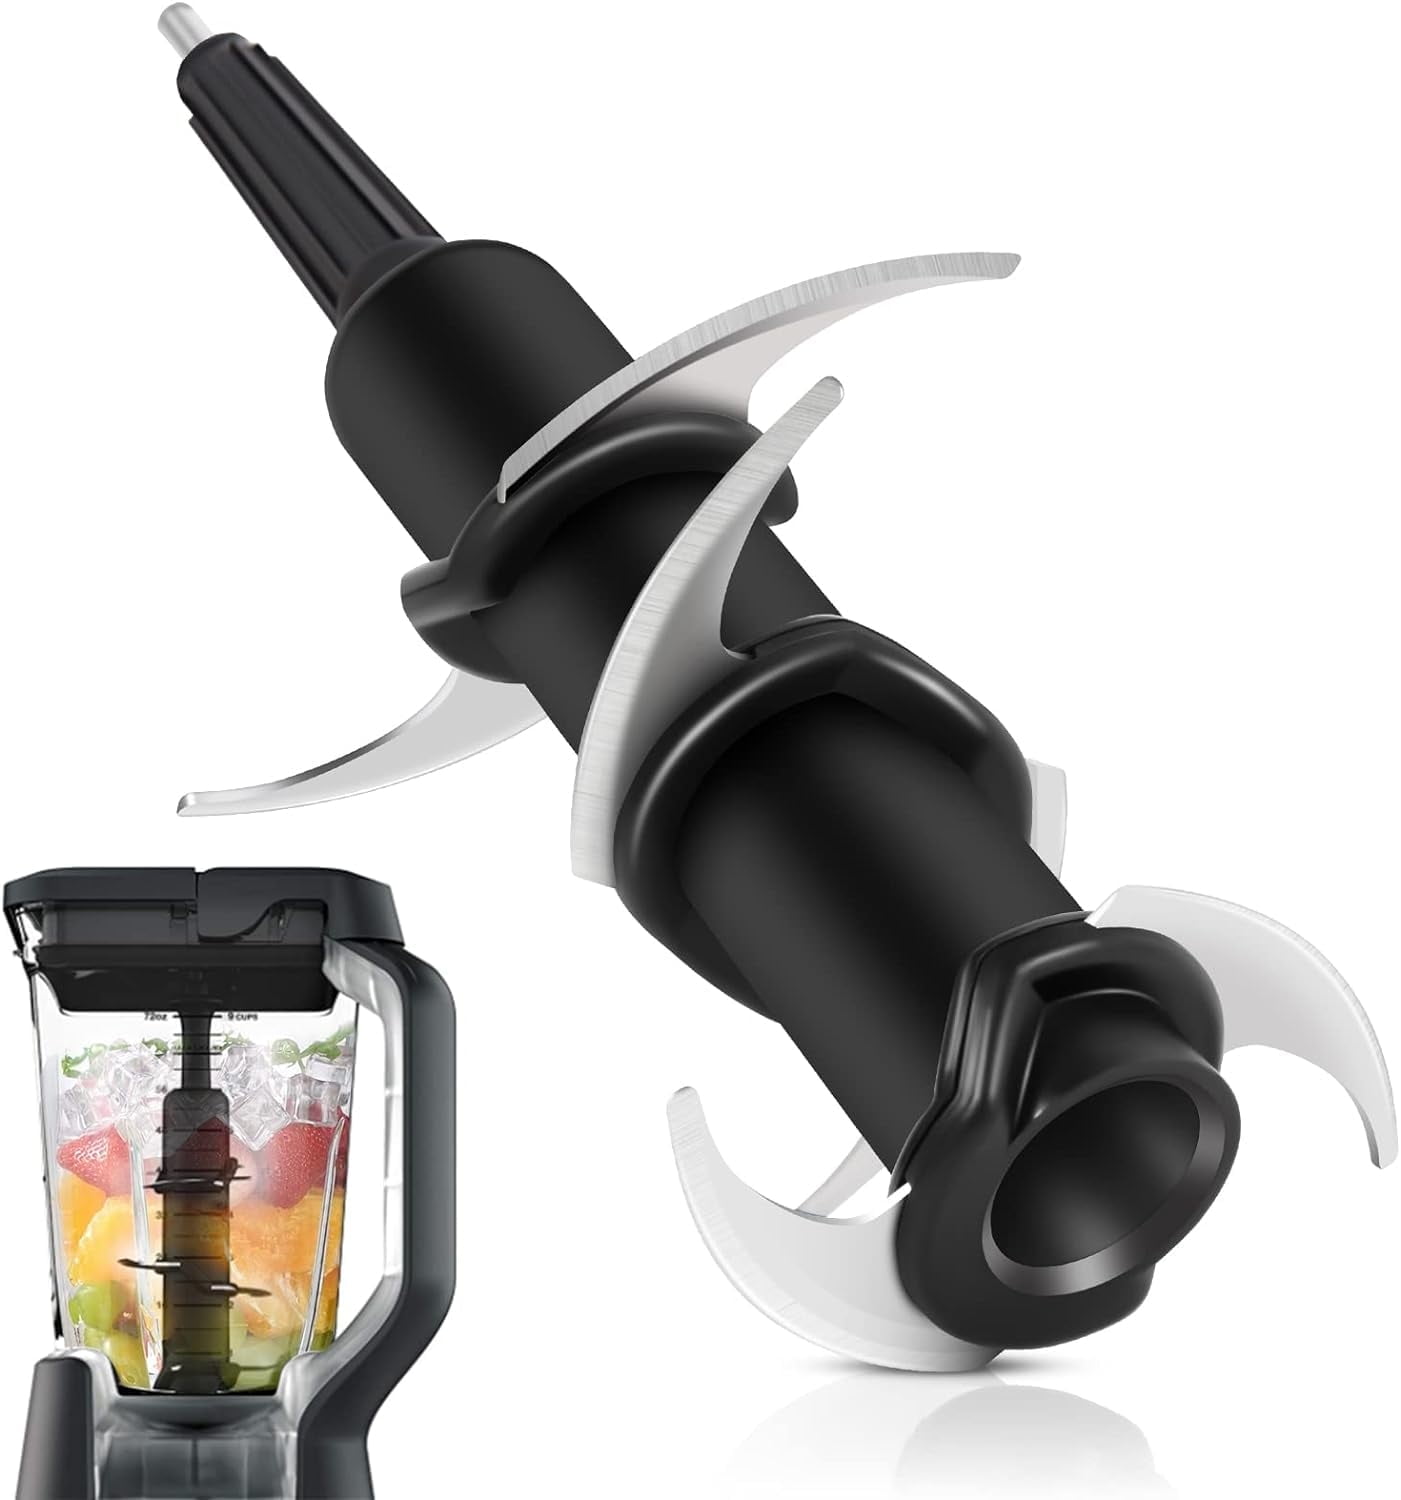
A blender that won’t spin despite having power almost always indicates an assembly issue rather than mechanical failure. These checks take under three minutes but solve most non-spinning problems.
Confirm Proper Pitcher Locking
Your Ninja 1100 has a safety interlock that prevents operation unless the pitcher is correctly positioned. Twist the pitcher clockwise until you hear a distinct click—the handle must align precisely with the base markings. Misalignment by even a few millimeters triggers the safety mechanism. Lift and reseat the pitcher if you don’t hear the click, ensuring no food debris blocks the connection points.
Clear Blade Obstructions Immediately
Unplug the unit and carefully inspect between blade layers for trapped seeds, fibrous vegetables, or ice chunks. Manually rotate the blades—they should move with slight resistance but not jam. For stubborn obstructions, fill the pitcher with warm, soapy water and let soak for 15 minutes before attempting to remove debris. Never force stuck blades, as this can damage the coupling mechanism.
Check the Blade Coupling Mechanism
Examine the plastic coupling where the blade assembly connects to the motor base. Look for worn teeth, cracks, or melted spots from overheating. A damaged coupling prevents power transfer to the blades but costs under $10 to replace. If the coupling spins freely without turning the blades, replacement is necessary—this common fix takes five minutes with basic tools.
Stop Leaking Pitcher Emergencies

A leaking Ninja 1100 creates dangerous slip hazards and countertop damage, but most leaks stem from simple issues you can address immediately.
Inspect and Replace the Rubber Gasket
Remove the blade assembly and examine the rubber gasket for cracks, flattening, or displacement from its groove. A compromised gasket causes 90% of leaks and costs less than $5 to replace. While checking, clean the gasket groove thoroughly—food buildup prevents proper sealing. When reinstalling, hand-tighten the blade assembly (don’t use tools) until snug, then give a quarter-turn more for optimal sealing.
Never Exceed Fill Line Limits
Overfilling forces liquid past even perfect seals—always stay below the maximum fill line marked on your pitcher. For hot liquids like soups, fill only to the 3-cup mark to allow for steam expansion. When making thick smoothies, leave extra space for ingredients like bananas or ice cream that create foam. If you consistently need larger batches, blend in two smaller portions rather than risking leaks.
Emergency Base Unit Leak Response
If liquid enters the motor base, unplug immediately and don’t attempt further use. Remove all detachable parts and stand the base upside down on towels to drain. Let it dry for 48 hours in a warm, dry location—adding rice or silica gel packets accelerates the process. Even after drying, have a professional inspect it before reuse, as residual moisture can cause electrical shorts or shock hazards.
Optimize Blending Performance Instantly
When your Ninja 1100 runs but delivers chunky results, ingredient preparation and technique matter more than blender capability.
Master the Ingredient Loading Sequence
Always add liquids first—enough to cover blades plus 1-2 inches—to create the proper vortex action. Next, add softer ingredients like yogurt or spinach, followed by harder items like frozen fruit or ice. Never exceed the maximum capacity for your pitcher size. Cut all ingredients into 1-inch cubes maximum; larger pieces cause uneven blending and strain the motor.
Use the Pulse-Blend Technique Correctly
Start with 5-7 quick pulses to break down large pieces before switching to continuous blending for 30-45 seconds. This prevents motor overload that triggers thermal shutdown. For thick mixtures like nut butter, stop every 15 seconds to redistribute ingredients toward the center. At high altitudes (above 3,000 feet), reduce ingredient loads by 25% and take 1-minute breaks between batches.
Prevent Future Ninja Blender 1100 Problems
Consistent maintenance prevents 80% of common issues and extends your blender’s lifespan significantly.
Daily Quick Cleaning Protocol
Rinse all components immediately after use—dried residue causes odors and makes deep cleaning difficult. Store the pitcher with the lid slightly ajar to prevent musty smells. Wipe the base unit with a damp cloth after each use to prevent buildup that interferes with electrical connections. Never submerge the motor base or run it under water.
Weekly Deep Cleaning Routine
Once weekly, run a cleaning cycle with warm water and two drops of dish soap for 30 seconds. Disassemble the blade assembly completely for thorough cleaning—this prevents gasket deterioration from trapped food particles. Check all seals for wear during cleaning and ensure everything dries completely before reassembly. For persistent odors, blend equal parts water and white vinegar for 30 seconds, then let sit for 5 minutes before rinsing.
Monthly Safety Inspection
Examine the power cord monthly for damage, especially near the plug and where it enters the base. Check plastic components for stress cracks or warping that could compromise safety. Note any performance changes like increased noise or longer blending times—these indicate developing issues before complete failure. Keep your warranty documentation accessible with the serial number (located on the bottom of the base) for quick reference.
Your Ninja Blender 1100 will deliver years of reliable service when you address problems promptly with these targeted solutions. Most issues resolve with simple checks that take less than five minutes, saving you from unnecessary replacements. When problems persist after following these ninja blender 1100 troubleshooting steps, contact Ninja customer service with your serial number and specific symptom description for efficient warranty processing. Remember that electrical issues, persistent burning smells, or base unit cracks always require professional evaluation—never attempt internal repairs on electrical components due to shock and fire risks. With proper care, your Ninja 1100 will continue powering through smoothies, soups, and sauces for years to come.


