

Your Ninja Foodi just finished cooking a perfect batch of crispy wings, but now you’re staring at a greasy mess with stubborn food particles clinging to every surface. Whether you’re dealing with baked-on residue in the ceramic pot or mysterious odors after cooking fish, knowing exactly how to clean your Ninja air fryer pressure cooker properly is essential for maintaining performance and extending its lifespan. Unlike standard kitchen appliances, this multi-functional device requires specific cleaning techniques for each component to avoid damaging sensitive parts while ensuring food safety. In the next few minutes, you’ll discover the precise methods Ninja recommends for keeping your Foodi in peak condition without risking electrical damage or voiding your warranty.
Most Ninja owners make the critical mistake of treating their Foodi like a regular air fryer or pressure cooker, leading to damaged components and frustrating malfunctions. The truth is, your Ninja air fryer pressure cooker has unique vulnerabilities—especially the electrical elements in the crisping lid and the precision valves in the pressure lid—that demand careful attention during cleaning. By following these specific procedures, you’ll prevent the #1 cause of premature Foodi failure: improper cleaning that leads to moisture damage in electrical components and compromised safety mechanisms.
Essential Safety Steps Before Cleaning Your Ninja Foodi
Never attempt to clean your Ninja air fryer pressure cooker while it’s still warm or plugged in. The crisping lid’s heating element retains heat significantly longer than the cooking pot—give it at least 30 minutes to cool completely after cooking to avoid serious burns. This waiting period also allows any residual steam to dissipate, preventing accidental scalding during the cleaning process.
Critical electrical protection zones: The main unit base, pressure lid electronics, and crisping lid interior must never be submerged in water. These areas contain sensitive components that will fail permanently if exposed to moisture. Instead, use only slightly damp cloths for these sections, wringing out excess water thoroughly before wiping.
Quick Daily Cleaning Method for Busy Cooks
Empty Components While Warm (Not Hot)
Remove the cooking pot, air fryer basket, and reversible rack immediately after cooking while they’re still warm—but not hot enough to cause burns. Wear oven mitts if needed. Empty all food debris and liquids right away; letting them sit creates stubborn buildup that turns into cement-like residue overnight. A quick rinse under warm water prevents this problem before it starts.
Two-Minute Exterior Wipe Down
Use a microfiber cloth dampened with mild dish soap to clean the main unit’s exterior, focusing on grease-prone areas around the control panel. For the crisping lid interior, gently wipe with a barely damp cloth, completely avoiding the heating element area. This simple habit prevents the accumulation of grease that causes burning smells during subsequent cooking sessions and maintains your Foodi’s appearance.
Deep Clean Ceramic Components Without Scratching

Cooking Pot and Basket Restoration Techniques
While Ninja states these ceramic-coated parts are dishwasher-safe (top rack only), hand washing significantly extends their lifespan. Fill your sink with warm water and a few drops of mild dish soap, then soak for 15 minutes to loosen debris before gentle cleaning. Use only soft sponges or nylon brushes—never metal scrubbers that permanently damage the non-stick ceramic coating.
For stubborn baked-on spots: Create a paste with baking soda and water. Apply with a soft cloth, let sit for 5 minutes to break down residue, then rinse thoroughly. This method safely removes burnt food without scratching the delicate ceramic surface, maintaining optimal non-stick performance for years.
Ridge Cleaning Hack for Air Fryer Basket
The air fryer basket’s ridges trap grease and food particles that standard cleaning often misses. Use a soft-bristled bottle brush to effectively clean between these ridges where debris accumulates. For extreme buildup, place the basket in warm soapy water with a dryer sheet overnight—the fabric softener ingredients remarkably loosen baked-on oils without harsh chemicals.
Pressure Lid Deep Clean Process for Safety
Remove and Clean Sealing Ring Properly
Gently pull the silicone sealing ring from its groove in the pressure lid—it stretches slightly for removal. Wash in warm, soapy water while checking the inner grooves for trapped food particles that compromise the seal. Although dishwasher-safe, hand washing prevents odor absorption that causes flavor transfer between meals. Smart cooks rotate between two differently colored rings (sold separately) to prevent cross-contamination between sweet and savory dishes.
Valve Maintenance That Prevents Malfunctions
Float valve: Push up from inside the lid to remove it. Rinse under warm water while ensuring the small silicone cap underneath stays correctly positioned—this safety feature prevents dangerous over-pressurization.
Pressure release valve: Pulls straight out for cleaning. Use a toothpick to carefully clear debris from the valve opening—the smallest obstruction affects pressure performance. Both valves must be completely bone-dry before reassembly to prevent dangerous steam leaks during operation.
Crisping Lid Care Secrets Most Owners Miss
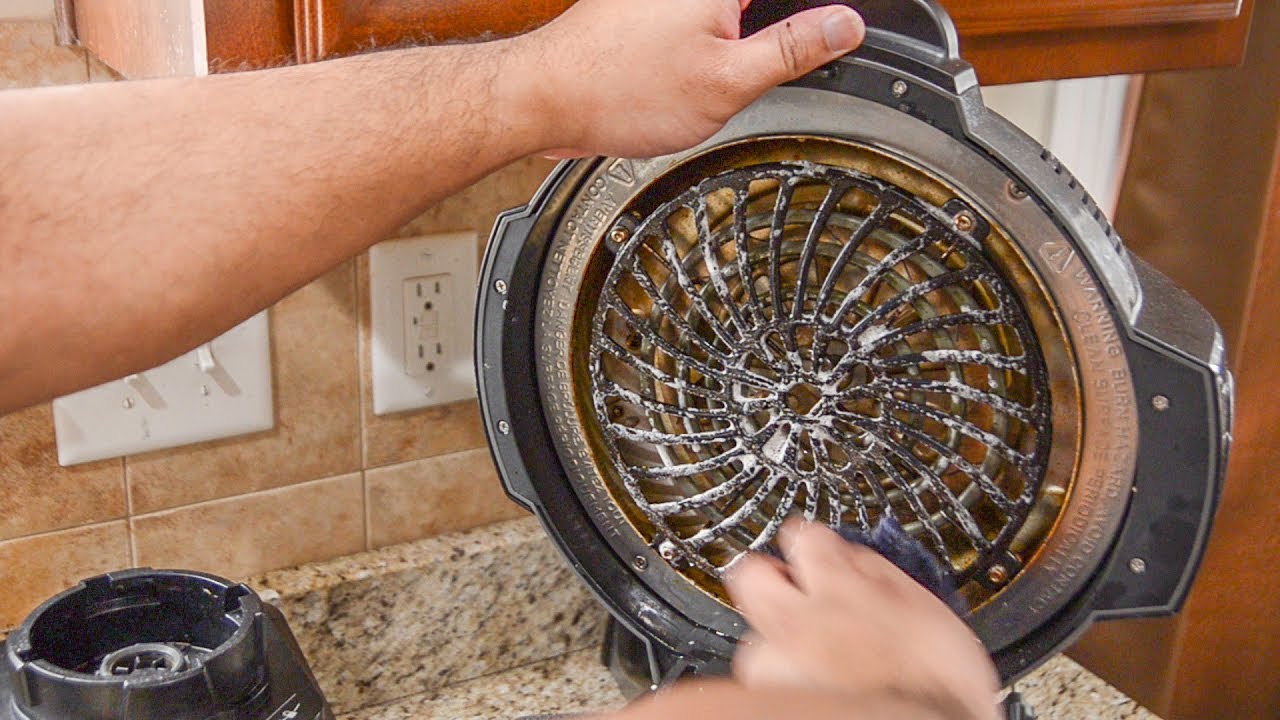
Heating Element Safety Protocol
The crisping lid contains both the heating element and fan—treat it like a mini oven that requires special care. Use only a soft, dry cloth or brush on the heating element, and only when completely cool. Never apply moisture here; even small amounts of water cause permanent electrical damage that requires expensive professional repair.
Fan Area Cleaning to Prevent Burning Smells
Gently brush dust and debris from the fan area using a soft paintbrush or clean makeup brush. This monthly maintenance prevents the burning smells that occur when accumulated dust heats up during air frying. Clean the fan area whenever you notice unusual odors or reduced air circulation during cooking.
Eliminate Stubborn Odors in Your Ninja Foodi Fast
Baking Soda Steam Method for Odor Removal
Fill the cooking pot with 2 cups water and 2 tablespoons baking soda. Pressure cook for 10 minutes, allow natural release, then air fry at 400°F for 10 minutes with an empty basket. This dual-action process uses steam to loosen odor-causing residues followed by high heat to burn off remaining particles—effectively neutralizing even the strongest smells from garlic or fish.
Lemon Fresh Technique for Natural Deodorizing
Place lemon wedges and 2 cups water in the pot. Pressure cook for 3 minutes, then natural release. The citric acid breaks down grease while leaving a fresh, clean scent throughout the appliance. This method works particularly well for tomato-based sauces that leave acidic residues and stubborn red stains.
Monthly Maintenance Checklist for Longevity
Critical Inspection Points
- Sealing ring: Check for cracks, deformation, or permanent discoloration that indicates replacement is needed
- Ceramic coating: Look for chips or excessive wear that affects non-stick performance and food safety
- Valves: Ensure float valve moves freely and pressure valve opening is completely clear
- Exterior: Inspect for damage that might affect safety or performance
Proper Storage Practices
Store all components completely dry to prevent mold growth. Keep the sealing ring separate from the lid to maintain its shape and prevent odor absorption. Place a paper towel between the pressure lid and main unit for proper air circulation. Store the air fryer basket upside down to prevent dust accumulation inside where food particles could later burn during cooking.
Common Cleaning Mistakes That Damage Your Ninja Foodi
Never use these destructive methods:
– Steel wool or metal scrubbers on ceramic surfaces (causes permanent scratches)
– Abrasive cleaners like Comet or Bar Keepers Friend (erodes non-stick coating)
– Bleach or ammonia-based products (damages multiple components)
– Oven cleaner on any part (contains chemicals that ruin seals and coatings)
Skip these dangerous shortcuts:
– Don’t put the entire pressure lid in the dishwasher (destroys internal safety mechanisms)
– Avoid submerging the main unit base (causes immediate electrical failure)
– Never force stuck valves—soak in warm water first, then gently clean
When to Replace Critical Ninja Foodi Components
The silicone sealing ring needs replacement every 12-18 months or immediately when cracked, deformed, or permanently stained red from tomato sauces. Replacement rings cost under $15 and come in multiple colors to prevent cross-contamination between sweet and savory dishes. Ninja offers official replacement rings that ensure proper fit and safety.
Ceramic coating chips aren’t covered under warranty as they’re considered normal wear, but excessive chipping affects cooking performance and food safety. The cooking pot and basket have a 1-year warranty against manufacturing defects, but normal wear from improper cleaning voids this protection.
Speed Clean Routine (Under 5 Minutes)
- Immediate action: Empty and rinse removable parts while warm (not hot)
- Quick wipe: Damp cloth on exterior and control panel to remove grease splatters
- Dry thoroughly: Prevent water spots and ensure safe storage
- Valve check: Quick visual inspection for obvious blockages
Your Ninja air fryer pressure cooker deserves proper cleaning that prevents buildup while protecting its sophisticated engineering. These methods work across all Ninja Foodi models, though specific part shapes may vary slightly. By following these precise techniques, you’ll maintain optimal performance for crispy fries, tender roasts, and perfect pressure-cooked meals for years to come. Remember that consistent, proper cleaning takes less time than dealing with a malfunctioning appliance—and keeps your warranty intact when components eventually need replacement. Start implementing these steps after your next cooking session and notice the difference in both your Foodi’s performance and your cooking results.


