
Ever pressed that cold lever on your office water cooler only to get lukewarm water, wondering why this seemingly simple machine failed you? That frustration hits hardest on sweltering afternoons when you’re counting on instant refreshment. Water coolers quietly serve us daily, yet most people have no idea how these unassuming units transform room-temperature water into icy relief within seconds. Understanding how does the water cooler work reveals a brilliant fusion of thermodynamics and practical engineering that solves a universal need. This guide breaks down the exact mechanisms behind both hot and cold delivery, so you can troubleshoot issues, extend your unit’s lifespan, and appreciate the science in every cup. You’ll discover why that satisfying glug-glug happens, how refrigerant magically chills water without freezing it, and what makes hot water dispensers safer than your kettle.
The Critical Components Powering Your Water Cooler
Your water cooler isn’t just a fancy dispenser—it’s a precision system where every part has a non-negotiable role in temperature control. When you examine the guts of a standard freestanding unit, you’ll find these engineered components working in concert to deliver reliable hot or cold water on demand.
Why Stainless Steel Cold Tanks Prevent Rust and Maintain Purity
The cold water reservoir is always crafted from food-grade stainless steel, not plastic, for a critical reason: constant exposure to chilled water promotes condensation and corrosion in lesser materials. This tank sits insulated within the unit’s core, holding 1-2 gallons of water ready for immediate dispensing. Its seamless construction prevents bacterial growth in seams while resisting pitting from mineral deposits in tap water. You’ll notice this tank feels consistently cool to the touch even when not actively cooling—a testament to its thermal insulation layer that minimizes compressor runtime. Without this specialized tank, your water would develop metallic tastes and the unit would fail prematurely from internal rust.
How the Refrigeration Unit Transforms Room-Temperature Water
Behind the stainless steel cold tank lies the compressor-driven refrigeration module—the true powerhouse of cooling. This compact system, roughly the size of a shoebox, contains sealed copper coils wrapped directly around the tank’s exterior. When activated, it doesn’t just cool water; it actively pulls heat energy out of the liquid through phase-changing refrigerant. Unlike a refrigerator that cools air, water coolers target liquid directly, making heat transfer 25 times more efficient. You’ll hear a faint hum when it engages—this is the compressor pressurizing refrigerant to kickstart the chilling process. If this unit fails, your water stays stubbornly warm regardless of how long you wait.
The Simpler but Equally Vital Hot Water System
The hot water side operates on straightforward resistive heating but with critical safety layers. A 300-500 watt heating element immerses directly into a smaller, heavily insulated tank (typically 0.5 gallons). A thermostat constantly monitors temperature, cycling the element to maintain water between 185-200°F—hot enough for instant coffee but below scalding point. Crucially, the hot tap requires a two-step action (push-and-turn or dual-button press) mandated by safety standards. This prevents accidental burns, especially in offices with children. When you dispense hot water, you’re drawing from this dedicated reservoir—not from reheated cold water—ensuring consistent temperature for tea or soup.
The Refrigeration Cycle: Step-by-Step Cooling Explained

Water coolers don’t “add cold”—they remove heat through a continuous thermodynamic loop. This process happens silently inside the unit every time you need chilled water, cycling every 15-30 minutes to maintain optimal temperature.
Why Compression Heats Refrigerant Before Cooling Your Water
The cycle begins when the cold tank’s thermostat detects water rising above 50°F (10°C). Here’s the exact sequence that transforms warm liquid into frosty refreshment:
- Compression Ignites the Process: The compressor squeezes low-pressure refrigerant gas into a high-pressure state, instantly heating it to 150-200°F. This isn’t a flaw—it’s essential for heat transfer. You might feel slight warmth near the unit’s base during this phase.
- Condenser Coils Release Heat Safely: The superheated gas flows through rear-mounted condenser coils. A small fan blasts room air across these coils, stripping away heat. As refrigerant cools, it condenses into warm liquid—visible as condensation on coils in humid environments.
- Expansion Valve Triggers Rapid Cooling: This liquid then hits the expansion valve—a precise metering device. Pressure plummets as refrigerant sprays into the evaporator coil, causing instant evaporation and a temperature drop to -20°F.
- Evaporator Coil Absorbs Water Heat: The frigid evaporator coil, wrapped around your cold tank, acts like a heat sponge. Water warmth transfers into the coil as refrigerant boils back to gas, chilling your water without direct contact.
- Cycle Resets Automatically: The gas returns to the compressor to restart the loop. This entire process takes 3-5 minutes to drop tank temperature by 10°F.
How Thermostats Prevent Energy Waste and Overcooling
Your cooler isn’t running constantly—smart thermostats manage efficiency. The cold tank thermostat has two critical functions: it triggers compression when water exceeds 50°F and shuts off the compressor once it hits 40°F. This 10-degree buffer prevents short-cycling that wears out compressors. Meanwhile, the hot tank thermostat maintains constant readiness without boiling water. If your cooler runs nonstop, these thermostats are likely faulty—a common failure point after 3-5 years of use. Always check thermostat settings before assuming compressor failure.
Water Delivery Mechanics: From Tank to Your Cup
The moment you press a lever, physics and engineering collaborate to deliver the right temperature water instantly. What seems like simple plumbing involves pressure management and safety protocols you never notice—until something goes wrong.
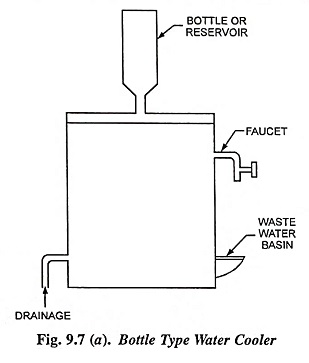
Why Gravity and Pressure Work Together for Smooth Flow
When you depress the cold lever, a spring-loaded valve opens against water pressure in the tank. Bottle-fed units rely on gravity: the elevated 5-gallon bottle creates 1-2 PSI pressure to push water downward. Direct-plumbed models use building water pressure (40-80 PSI), regulated by a pressure-reducing valve inside the cooler. Both systems include an air vent in bottle units or a pressure tank in plumbed models to prevent vacuum lock—the cause of that frustrating “glug-glug” sound when air can’t replace dispensed water. If water sputters or flows weakly, this vent is likely clogged with mineral deposits.
Bottle vs. Plumbed Systems: Critical Differences in Operation
The water source fundamentally changes maintenance needs:
* Bottle Systems: Require manual bottle changes but include an air-purging tube that draws fresh air into the bottle as water dispenses. If this tube gets blocked by dust or mold, water stops flowing entirely. Always wipe the bottle neck before loading to prevent contaminating the reservoir.
* Direct-Plumbed (POU) Systems: Use inline carbon filters that last 6-12 months. A float valve in the cold tank opens when water level drops, refilling automatically. These units develop leaks if shut-off valves aren’t closed during filter changes—a frequent installer mistake. Plumbed models never run dry but depend entirely on building water quality.
Essential Parts Every User Should Recognize
Knowing these components helps diagnose 80% of common issues without calling a technician. Each serves a non-negotiable role in safe, efficient operation.
- Compressor: The humming heart of cooling (located at base). If silent when cold water is needed, check power first—90% of “broken cooler” calls are tripped circuit breakers.
- Condenser Fan: Visible through rear vents. If blocked by dust bunnies, the unit overheats and stops cooling. Clean monthly with a vacuum brush attachment.
- Hot Tank Relief Valve: A small brass valve on the hot tank (required by law). If it leaks, the tank is over-pressurized—turn off power immediately and call service.
- Drip Tray: Often overlooked until overflowing. Pull it out weekly; standing water breeds bacteria that contaminate your cup.
- Child Safety Lock: On hot levers, this requires intentional force to activate. Never disable it—scalding injuries happen in 0.5 seconds at 200°F.
Fixing Common Water Cooler Failures Yourself
Most “broken” coolers just need simple interventions. Try these diagnostics before scheduling service:
Why Lukewarm Water Usually Isn’t a Compressor Problem
If cold water isn’t chilling:
– First: Unplug the unit for 10 minutes. Thermostats sometimes “stick” in off position.
– Second: Check clearance—coolers need 6 inches of space around vents. Overheating from stuffed corners is the #1 cause of cooling failure.
– Third: Clean condenser coils with a soft brush. Dust buildup reduces efficiency by 40%.
– Only then: Suspect refrigerant leaks (hissing sound) or compressor failure—requires professional service.
Stop Leaks Before They Damage Floors
Water pooling at the base typically means:
– Overflowing drip tray: Empty immediately and check for cracks.
– Loose bottle seal: Re-seat the bottle firmly; misalignment causes slow seepage.
– Failed tank gasket: Visible as moisture around tank seams. Requires part replacement.
Never ignore slow leaks—stainless steel tanks can corrode within months if water pools internally.
Reviving Weak Water Flow in Seconds
When dispensing slows to a trickle:
– For bottle units: Blow through the air tube (located beside the water spout) to clear mold blockages.
– For plumbed units: Close the shut-off valve, remove the filter housing, and flush debris from the inlet screen.
– Always check the drip tray isn’t obstructing the tank base—this common oversight restricts flow.
Understanding how does the water cooler work transforms you from a passive user to an informed operator. By recognizing the refrigeration cycle’s rhythm, identifying critical components, and performing basic maintenance, you’ll extend your unit’s life by years while ensuring every cup is perfectly chilled. Remember to clean drip trays weekly, maintain ventilation space, and replace filters on schedule—these three habits prevent 90% of failures. When issues arise, now you know whether it’s a simple fix or a call to professionals. Next time you press that cold lever, appreciate the elegant engineering that delivers instant refreshment: a miniature thermodynamic marvel working tirelessly in your office corner. Keep this guide handy, and you’ll rarely face warm water disappointment again.


