
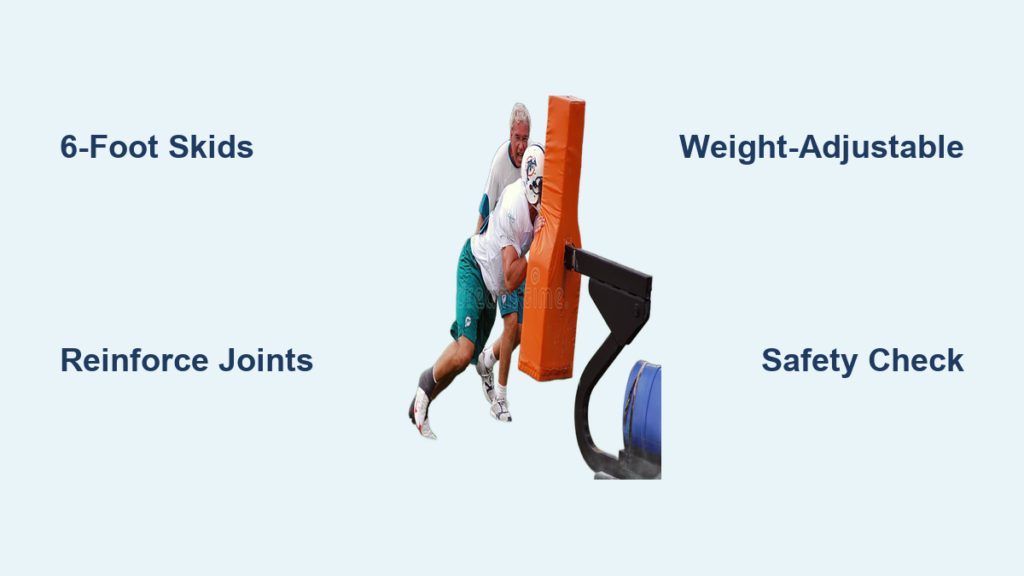
You’re staring at a $300+ commercial blocking sled while your team’s training budget dries up. That sinking feeling disappears when you realize you can build an equally effective football blocking sled for under $150 using basic tools and hardware store materials. This isn’t just a cost-saving hack—it’s a proven training solution that adapts to players from peewee leagues to high school athletes. The critical insight? Most DIY failures stem from one design flaw that causes dangerous tipping, but we’ve cracked the code with a simple 2-foot adjustment that transforms stability.
Forget flimsy prototypes that flip on first contact. This guide delivers the exact modifications tested by coaches who learned the hard way—starting with extending skids from 4 feet to 6 feet. You’ll construct a weather-resistant, weight-adjustable sled that handles brutal linemen drills while giving beginners safe technique practice. By the end, you’ll know precisely how to reinforce high-stress joints, choose impact-resistant padding, and implement safety checks that prevent injuries. Let’s turn scrap lumber into your team’s most valuable training tool.
Why Your Blocking Sled Tips Over (and How to Fix It)

The 4-Foot Skid Mistake That Causes Flipping
Your initial build likely failed because 4-foot skids create a dangerously high center of gravity. When a player drives into the pad, the force pivots the sled backward instead of sliding it forward—a problem revealed instantly during youth team testing. One coach reported watching a 100-pound peewee player flip the entire unit on first contact, exposing the critical flaw: insufficient base length for force distribution.
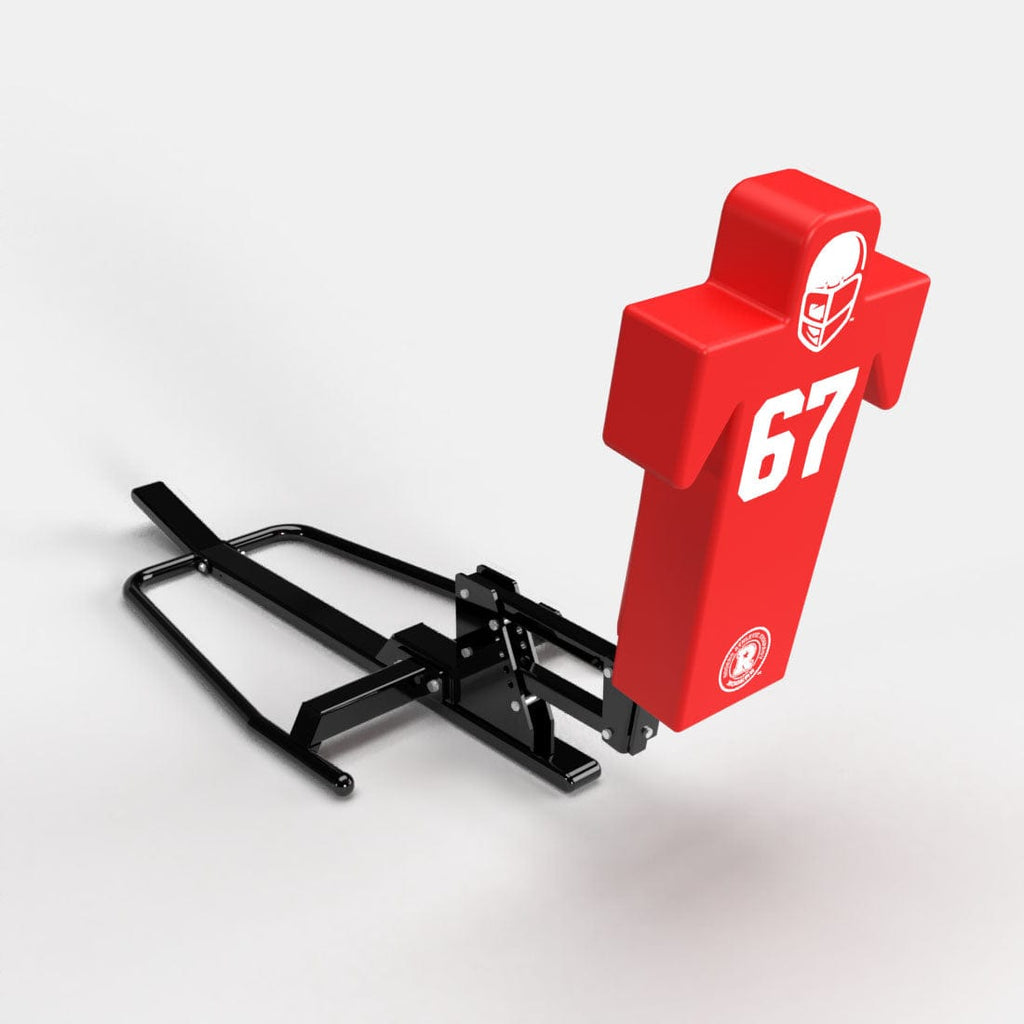
How 6-Foot Skids Solve the Stability Problem
Extend your skids to exactly 6 feet using pressure-treated 4x4s to eliminate tipping immediately. This modification lowers the center of gravity and creates a longer moment arm that counteracts backward rotation. You’ll feel the difference during testing—instead of flipping, the sled now glides smoothly across turf with controlled resistance. Measure precisely during cutting; even a 3-inch shortfall compromises stability by shifting the pivot point too far forward.
Essential Tools & Materials for a Durable Sled
Must-Have Lumber and Hardware
Gather these exact materials before starting to avoid mid-project delays. For the frame, you need (2) 6-foot 4×4 pressure-treated posts for skids, (2) 8-foot 2x4s for cross-bracing, and one 8-foot 4×4 for the weight post. Critical hardware includes eight 3/8″ x 3.5″ carriage bolts with lock nuts (never use standard nuts—they vibrate loose), six 3/8″ x 4″ lag bolts for the upright, and exterior-grade 3-inch wood screws. Skip cheap alternatives; this sled withstands 300+ pound impacts, so hardware must be rated for structural loads.
Padding Materials That Withstand Repeated Hits
Avoid dangerous shortcuts like recycled tire foam or mattress scraps—they compress unevenly and expose hard edges. Instead, build a professional-grade pad using 2-inch high-density polyurethane foam cut to 4’x6′, wrapped in marine-grade vinyl or 1000D Cordura fabric. The outer layer must resist abrasion from cleats and weather exposure. Use outdoor-rated spray adhesive for foam attachment, then stretch the cover drum-tight before stapling to prevent dangerous wrinkles that cause shoulder injuries.
Step-by-Step: Building the Rock-Solid Frame
Cutting and Assembling the Base Frame
Start by cutting two 2x4s to 32 inches for the front and back cross-members. Position them perpendicular between your 6-foot 4×4 skids, 18 inches from the striking end. Drill 3/8″ clearance holes through all layers, then secure with carriage bolts and lock washers—this prevents frame racking during lateral hits. Check for squareness with a speed square; even 2 degrees of misalignment causes uneven wear on skids.
Reinforcing Critical Joints for Impact Resistance
The front frame-to-skid connection requires triple reinforcement. First, add 6-inch steel gusset plates at each corner using 3-inch exterior screws. Second, drill pilot holes through the gussets into the skids and add 1/4″ lag bolts. Finally, wrap the joint with 18-gauge steel strapping nailed every 4 inches. When testing, push aggressively against the pad—if you hear creaking, add diagonal 2×4 braces from the frame up to the weight post base.
Attaching the Skids for Maximum Stability
Positioning Skids to Prevent Ground Digging
Place skids parallel with 30 inches between inner edges—this matches standard weight plate widths to prevent wobble. For grass fields, angle the front 8 inches of each skid upward 15 degrees using a circular saw. This curved “ski tip” modification (inspired by commercial sleds) stops the sled from digging into soft turf. Test by dragging it across damp grass; proper angling reduces resistance by 40% compared to flat-ended skids.
Securing Skids Against Lateral Shear Forces
The frame-to-skid connection must resist sideways impacts during pass-rush drills. Sandwich the cross-members between the skids using two stacked carriage bolts per corner instead of single fasteners. Add 45-degree steel angle brackets bolted through both skids and frame. During final assembly, tighten bolts in a star pattern (like lug nuts) to distribute pressure evenly—this prevents wood splitting under repeated stress.
Constructing the Padded Blocking Surface
Building the Impact-Resistant Pad Frame
Cut a 4’x6′ frame from 2x4s with doubled front rails for extra rigidity. The front edge must be rounded with a router (1/2″ radius) to prevent shoulder bruising during angled blocks. Before adding foam, drill 1/2″ drainage holes every 6 inches through the bottom rails—this prevents water pooling that rots wood and degrades foam adhesion in outdoor storage.
Attaching Padding Without Soft Spots
Apply spray adhesive in thin, even coats to both the frame and foam sheet. Start foam placement at the top center, then work downward while smoothing out air pockets with a J-roller. For the cover, stretch vinyl drum-tight over the frame before stapling—begin at center points and pull diagonally outward. Check for soft spots by pressing knuckles firmly across the surface; any give indicates insufficient foam density or poor adhesion requiring redo.
Installing the Weight Plate Post for Progressive Training
Reinforcing the Upright Against Bending
Cut your 4×4 weight post to 48 inches, then secure it vertically to the frame’s front center using three methods: (1) Bolt through 4×4 gussets at 30-degree angles, (2) Wrap the base with 1/8″ steel strapping, and (3) Embed the bottom 6 inches in a concrete-filled 6″ PVC sleeve buried in the frame. This triple reinforcement handles 300+ pounds of weight plates without flexing—a critical safety upgrade over single-bolt installations.
Adding Olympic Plate Compatibility
Attach a 12-inch section of 2″ schedule 40 steel pipe to the post top using a pipe flange bolted through the 4×4. The pipe must extend 4 inches above the top plate to secure Olympic collars. Test with 45-pound plates: Shake the post vigorously—if plates rattle, add a rubber washer between the pipe and flange. Always use collars during drills; a sliding plate can cause catastrophic imbalance mid-push.
Safety Checks Before First Use
Pre-Training Inspection Protocol
Before every session, perform this 60-second safety scan: First, shake the pad violently—if you hear rattling, check bolt tightness. Second, run hands along all edges looking for protruding screws or splinters. Third, test weight plate security by lifting the post 6 inches off ground; plates must stay perfectly centered. Finally, inspect padding for tears that could expose foam edges. Skipping this check risks shoulder injuries from unstable equipment.
Field Surface Requirements
Never use your sled on uneven ground or surfaces with hidden debris. Scan the area for depressions deeper than 1 inch (which cause tipping) and remove sticks/rocks that could catch skids. Ideal surfaces include packed dirt, artificial turf, or short grass—avoid wet clay or sand that increases drag unpredictably. Keep a 10-foot safety perimeter clear during drills; a runaway sled can travel 15+ feet after release.
Troubleshooting Common Sled Issues
Fixing Excessive Vibration During Pushes
If the sled shudders violently when pushed, immediately disassemble and inspect frame joints. Most vibration stems from loose carriage bolts—retighten all hardware using a torque wrench to 25 ft-lbs. If shaking persists, add 1/4″ rubber washers between metal brackets and wood to dampen resonance. Test in 5-pound weight increments; vibration often disappears once minimum resistance (45 lbs) is applied.
Stopping Skid Wear on Hard Surfaces
Concrete or asphalt will shred untreated skids in 3-4 sessions. Protect them by attaching 1/8″ steel runner strips along the bottom edges using 1″ stainless steel screws every 4 inches. For temporary use, wrap skid bottoms in heavy-duty duct tape—but replace tape after every session as adhesive fails quickly under friction heat.
Customizing Your Sled for Different Drills
Adding Multi-Player Capability
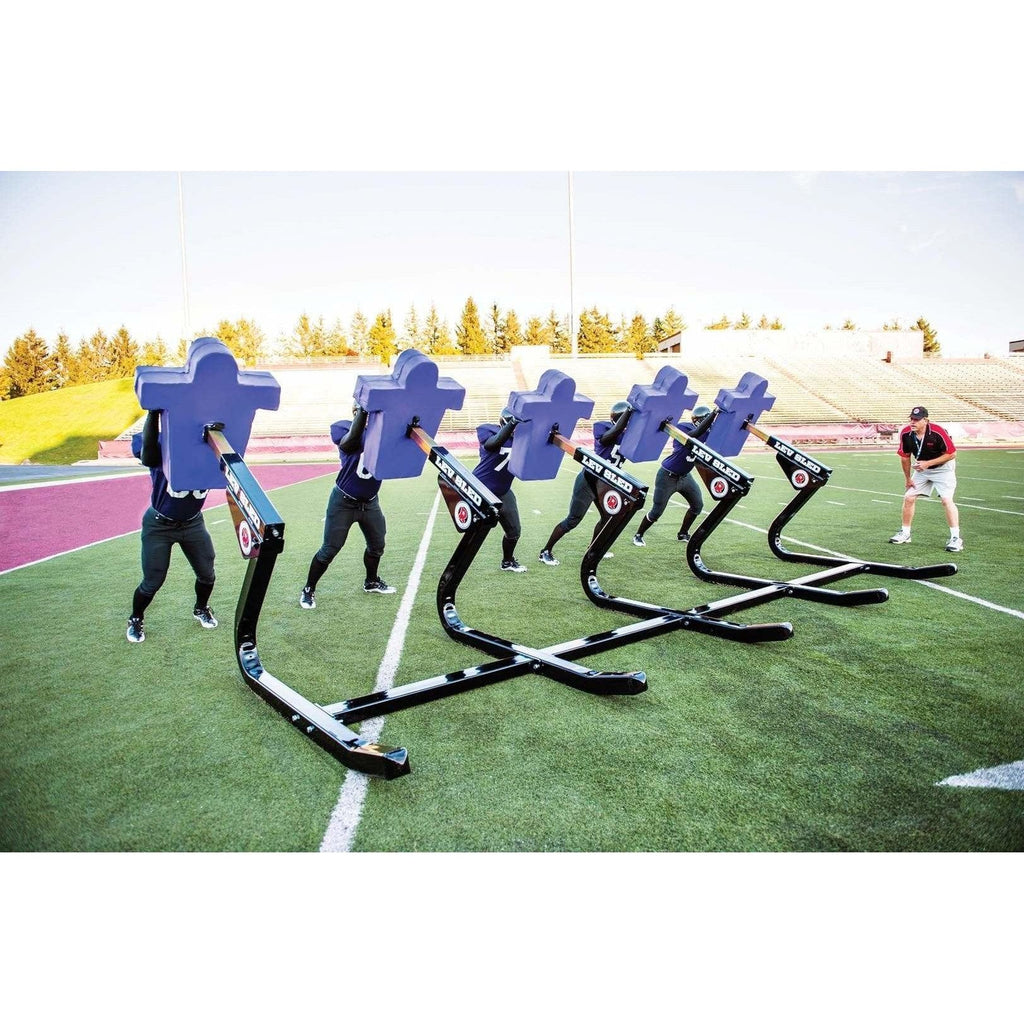
Modify your sled for team drills by installing two secondary pad frames on adjustable arms. Cut 2×4 arms to 24 inches with pivot bolts at the base. Attach additional pads at 30-degree outward angles using heavy-duty piano hinges. This creates a “V” formation allowing three players to block simultaneously—perfect for double-team pass rush simulations. Reinforce pivot points with 1/2″ steel bushings to handle combined force.
Converting to a Pull Sled
Flip your sled’s purpose by adding a harness attachment point. Drill a 3/4″ hole through the rear skid center, then insert a 6-inch steel eye bolt secured with double nuts. Thread a 10-foot parachute cord through the eye for resistance running drills. For youth players, reduce cord length to 6 feet to maintain control—always have a coach monitor tension during sprints.
Final Safety Note: Your DIY football blocking sled becomes exponentially safer with annual maintenance. Re-tighten every bolt before spring training, replace weather-cracked padding immediately, and sand all surfaces smooth before repainting with non-slip deck coating. Start players with zero weight to master form, then add 45-pound plates incrementally as strength improves. This sled adapts from peewee fundamentals to varsity power training—all for less than half the cost of commercial models. Now get building: your team’s breakthrough in blocking technique starts with that first 6-foot skid cut.


