
Your shed workbench isn’t just another piece of furniture—it’s the command center for every project you’ll tackle. Without a sturdy, well-designed work surface, even simple repairs become frustrating, and ambitious builds risk failure due to wobble or instability. How to build a shed workbench starts with understanding that this isn’t a garage hand-me-down; it must withstand shed-specific challenges like humidity, limited space, and heavy tool loads. In this guide, you’ll discover exactly how to construct a rock-solid workbench that transforms your shed from a storage unit into a high-functioning workshop. You’ll learn precise anchoring techniques, moisture-resistant materials, and space-saving layouts—all tailored for real-world shed conditions.
Most DIYers waste precious shed space with flimsy, freestanding benches that vibrate during routing or sag under weight. The solution? Build directly into your shed’s structure. By anchoring to wall studs and optimizing your 8×12-foot footprint, you create a permanent workstation that feels like part of the building itself. This isn’t theoretical—we’ll walk through the exact dimensions, materials, and safety steps that turn overlooked shed corners into productivity hubs.
Size Your Shed Workbench for 8-Foot Walls and 2-Foot Depth
Why 8 feet long and 2 feet deep is non-negotiable for shed workbenches: This dimension fits perfectly across standard 8-foot shed walls while providing enough surface to handle 4×8 sheet goods without overhanging. A depth under 24 inches forces you to lean over constantly, straining your back during assembly work. Crucially, this size leaves 3 feet of clearance in front for maneuvering lumber—something most beginners overlook until they’re tripping over scrap wood.
Avoid These Common Sizing Mistakes
- Ignoring door swing clearance: Measure your shed door’s arc before finalizing placement. A bench blocking the door creates daily frustration.
- Underestimating height needs: Set your work surface at 36 inches tall for standing work (like sanding) or 28 inches for seated tasks (like detail carving).
- Skipping the “tool swing test”: Stand at your planned bench location and mimic tool motions (e.g., swinging a hammer). If you hit a wall or storage, adjust your layout now.
Anchor Your Workbench Frame Directly to Wall Studs with Lag Bolts

Why wall anchoring beats freestanding legs every time: Sheds lack interior walls for bracing, so your bench must transfer hammering and planing forces into the shed’s structure. Freestanding designs wobble under pressure, ruining precision cuts. The fix? Bolt your rear frame rail directly into wall studs using 1/2-inch lag bolts—not screws. This creates a cantilevered platform that stays rigid even when you’re chiseling hardwood.
Step-by-Step Anchoring Process
- Locate studs: Use a stud finder to mark centers every 16 inches along your chosen wall.
- Cut notches in the frame: Notch your 2×4 rear rail to fit snugly around studs (don’t weaken the wall by cutting through them).
- Drill pilot holes: Bore 3/8-inch holes through the rail into each stud—1 inch deeper than your bolt length.
- Secure with lag bolts: Drive 1/2-inch x 3-inch lag bolts with a socket wrench. Critical: Tighten until the washer bites into the wood—but stop before splitting the rail.
Pro Tip: Test stability by standing on the bench’s front edge. If it flexes more than 1/8 inch, add a central 4×4 leg. For benches over 6 feet, install a 2×6 front apron to eliminate front-leg clutter.
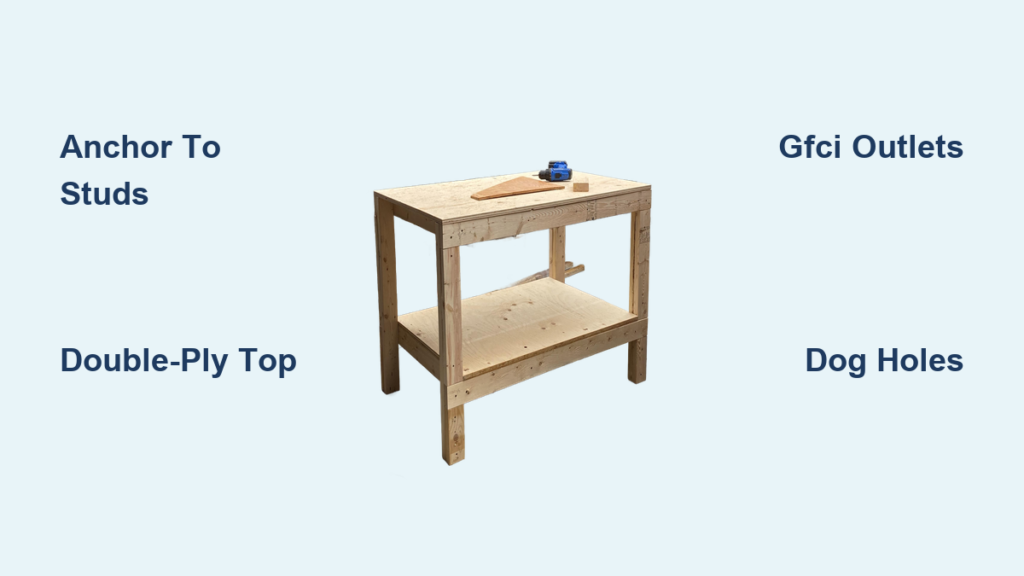
Build a Double-Plywood Top or Torsion Box for Heavy-Duty Use
Why particleboard or single plywood fails in sheds: Humidity warps flat tops within months, while thin surfaces dent under vise pressure. Your top must resist moisture and support 300+ pounds of tools. Two field-tested solutions:
Double-Plywood Top (Budget-Friendly)
- Glue and screw two 3/4-inch plywood sheets together.
- Add a 1/4-inch hardboard sacrificial layer on top—replace it when gouged.
- Time required: 2 hours | Cost: $80 for an 8-foot top
Torsion Box Top (Ultimate Rigidity)
- Build a 4-inch-deep grid with 2x4s on edge (spaced 12 inches apart).
- Cover both sides with 3/4-inch plywood, glued and screwed.
- Fill interior gaps with cross-braces at stress points.
– Result: A 70-pound top that won’t sag under a 500-pound anvil.
– Time required: 5 hours | Cost: $150
Warning: Never skip wood acclimation! Store plywood in your shed for 72 hours before building. Unacclimated wood warps as it absorbs shed humidity.
Position Your Workbench Under a Window for Natural Lighting
Why window placement beats artificial light alone: Natural light reveals wood grain imperfections and reduces eye strain during detail work. An 8-foot bench fits perfectly below standard shed windows, but position it 6 inches away from the wall to avoid shadow casting. If your shed lacks windows, install a translucent polycarbonate panel above the bench—never block existing light sources with storage.
Optimize Small-Shed Layouts
- Front-corner seating: Angle the bench 15 degrees toward your dominant hand (e.g., left corner for right-handed users) to maximize reach.
- Clearance zones: Maintain 36 inches in front and 24 inches on sides—measure this space after adding tool storage.
- Overhead storage hack: Mount French cleats 12 inches above the bench for clamps and vises, keeping them within arm’s reach but off the work surface.
Install GFCI Outlets and a Dedicated 20-Amp Circuit for Power Tools
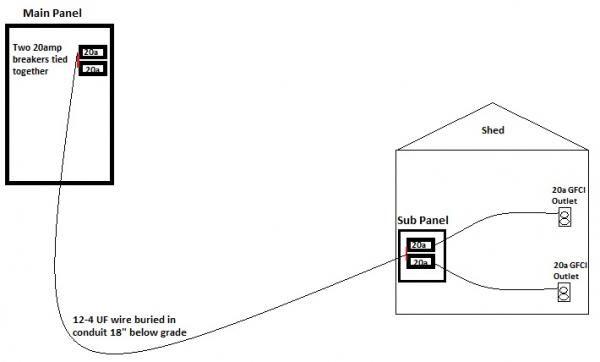
Why standard household outlets risk fires in sheds: Humidity causes short circuits, and overloaded circuits trip during critical cuts. Every outlet within 6 feet of your bench must be GFCI-protected—this isn’t optional for damp locations. For serious tool use, run a dedicated 20-amp circuit from your home panel.
Shed Power Setup Checklist
- Outlet placement: Install four outlets along the back wall (12 inches apart) and one under the bench front lip.
- Circuit capacity: A 15-amp circuit handles lights and one tool; 20-amp is mandatory for simultaneous router/sander use.
- Safety must-haves:
- Use outdoor-rated conduit for all wiring
- Mount outlets 18 inches above floor to avoid water splash
- Label circuits clearly at the breaker box
Critical mistake: Never daisy-chain power strips. Plug high-draw tools (like table saws) directly into wall outlets.
Add 3/4-Inch Dog Holes for Securing Irregular Workpieces

Why vises alone won’t cut it for complex projects: Dog holes let you clamp odd-shaped wood that slips in standard vises. Drill a grid of 3/4-inch holes 4 inches apart across your bench front edge. Pair them with $5 steel bench dogs to immobilize workpieces during routing or hand-planing.
Dog Hole Setup in 3 Steps
- Use a Forstner bit to drill perpendicular holes 2 inches deep.
- Sand hole interiors smooth—rough edges catch dog pins.
- Store dogs in a wall-mounted tube next to your bench.
Pro upgrade: Add an end vise for long-board support. Position it on the right side (for right-handed users) to avoid clashing with your front vise.
Prevent Rust with Dehumidifiers and Paste Wax on Metal Tools
Why shed humidity destroys tools 10x faster than garages: Uncontrolled moisture causes rust overnight on cast-iron surfaces. Combat this with a $50 mini-dehumidifier running during humid months—set it to maintain 50% humidity. For immediate protection:
Rust Prevention Routine
- Monthly: Wipe tools with camellia oil or Boeshield T-9
- Storage: Place silica gel packs in every toolbox (replace quarterly)
- Emergency fix: Rub rust spots with aluminum foil dipped in vinegar—no scrubbing needed
Mount a Class ABC Fire Extinguisher Within Arm’s Reach
Why most shed fires start at the workbench: Sawdust buildup near power tools ignites easily. Keep a 5-pound Class ABC extinguisher mounted 5 feet from your bench—never behind stored items. Test it monthly by checking the pressure gauge needle stays in the green zone.
Shed Safety Non-Negotiables
- Electrical: GFCI outlets within 3 feet of all tools
- Ventilation: Run an exhaust fan during sanding/painting sessions
- Dust control: Attach a shop vac hose to your bench’s edge with a custom bracket
Building your shed workbench isn’t just about nailing wood—it’s about creating a system where every element fights shed-specific challenges. By anchoring to studs, optimizing for natural light, and integrating moisture defenses, you’ll craft a workstation that outlasts cheap alternatives by decades. Your next step: Measure your shed tonight and mark stud locations—tomorrow, cut your first 2×4. In 48 hours, you’ll have a foundation that turns “how to build a shed workbench” from a question into your most productive reality. Remember: The perfect shed workshop starts with one rigid, reliable surface. Build it right, and every project that follows will thank you.


