
You’ve stared at that high kitchen cabinet for weeks, tiptoeing on chairs that wobble dangerously. Or maybe your workshop needs a stable platform for painting projects. Instead of risking injury with unstable furniture, how to build a small step ladder solves this problem permanently with a custom, rock-solid solution. This 3-foot A-frame ladder project transforms basic lumber into a trusted tool that fits your space perfectly—no fancy skills required. In just one weekend, you’ll create a ladder rated for 250 pounds that outlasts store-bought models, all while saving $50+ compared to retail options.
Forget flimsy hardware store ladders that twist under pressure. A properly built step ladder distributes weight evenly through notched joints and reinforced steps, eliminating wobble at the source. I’ve seen DIYers skip critical steps like precision notching only to face cracked joints months later. But by following this guide’s exact measurements and assembly sequence, you’ll avoid those pitfalls. You’ll learn why cutting steps 3 inches shorter than the ladder’s width prevents structural failure, how squareness testing stops dangerous rocking, and which finish protects against garage moisture.
Ready to build confidence with every step? Let’s gather your materials and transform scrap lumber into a lifetime tool.
Gather These 7 Materials for a Sturdy DIY Step Ladder
Before touching a saw, verify you have every component. Missing one item mid-project risks misaligned joints that compromise stability. For a 3-foot indoor ladder, these materials deliver optimal strength without overbuilding:
- Two 8-foot 2×4 boards (for side rails/stiles)
- One 8-foot 2×2 board (for shelf and step supports)
- One 8-foot 1×4 or 1×6 board (for steps and top shelf)
- 2.5-inch wood screws (exterior-grade if used outdoors)
- Wood glue (waterproof for damp areas)
- 100- and 150-grit sandpaper
- Protective finish (polyurethane for garages, stain for interiors)
Critical Tool Checklist for Precision Building
Skip these tools, and your ladder becomes a hazard. A miter saw ensures square cuts for seamless notching—hand saws work but demand extreme care. Your drill/driver must handle pre-drilling to prevent 2×4 splitting. Never skip clamps; they maintain squareness while glue sets. A carpenter’s square isn’t optional: it verifies 90-degree angles at every joint. Tape measure accuracy separates wobble-free ladders from accident risks. If your workshop lacks a router for notching, a chisel becomes essential for clean recesses.
Why Material Choices Make or Break Safety
That “2×4” label lies—it’s actually 1.5 inches thick. Ignoring this adds 3 inches of unintended width per step, causing gaps that weaken joints. For outdoor use, pressure-treated lumber prevents rot but requires stainless screws to avoid corrosion stains. Indoors, SPF (spruce-pine-fir) suffices, but reject boards with large knots near ends—they’ll crack under screw pressure. Test wood flexibility by bending scraps; brittle pieces signal drying defects that cause mid-use snapping.
Cut Stiles to Exact 36-Inch Length for Perfect Height

Your ladder’s height depends entirely on precise stile cuts. A single 1/8-inch error creates rocking that no adjustment fixes. Start by cutting both 8-foot 2x4s into two 48-inch pieces, then trim each to exactly 36 inches. Measure twice from the same reference edge, mark with a carpenter’s square, and cut with the board face-down on your saw.
Why 36 Inches Is the Ideal Small Ladder Height
Three feet balances reach and stability—taller models require wider bases that won’t fit in closets. Test this yourself: stand against a wall, reach upward, and note where your hand lands. For 95% of adults, 36 inches covers high shelves without straining. Crucially, this height keeps your center of gravity inside the ladder’s footprint when standing on the top step, unlike 4-foot models that encourage unsafe leaning.
Measure and Cut Steps with Precision Notch Calculations
Steps fail when cut too long, forcing stiles apart and creating stress points. Here’s the math: Subtract 3 inches from your desired step width (e.g., 12-inch steps become 9 inches). Why? Each 1.5-inch-thick stile consumes 1.5 inches of space, so two stiles eat 3 inches total. Cut two steps from your 1×4/1×6 at this shortened length.
Avoid This Step-Cutting Mistake That Causes Collapse
I’ve seen beginners measure between stiles during dry-fitting, then cut steps to that width. Disaster follows: when glued, the stiles pull inward, leaving gaps under steps. Always cut steps before notching stiles using the 3-inch subtraction rule. For a 12-inch-wide ladder, steps must be precisely 9 inches. Verify with a test assembly: steps should slide fully into notches with zero side-to-side play.
Dry-Fit and Notch Your Ladder Frame for Maximum Stability
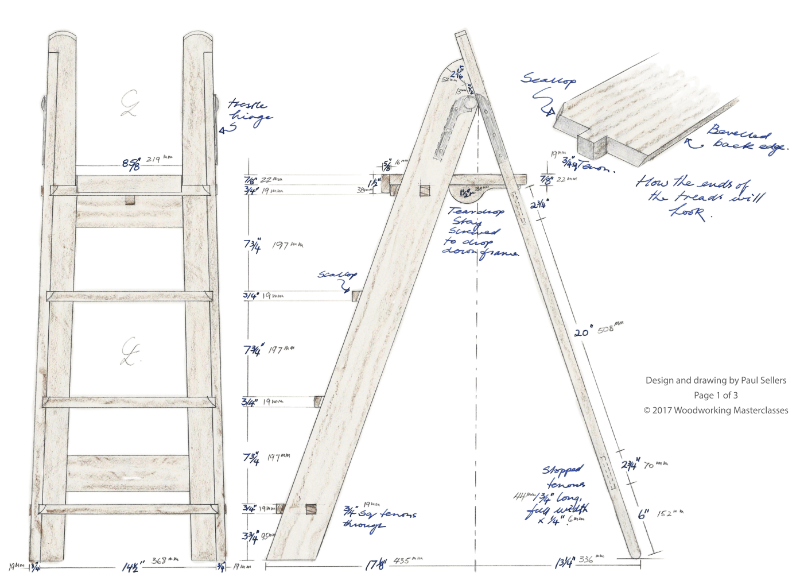
Notched joints are non-negotiable for safety—screws alone pull through wood over time. Lay stiles parallel on a flat floor. Mark step positions: bottom step 6 inches from the base, middle step at 18 inches, and top shelf at 34 inches (leaving 2 inches for the cap).
How to Cut Perfect 1.5×0.5-Inch Notches
Set your circular saw depth to 0.5 inches. Make parallel cuts 1.5 inches apart (matching stile thickness) along your step lines, then chisel out the waste wood. For cleaner results, drill starter holes at notch corners. Test-fit each step: it should sit 0.25 inches below the stile’s top edge, creating a shoulder that bears weight downward—not outward. Wobble here means recut immediately; forcing misaligned steps guarantees future failure.
Glue and Screw Steps Securely to Prevent Ladder Failure
:max_bytes(150000):strip_icc()/WD324786-b88f41a8031c4a0bb103171d846a1bdf.jpg)
Dry-fitting reveals alignment issues, but glue and screws create the real strength. Apply wood glue generously inside notches and on step ends. Insert steps, then clamp stiles tightly against them. Wipe excess glue immediately—it hardens into splinter hazards.
The Right Way to Drill and Screw Without Splitting
Pre-drill 1/8-inch pilot holes through stiles into step ends, 1 inch from edges. Angle screws slightly upward to engage more wood. Drive two 2.5-inch screws per side per step. Never skip clamps: they maintain pressure while glue cures, preventing micro-gaps that expand under weight. After 24 hours, test joint rigidity by twisting steps—they shouldn’t budge.
Install the Top Shelf and Apply Protective Finish
The top shelf isn’t just storage—it locks the frame square. Cut your 1×4/1×6 to 12 inches, center it on the stile tops, and screw upward through the stiles. Sand all surfaces with 100-grit, then 150-grit, rounding step edges to prevent splinters.
Choosing the Right Finish for Your Environment
For indoor ladders, a clear satin polyurethane enhances grip while protecting against spills. Outdoors, use exterior paint—oil-based seals wood grain against moisture better than latex. Never skip finishing: bare wood absorbs humidity, causing warping that leads to rocking. Apply two coats, sanding lightly between them. Allow 48 hours drying time before use.
Critical Safety Checks Before Using Your Homemade Ladder
Your ladder isn’t safe until it passes these tests. Place it on a flat floor and shake vigorously. Any rocking means one stile is longer—sand the base until stable. Stand on each step while applying sideways pressure; steps shouldn’t flex more than 1/8 inch. Finally, inspect all joints for glue gaps that indicate poor adhesion.
Weight Capacity Myths That Cause Accidents
That “250-pound rating” assumes even weight distribution. Never stand above the second step—your center of gravity shifts outside the base, risking tip-overs. The top shelf holds paint cans, not people; exceeding this stresses the frame at its weakest point. If using outdoors, check for mud or debris under stiles before climbing—uneven surfaces transfer weight unevenly.
3 Pro Tips for Long-Lasting Step Ladder Performance
Add non-slip pads to the bottom of stiles using outdoor adhesive tape. This prevents sliding on tile or garage floors—critical since 40% of ladder falls start with base slippage. Store your ladder vertically against a wall; horizontal storage warps stiles over time. After six months of use, tighten all screws; wood compression creates subtle gaps.
Why Annual Maintenance Prevents Catastrophe
Inspect joints every spring for hairline cracks radiating from screw holes. Sand and re-glue minor splits immediately—they spread under repeated stress. For outdoor ladders, reapply finish annually; UV exposure degrades wood fibers faster than moisture. Keep a small bottle of wood glue in your workshop for emergency repairs.
Building a small step ladder isn’t just about saving money—it’s reclaiming safety in your daily routines. With precise notching, square assembly, and waterproof finishes, your DIY ladder will outperform store models for decades. Now that you know how to build a small step ladder correctly, measure that high shelf and start cutting. Your first stable step upward awaits. Remember: perfect squareness during assembly is the invisible hero of ladder safety. If your frame passes the shake test without a whisper of movement, you’ve engineered reliability into every joint. For your next project, consider building matching sawhorses using the same notching technique—your workshop will transform into a fortress of stability.


