
Building a truly spherical workbench presents significant challenges that most woodworkers never attempt. While the concept of a 360° accessible, perfectly round work surface sounds intriguing, the practical realities make this design fundamentally unstable and functionally problematic. A perfect sphere would roll uncontrollably, making it impossible to perform precise work. Instead of pursuing an impractical perfect sphere, this guide will help you create a stable workbench with spherical elements that maintains functionality while incorporating curved design aesthetics.
The fascination with spherical work surfaces likely stems from seeing rounded-top benches in workshops or artistic interpretations online. What many mistake for “spheres” are actually workbenches with rounded edges, domed tops, or spherical decorative elements—not fully spherical structures. Creating a stable work surface requires a flat plane for precision work, making a true sphere counterproductive for most workshop tasks. This guide will focus on how to incorporate spherical design elements into a functional workbench while maintaining stability and practicality.
Why a True Sphere Workbench Isn’t Practical
Fundamental Stability Issues
A perfect sphere cannot remain stationary on a flat surface without additional stabilization mechanisms. Physics dictates that any force applied to a spherical object will cause it to roll. When you’re trying to chisel, saw, or clamp materials, even minor pressure would send your entire workbench moving across the workshop. Unlike traditional rectangular benches with four stable contact points, a sphere has only one point of contact with the ground, creating constant instability.
Structural Weakness in Wood Construction
Wood’s natural grain and structural properties make creating a true sphere extremely challenging. Solid wood would require impossible carving techniques, while plywood or MDF would need complex curved lamination that most home workshops can’t achieve. The stresses on wood bent into a perfect sphere would cause cracking and failure over time, especially under workbench-level use. Even with advanced techniques like steam bending or laminated veneer, maintaining structural integrity for a functional work surface proves impractical.
Practical Alternatives to a True Sphere Design
Rounded-Edge Workbench Design
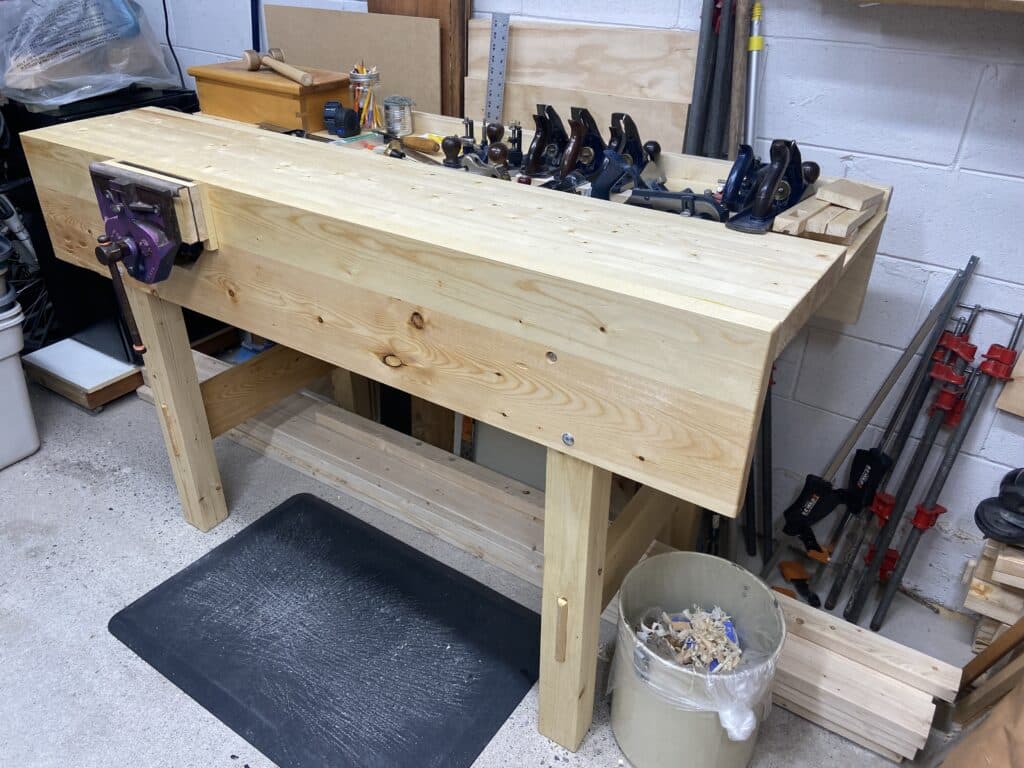
Create a standard rectangular workbench (30″ high × 24″ deep × 48″ long) with dramatically rounded edges that give the visual impression of spherical influence without sacrificing stability. Start with a standard frame using 4×4 legs and 2×4 aprons, then use a router with a large-radius bit (1½” or larger) to round all top edges completely. This creates a smooth transition from vertical to horizontal surfaces that mimics spherical aesthetics while maintaining a flat, stable work surface.
How to achieve the rounded effect:
– Use a 1½” roundover bit for the initial shaping
– Follow with a 3/4″ roundover bit to soften the transition
– Sand progressively from 80 to 220 grit for a seamless curve
– Apply multiple coats of hard wax oil to enhance the organic appearance
Hemisphere-Inspired Workbench Top
For a more dramatic spherical influence, build a standard workbench frame but create a work surface that incorporates a partial hemisphere. Cut a large circular section from 2″ thick maple, then use a router jig to hollow out the underside, creating a shallow dome effect (not a full hemisphere). This provides subtle spherical visual interest while maintaining enough flat surface area for practical work. The dome should have no more than a 2″ rise at the center to preserve functionality.
Essential Tools and Materials for Spherical-Inspired Design

Specialized Tools Required
Creating meaningful spherical elements requires specific tools beyond standard workbench construction. A router with multiple large-radius bits (1½”, 2″, and 3″ roundover), a circle-cutting jig for your router, and an oscillating spindle sander become essential for achieving smooth, consistent curves. Without these specialized tools, attempting to create convincing spherical elements will result in uneven, amateurish results that compromise both aesthetics and function.
Material Selection Considerations
For any spherical-inspired element, select materials that can handle curved forms. Solid hardwoods like maple or cherry work better than plywood for visible curved sections, though plywood remains suitable for structural components. Avoid MDF for curved sections as it lacks the structural integrity needed for spherical shapes and will delaminate under stress. For the work surface, 2″ thick solid wood provides enough material to shape meaningful curves while maintaining durability.
Step-by-Step: Building a Spherical-Inspired Workbench
Creating the Stable Foundation
Begin with a traditional rectangular base that ensures stability—the absolute requirement for any functional workbench. Construct a 30″ high × 24″ deep × 48″ long frame using 4×4 legs joined to 2×4 aprons with mortise and tenon joints reinforced with epoxy. This creates the stable foundation necessary before adding any curved elements. Install bench dogs and a vise on one long side to maintain functionality. The key is building exceptional stability in the base to compensate for any visual spherical elements you’ll add above.
Adding Spherical Design Elements
Rather than attempting a full sphere, incorporate spherical design through these practical techniques:
- Rounded top edges: Use a router with a large-radius bit to gradually round all top edges until they flow seamlessly from vertical to horizontal
- Curved apron design: Shape the front apron with a gentle curve that suggests spherical influence without compromising structural integrity
- Spherical storage compartments: Build small, fully spherical containers that attach to the bench for tool storage rather than making the entire bench spherical
Achieving the Perfect Curve
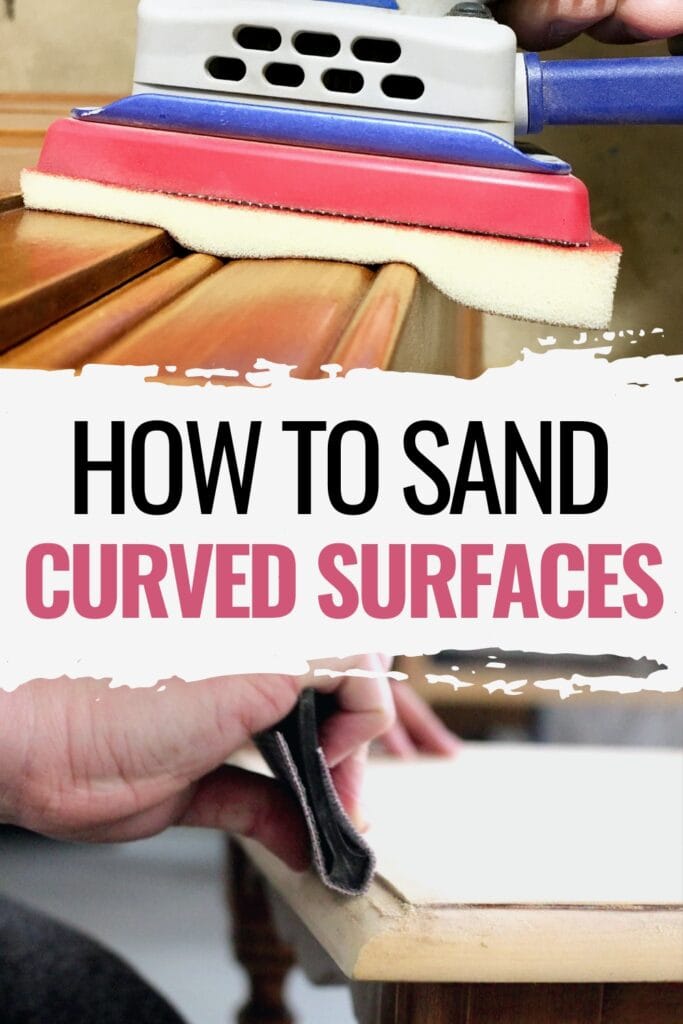
The secret to convincing spherical elements lies in progressive sanding. Start with coarse 80-grit sandpaper to establish the basic curve, then move through 120, 180, and 220 grits, checking the curve constantly with a template. For larger curved sections, use a flexible sanding pad that conforms to the shape. The transition between flat and curved surfaces should be completely seamless—no visible lines or abrupt changes in angle. This requires patience and multiple iterations of sanding and visual inspection.
Common Mistakes to Avoid
Overestimating Spherical Elements
Many beginners make the mistake of incorporating too much curve, sacrificing functionality for aesthetics. Remember that your workbench must support precise work—excessive curvature creates unstable surfaces where tools and materials slide off. Limit dramatic curves to non-functional areas like the base or purely decorative elements. The actual work surface should remain predominantly flat with only subtle curved transitions at the edges.
Underestimating Material Requirements
Curved elements require significantly more material than their straight counterparts. A standard 3/4″ thick workbench top becomes inadequate when you need to route deep curves—it requires 1.5″ to 2″ thickness to maintain structural integrity after shaping. When planning your project, account for this increased material requirement in both your budget and design specifications.
Maintenance and Long-Term Viability
Addressing Wear Patterns
Spherical-inspired elements create unique wear patterns. Rounded edges will show concentrated wear at the most frequently contacted points. Plan for this by using extremely durable finishes like conversion varnish or multiple coats of wipe-on polyurethane. Consider making curved elements replaceable—designing them as separate components that can be swapped out when worn rather than trying to refinish complex curves in place.
Stability Checks
Regularly check your bench for stability, especially if you’ve incorporated significant curved elements. The connections between curved and straight components experience different stresses than traditional benches. Monthly inspections of joints and fasteners will prevent gradual loosening that could compromise safety. If you notice any movement, reinforce connections immediately rather than waiting for problems to worsen.
Final Considerations for Your Spherical-Inspired Workbench
While the dream of a perfectly spherical workbench captures the imagination, practical woodworking demands stability and function. By incorporating spherical design elements into a traditionally stable workbench structure, you can achieve visual interest without sacrificing utility. Focus on subtle curves, seamless transitions, and strategic placement of rounded elements to create a bench that’s both beautiful and functional.
The most successful spherical-inspired workbenches use the sphere as a design motif rather than a structural principle. Consider adding small spherical elements like perfectly round tool holders, spherical turnings as decorative accents, or a single spherical leg cap as a focal point. These touches satisfy the spherical aesthetic while maintaining the rock-solid stability that defines a truly functional workbench. Remember that the best workshop tools blend form and function—your workbench should inspire creativity while providing the unwavering stability that quality craftsmanship demands.


