
Your picture frames wobble. Your miter joints gap open. That $500 table saw can’t seem to cut a perfect 45-degree angle no matter how carefully you measure. You’re not alone—most woodworkers struggle with crooked miters until they discover the secret weapon hiding in plain sight: a shop-made table saw miter sled. This precision jig transforms your table saw into a crosscutting powerhouse, delivering flawless 45-degree miters for picture frames and dead-square 90-degree cuts that outperform commercial miter saws. Forget cheap plastic accessories—building your own miter sled is the single most impactful upgrade you can make for frame-quality joinery. In this guide, you’ll learn exactly how to construct a professional-grade sled that eliminates guesswork and delivers repeatable, shop-made perfection.
Unlike store-bought versions that flex and wobble, a custom-built miter sled locks your workpiece at absolute 45 or 90 degrees to the blade path. The difference? No more sanding gaps out of frame corners or wasting expensive hardwood on test cuts. By the end of this guide, you’ll have a jig that cuts tighter miters than your miter saw, handles full sheet goods, and becomes your go-to solution for precision crosscuts. Let’s build the one tool that’ll make you wonder how you ever worked without it.
Cutting Your Base and Installing Precision Runners
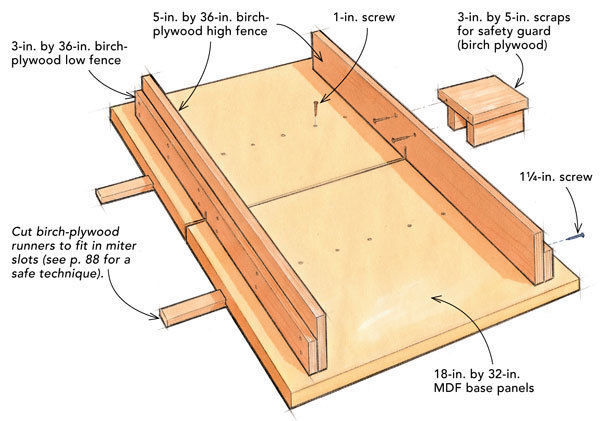
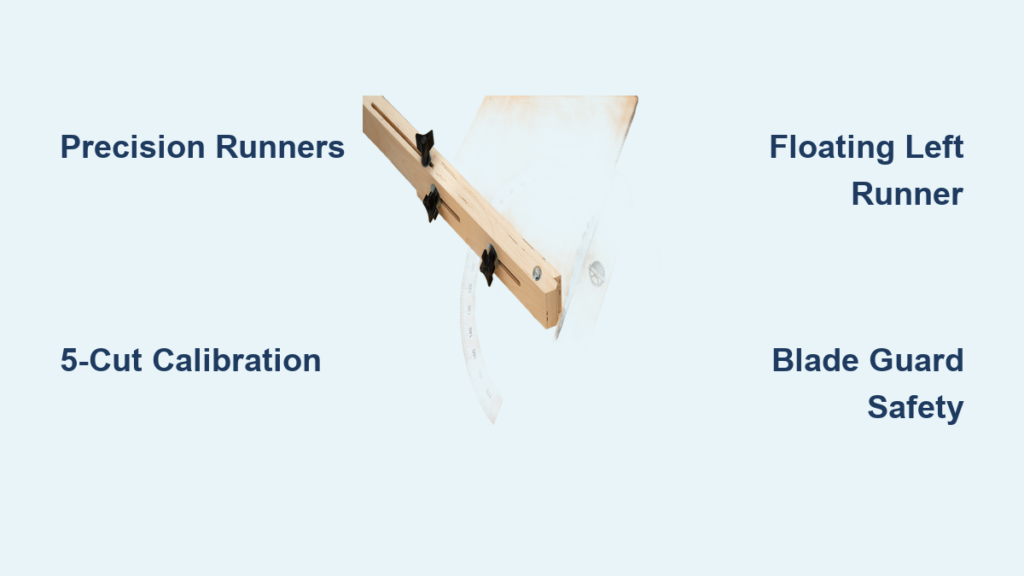
Your sled’s accuracy lives or dies by the runner system—those critical strips that glide in your table saw’s miter slots. Start by cutting a 24″ x 24″ base from 3/4″ Baltic birch plywood. This size handles most picture frame stock while staying maneuverable. Now for the runners: Cut two 3/4″ x 3/4″ maple strips to 22″ long (leaving clearance at the front). The fit here is non-negotiable—you need a slip fit where runners slide smoothly with zero side-to-side play. Test each runner in your saw’s miter slots before attaching.
Why Top-Down Runner Attachment Beats Traditional Methods
Flip your base upside down with runners seated in the miter slots. Apply wood glue along the runner tops, then position the base over them. Clamp firmly while checking for perfect alignment—any twist here ruins accuracy. Now drill 3/16″ clearance holes through the base into each runner, 4″ apart. Use #8 flat-head screws driven from the top of the base (not up through the bottom). This technique pulls runners tightly against the miter slot walls, compensating for seasonal wood movement. Never glue runners directly to the base—screws allow subtle expansion without warping.
Preventing Binding with the “Floating Left Runner” Technique
The left runner (fence side) must float to avoid binding as humidity changes. Cut this runner slightly narrower—3/4″ tall but only 11/16″ wide—and notch the front 2″ with a 45-degree chamfer. When installed, this runner contacts only the back half of the miter slot, letting the sled expand freely while the right runner maintains precise tracking. Wax both runners with paste wax before first use for glass-smooth operation.
Calibrating Your 90-Degree Fence with the 5-Cut Method
Your rear fence must be absolutely perpendicular to the blade path—no square can verify this alone. Build a temporary fence from straight maple, attached with only two partially driven screws. Now perform the 5-cut squareness test:
- Cut a 6″ x 12″ scrap piece with the temporary fence
- Rotate the piece 90 degrees clockwise and make a second cut
- Repeat rotations and cuts three more times (total of 5 cuts)
- Measure the final cutoff piece’s parallel sides
If measurements differ, calculate adjustment: Subtract the narrow end from the wide end, divide by 5, then multiply by the sled’s fence length (e.g., 1/64″ error ÷ 5 × 18″ = 0.006″ shim needed). Insert a business-card-thick shim under the fence’s high end, retest, and repeat until measurements match within 0.002″. Only then drive all screws home and reinforce with glue blocks. This method magnifies tiny errors 5x—making micro-adjustments possible where a single cut would fool your eyes.
Creating a Perfect 45-Degree Fence Using Sled-Ception
Commercial 45-degree fences always have alignment errors. Here’s the pro technique: First, build your sled with a verified 90-degree rear fence. Then cut a 45-degree angle on a 2″ x 6″ x 24″ maple board using the sled itself. The freshly cut edge now is your 45-degree reference—guaranteed accurate because it’s generated by the sled’s own travel path.
Mounting and Tuning the 45-Degree Fence
Attach this board to the sled’s front edge with the 45-degree cut facing you. Position it at least 12″ from the base front to accommodate stop blocks. Clamp it temporarily and cut two mating 45s on scrap wood. When butted together, they should form a perfect 90-degree corner. If the joint opens at the top (overcut), the fence angle is too steep—shim the bottom of the fence with 0.25-degree tapered wedges. If it closes (undercut), shim the top. Test after each adjustment until you get zero-gap joints. Once perfect, secure with glue and #6 screws through countersunk holes, adding triangular glue blocks at both ends for rigidity.
Integrating Stop Systems and Safety Guards

A sled without stops is just a fancy push block. Install T-track into your 90-degree fence using a 1/4″ straight bit in a router. Then add a sliding stop block with a flip-lock mechanism—this lets you lock measurements instantly for repeatable frame sides. For the 45-degree fence, mount a secondary T-track with a dedicated stop block that locks perpendicular to the fence. Inlay a steel tape measure into the base along the T-track for instant measurements.
Non-Negotiable Safety Upgrades
Cut a 6″ x 12″ piece of 1/4″ acrylic to create a sliding blade guard. Attach it to the front fence with two 1/4-20 bolts and wing nuts, positioning it 1/2″ above your typical workpiece height. This transparent shield keeps hands clear during critical final cuts on small frame stock. Also add a replaceable zero-clearance insert: Glue a 1/4″ MDF or HDPE strip around the blade slot. When worn, simply peel it off and glue a new one—this eliminates tear-out on veneered plywood and delicate hardwoods.
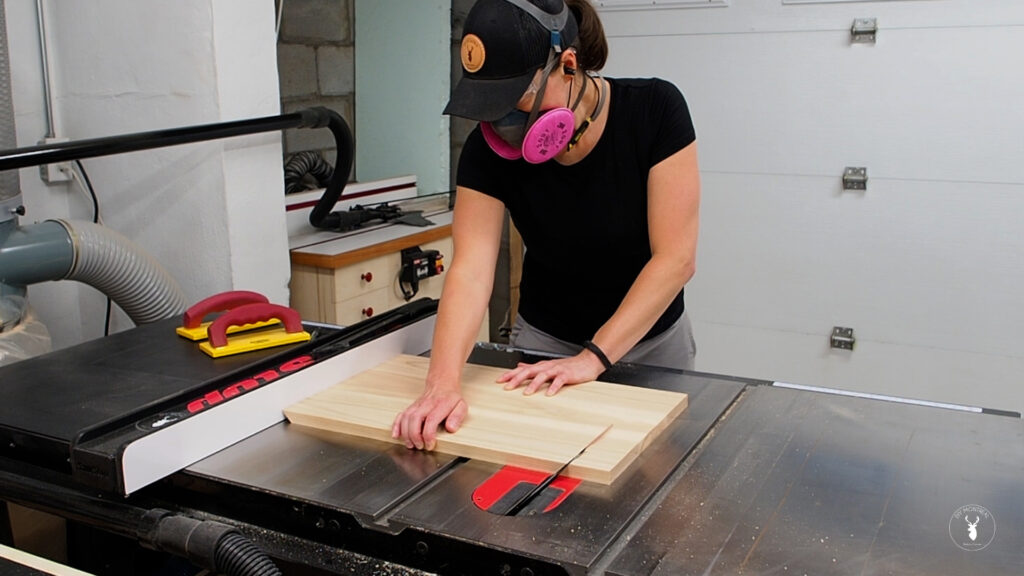
Final Calibration and Proven Operation Techniques
Even a perfectly built sled needs fine-tuning after initial use. Recheck your 90-degree fence with the 5-cut method after 10 hours of operation—wood movement can shift alignment. For 45-degree verification, cut four identical frame pieces and assemble them dry. Any gap means your fence needs micro-shimming. Keep a set of 0.25° and 0.5° plastic shims in your sled toolbox for instant fixes.
Three Critical Safety Habits for Miter Sleds
- Blade Height Rule: Set the blade to protrude only 1/8″ above your workpiece—this minimizes kickback risk while preventing tear-out on thin stock.
- Hand Positioning: Always keep both hands behind the blade line. Use a “lobster claw” clamp (a V-shaped hardwood block with a handle) to secure workpieces during final pushes.
- Sled Return Method: Lift the sled 1/16″ when returning it—dragging across the table wears miter slots and introduces play.
Wax the entire bottom surface with automotive paste wax every 20 hours of use. This reduces friction by 70% compared to bare wood, making heavy cuts effortless. For picture frame work, clamp your stop block directly to the fence—not the T-track—to eliminate any potential play in the system.
A precision table saw miter sled pays for itself in saved materials and frustration after just three picture frame projects. Unlike commercial jigs that flex under pressure, your shop-built version delivers unshakeable accuracy because you controlled every critical dimension. Remember: The 5-cut method isn’t just a calibration step—it’s your quality insurance policy for every cut. Keep your shims and digital angle gauge in the sled tray, and you’ll never second-guess a miter joint again. Now fire up your saw and make those gap-free frames you’ve always wanted—your new sled is ready to prove its worth on the very first cut.


