
That unmistakable smell of last night’s salmon clinging to this morning’s breakfast hash browns? Or maybe your air fryer’s taking twice as long to crisp fries that used to cook perfectly in minutes. These frustrating issues almost always point to one culprit: a clogged filter. Your Ninja air fryer relies on this small but critical component to trap grease and odors while maintaining optimal airflow. When neglected, performance plummets and your cooking experience suffers. The good news? Changing or cleaning your Ninja air fryer filter takes under 15 minutes and transforms your appliance back to peak performance. Let’s walk through exactly how to handle filter maintenance for your specific Ninja model—no guesswork required.
Locate Your Ninja Air Fryer Filter
Find Filter Position on Your Model
Your Ninja air fryer’s filter hides in one of two strategic locations depending on your model series. For most Foodi series units, remove the cooking basket completely and inspect the bottom—there you’ll spot a rectangular mesh component with small tabs for removal. Newer compact Ninja models often integrate the filter directly into the top ventilation system, requiring you to locate a removable vent cover instead. Don’t force anything; the filter should be visible once you know where to look. If you’re unsure which model you own, check the bottom of your unit for the model number before proceeding.
Identify Filter Type Instantly
Metal mesh filters appear as silver stainless steel grids with fine woven patterns and small tabs for easy removal—they’re built for repeated cleaning and reuse. Paper filters look like white or light gray fibrous sheets that slide into designated slots and require complete replacement after use. Your model determines which type you have: most Ninja Foodi series feature metal mesh filters, while specific Ninja Foodi 6-in-1 models use disposable paper filters. Knowing your filter type prevents costly mistakes—never try to wash a paper filter, and never dispose of a metal mesh filter thinking it’s single-use.
Safety Steps Before Filter Removal
Power Down and Cool Off
Unplug your Ninja air fryer immediately—never attempt filter maintenance while the unit remains connected to power. Wait 30-45 minutes for complete cooling, even if the exterior feels cool to the touch. Internal components retain heat much longer than expected. Before proceeding, gently touch the heating element area near the top of the cooking chamber—only continue when completely cool to prevent burns or electrical hazards.
Prepare Your Workspace
Clear a section of counter near your sink to handle potential grease drips during cleaning. Lay down an old towel to protect surfaces and catch debris. Gather these essential supplies: mild dish soap, soft brush or non-abrasive sponge, warm water (100-110°F), and paper towels. Having everything ready prevents mid-process interruptions that could leave your air fryer disassembled and vulnerable to accidents.
Remove Filter Without Damage
Metal Mesh Filter Removal
Grasp the small metal tab protruding from the filter edge—this is your designated grip point. Pull straight outward using firm, even pressure without twisting or yanking, which can bend the delicate frame. Some models require a slight downward press before sliding out completely. If resistance occurs, check for hardened grease in the tracks rather than forcing it. The filter should glide smoothly; if stuck, apply warm soapy water to the edges to loosen buildup before trying again.
Paper Filter Extraction
Slide the saturated paper filter from its housing slot using gentle, steady motion. Some models position the filter in a shallow tray—lift straight up without tilting to prevent tearing. Dispose immediately in regular household trash—never attempt to clean paper filters as they lose structural integrity when wet. Check for any remaining paper fragments in the housing before proceeding to installation.
Clean Metal Mesh Filter Thoroughly

Soak and Loosen Grease
Fill your sink with warm water (100-110°F) and add a few drops of mild dish soap—avoid harsh degreasers that damage stainless steel. Submerge the metal filter completely for 5-10 minutes to soften stubborn grease. For particularly greasy filters, extend soaking time up to 15 minutes, but never leave it unattended as prolonged soaking isn’t necessary for effective cleaning.
Scrub Both Sides Gently
Use a soft-bristled brush in circular motions across both sides of the mesh—focus on the side facing the heating element as it collects most residue. Create a baking soda paste for stubborn spots: mix 1 tablespoon baking soda with water, apply to problem areas, wait 10 minutes, then scrub gently. Never use steel wool or abrasive pads that destroy the fine mesh surface and reduce future effectiveness.
Rinse Until Water Runs Clear
Hold filter under warm running water while gently rubbing both sides with your fingers—clean filters should appear almost transparent when held to light. Check for trapped particles in the frame corners that often hide grease buildup. Shake off excess water gently but thoroughly—aggressive shaking can bend the frame and compromise proper seating during reinstallation.
Dry Filter Completely Before Reinstalling
Air Dry Method
Place filter on clean towel or drying rack in well-ventilated area—never use artificial heat sources. Allow 2-4 hours for complete drying; moisture causes electrical issues and steam during operation. Speed up drying by occasionally flipping the filter, but never skip this critical step. A bone-dry filter feels completely cool to the touch with no moisture visible in the mesh weave.
Quick Check Before Installation
Run your finger along frame edges to detect hidden moisture pockets. Hold filter up to light and look for water droplets clinging to the mesh. Verify zero moisture remains—any dampness risks damaging your air fryer’s internal components and creating safety hazards during use.
Replace Paper Filter Correctly
When to Replace Paper Filters
Replace after every use when cooking bacon, sausage, or other high-fat foods. Replace after 3-5 uses for lighter cooking like vegetables or reheating leftovers. Watch for darkened or translucent areas—these visible saturation points indicate immediate replacement is needed regardless of usage count. Never wait until the filter appears completely soaked, as reduced effectiveness begins well before that point.
Install New Filter Properly
Align new paper filter with guide rails or placement indicators—most models have subtle notches for proper orientation. Slide until fully seated with no visible gaps around the edges. Verify flat positioning without wrinkles or folds that create airflow restrictions. Check both sides to ensure complete coverage of the air passage area for optimal performance.
Clean Filter Housing Area
Wipe Down Compartment
Remove all food debris from the filter housing using a damp cloth—focus on corners where grease accumulates. Use cotton swab for tight spaces around ventilation openings without forcing it into sensitive areas. Avoid water entry into electrical components—dampen your cloth but never saturate it, and never spray cleaners directly into the housing.
Final Pre-Installation Check
Inspect housing for damage—look for bent components or loose connections that affect filter seating. Confirm complete dryness of all surfaces with a dry cloth before proceeding. Check filter seating tracks for remaining debris that prevents proper installation—run your finger along the track to feel for hidden particles.
Reinstall Filter Securely
Metal Filter Reinstallation
Position filter with correct orientation—arrows or notches indicate proper direction (usually with the mesh slightly angled toward airflow). Slide until you hear a click or feel firm seating against the housing. Verify flush fit with no visible gaps around the edges. Test stability by gently tugging the tab—should remain firmly in place without movement.
Paper Filter Installation
Slide new filter following guide rails until fully seated with no resistance. Check flat positioning—any wrinkles reduce effectiveness by creating air channels. Confirm complete air passage coverage by looking through the housing from multiple angles. Double-check orientation matches removal position for optimal performance—most paper filters have a designated top side.
Set Maintenance Schedule
Standard Cleaning Frequency
Clean metal filters after 3-5 uses for regular cooking like reheating or vegetable roasting. Increase to every use when cooking high-fat foods like bacon, wings, or frozen snacks. Mark your calendar or set phone reminders—consistency prevents 90% of performance issues while extending your unit’s lifespan significantly.
Performance Warning Signs
Watch for these indicators requiring immediate attention: visible smoke during cooking (indicates severe grease buildup), persistent odors transferring between different foods, increased cooking times by 25% or more, or visible grease accumulation on the filter surface. Don’t wait for multiple symptoms—address filter maintenance at the first sign of trouble.
Avoid Common Mistakes
Never Do These Actions
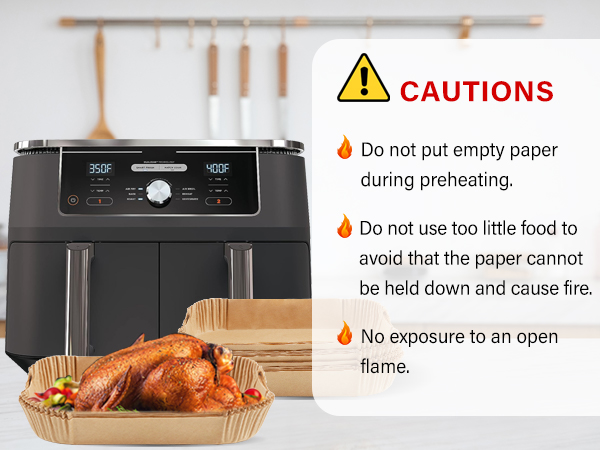
Don’t operate without filter—creates fire hazards and allows grease to coat internal components. Avoid steel wool or metal brushes that destroy the mesh surface and reduce future effectiveness. Never use compressed air which forces debris deeper into the system. Skip harsh chemicals like oven cleaner that leave toxic residues affecting food taste and safety.
Long-Term Filter Care
Deep clean metal filters monthly with kitchen-safe degreasing solution for stubborn buildup. Replace damaged filters immediately—tears, bent frames, or permanent discoloration significantly reduce effectiveness. Store extra paper filters in dry location away from humidity to maintain structural integrity for quick replacements.
Fix Persistent Issues After Filter Change
Eliminate Lingering Odors
Run empty air fryer at 400°F for 10 minutes to burn off residual particles after filter replacement. Clean entire cooking chamber including basket and crisper plate with warm soapy water. Check heating element area for accessible cleaning according to your manual—sometimes odor sources exist beyond the filter.
Restore Reduced Airflow
Inspect air intake and exhaust areas for additional blockages beyond the filter compartment. Clean fan blades if accessible per user manual instructions—use a soft brush on low-speed settings. Verify proper filter installation—misaligned filters restrict airflow significantly even when clean.
Clean filters equal crispy results. Your Ninja air fryer now operates like new, circulating hot air efficiently without transferring yesterday’s salmon flavor to today’s cookies. Set those calendar reminders—consistent filter maintenance prevents 90% of performance issues while extending your unit’s lifespan significantly. A well-maintained filter keeps your air fryer running safely, efficiently, and ready to deliver perfect results with every use.


