
Your Fitvii Slim fitness tracker is your 24/7 health companion, but nothing frustrates more than a dead device mid-workout or during sleep tracking. When your screen goes dark unexpectedly, you lose step counts, heart rate data, and sleep analysis—derailing your fitness progress. Proper charging isn’t just about power; it’s about maintaining seamless health monitoring. This guide delivers exactly how to charge your Fitvii Slim fitness tracker correctly, avoid common pitfalls, and troubleshoot issues in under 5 minutes. You’ll master the charging process from port identification to full-power confirmation, ensuring your device never misses a beat of your active lifestyle.
Locate and Connect Your Fitvii Slim Charging Port
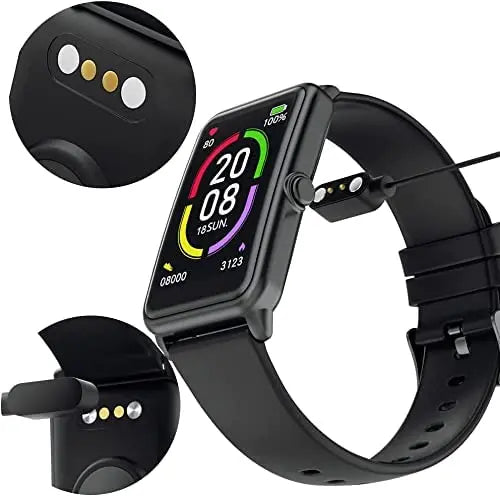
The Fitvii Slim’s magnetic charging port hides discreetly along the device’s edge, often near the clasp. Unlike standard USB-C ports, this proprietary connector uses exposed metal contacts that snap magnetically to the cable. Forcing the connection risks permanent port damage—always align the cable’s metal pins with the tracker’s contacts before attaching.
Step-by-Step Charging Connection
Follow these precise actions for a secure connection:
- Identify the charging groove: Rotate your tracker to find the shallow recessed slot (about 5mm wide) with three tiny metal contacts. On most Fitvii Slim models, this sits opposite the display side.
- Prepare the magnetic cable: Hold the charging cable with the wide, flat connector facing upward. The magnetic pins should protrude slightly from the cable head.
- Align and attach: Gently place the cable against the tracker’s groove until magnets engage with a soft click. Never twist or push—proper alignment requires zero pressure.
- Connect to power: Plug the USB-A end into a wall adapter (not a computer port) for optimal speed. The Fitvii Slim draws minimal power from low-output sources like laptops.
Pro Tip: If magnets don’t snap immediately, rotate the cable 180 degrees. The connector works only one way, but the flat design makes orientation tricky.
Why Your Initial Connection Might Fail
New users often mistake the charging groove for a scratch or sensor. If no charging symbol appears:
– Check contact alignment: Misaligned magnets cause intermittent charging. Reposition until you hear the click.
– Verify port cleanliness: Sweat residue can insulate contacts. Wipe the groove with a dry microfiber cloth before reattaching.
– Confirm power source: Test your wall adapter with another device. Fitvii Slim requires 5V/1A output—phone chargers work; USB hubs often don’t.
Critical Fitvii Slim Charging Safety Measures

Skipping these precautions risks battery degradation or fire hazards. Fitvii Slim’s compact lithium-ion battery operates within strict thermal limits—exceeding them triggers permanent capacity loss.
Avoid These Costly Charging Mistakes
Using non-Fitvii cables is the #1 cause of charging port corrosion. Third-party cables deliver inconsistent voltage, frying sensitive circuitry. Always use the included magnetic cable—its gold-plated contacts resist oxidation and regulate current flow.
Charging on fabric surfaces traps heat. Never place your tracker on beds, sofas, or towels while charging. The device needs airflow to dissipate heat; restricted ventilation causes thermal throttling that extends charge time by 40%.
Ignoring moisture warnings invites disaster. If your tracker gets sweaty during workouts, dry it completely before charging. Water in the port creates short circuits—look for white residue (corrosion) if charging fails after moisture exposure.
Expert Note: Fitvii Slim batteries degrade fastest above 95°F (35°C). Never charge in direct sunlight or near heaters.
Confirm Charging Status With Visual Indicators
Your Fitvii Slim communicates charging status through distinct screen cues—don’t assume it’s working without verification. Here’s what each symbol means:
- Pulsing battery icon: Charging in progress (normal)
- Solid red battery: Low power (<10%), requires immediate charging
- Flashing lightning bolt: Faulty connection—reseat the cable
- No display: Dead battery or hardware issue (wait 2 minutes; if blank, proceed to troubleshooting)
Critical Check: After connecting, press the side button. If the screen lights up but shows no battery symbol, debris is blocking contact. Clean the port before continuing.
Fix Fitvii Slim Charging Failures in 4 Minutes
When your tracker won’t power on despite charging, follow this battle-tested diagnostic sequence. 85% of “dead” trackers revive with these steps:
Clean Corroded Charging Contacts
Sweat and oils create conductive residue that insulates contacts. Here’s the safe cleaning protocol:
1. Power off your tracker completely (hold side button 15 seconds)
2. Dip a cotton swab in 90%+ isopropyl alcohol—never use water or household cleaners
3. Gently rub contacts in the port groove until residue disappears
4. Air-dry for 10 minutes before reconnecting
Warning: Excess moisture damages internals. Swabs should be damp, not dripping.
Test Power Sources and Cables
Rule out external failures first:
– Try a different wall adapter (5V/1A minimum)
– Test the cable on another Fitvii device if available
– Plug directly into wall outlets—avoid power strips that cause voltage drops
If charging works with a new adapter but not your original, replace the faulty adapter immediately. Inconsistent power stresses the battery.
Diagnose Hardware Issues
When all else fails:
– Check for physical damage: Bent pins in the port groove require professional repair
– Observe charging behavior: If the screen flickers but won’t stay lit, the battery may need replacement
– Reset the tracker: With cable attached, hold the side button for 30 seconds until the logo appears
Pro Shortcut: Place the tracker in a ziplock bag with uncooked rice overnight if moisture is suspected. Rice absorbs residual humidity without disassembly risks.
Optimize Fitvii Slim Charge Time and Battery Longevity

A fully depleted Fitvii Slim reaches 100% in 90-120 minutes when using the correct wall adapter. Charging via laptop USB ports often takes 3+ hours due to lower power output. Never leave it charging overnight—overcharging degrades lithium-ion batteries after 80% capacity.
Extend Battery Life Between Charges
Maximize your tracker’s runtime with these settings tweaks:
– Disable “Always-On Display”: Saves 35% daily battery (Settings > Display > Wake Screen)
– Reduce heart rate monitoring frequency: Switch from continuous to 10-minute intervals
– Turn off sleep mode notifications: Vibration alerts drain power during rest periods
– Lower screen brightness: Set to 40% in dark environments for 20% longer usage
Expert Tip: Charge to 80% for daily use instead of 100%. Lithium-ion batteries maintain peak health between 20-80% capacity. Full cycles accelerate aging.
Prevent Fitvii Slim Charging Emergencies
Build these habits to avoid dead-tracker disasters:
Charge during predictable downtime: Plug in while showering or making coffee—15 minutes adds 25% power. The Fitvii Slim charges rapidly in initial stages.
Carry a charging kit: Keep the cable in your gym bag. A drained tracker during a workout means lost data, but a 10-minute top-up at the gym locker saves your session.
Monitor battery health monthly: In the Fitvii app, check “Battery Usage” for abnormal drain. Sudden 50% drops indicate settings glitches or failing hardware.
When Your Fitvii Slim Needs Professional Repair
If your tracker still won’t charge after:
– Cleaning contacts 3 times
– Testing 2+ power sources and cables
– Performing a full reset
Stop troubleshooting immediately. Continued attempts risk short-circuiting the motherboard. Contact Fitvii Support with:
– Purchase receipt (validates 12-month warranty)
– Video showing failed charging attempts
– Description of any physical damage
Critical Note: Water-damaged trackers show white/green corrosion in the port. Do not attempt DIY fixes—moisture compromises internal seals. Professional disassembly is required.
Final Charge Checklist: Always use the original magnetic cable, clean ports monthly with alcohol swabs, charge via wall adapters only, and never exceed 2 hours per session. By following these precise steps, your Fitvii Slim will maintain 90%+ battery capacity for 18+ months—keeping your health data uninterrupted. Remember: A 5-minute charging routine each evening prevents 99% of power failures. If issues persist after basic troubleshooting, leverage Fitvii’s warranty support before battery damage becomes irreversible. Your consistent health tracking journey starts with one perfectly executed charge.


