

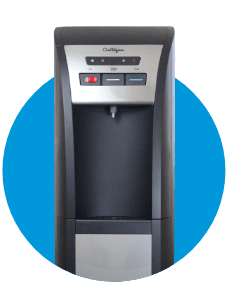
Nothing ruins the refreshing experience of a cool drink more than noticing strange tastes or smells from your water cooler. If your Culligan water dispenser suddenly delivers water with an odd flavor or you spot mold creeping around the drip tray, it’s time for a thorough cleaning. Regular maintenance of your Culligan water cooler isn’t just about aesthetics—it’s crucial for preventing bacterial growth, eliminating contaminants, and ensuring every glass of water meets your quality expectations.
Whether you have a traditional bottled Culligan cooler or a modern bottleless model connected to a filtration system, proper cleaning procedures will extend your appliance’s lifespan and protect your household’s health. Many people don’t realize that water coolers can harbor harmful bacteria like E. coli and mold if not properly maintained. This comprehensive guide walks you through every step needed to safely and effectively clean your Culligan water cooler, with specific instructions tailored to different models and common problem areas.
Essential Supplies for Proper Culligan Cooler Cleaning
Before unplugging your unit, gather these specific cleaning supplies to ensure a thorough job without damaging your appliance. You’ll need white vinegar (not apple cider vinegar), mild dish soap without harsh fragrances, a soft-bristle bottle brush that reaches into reservoirs, microfiber cloths that won’t leave lint, and food-safe hydrogen peroxide for disinfection. Avoid using abrasive sponges, bleach-based cleaners, or citrus-based solutions that can damage plastic components and leave chemical residues in your water.
For Culligan models with internal filters, check your user manual for compatible replacement filters and any model-specific cleaning requirements. Many Culligan bottleless coolers require special attention to their UV purification systems during cleaning. Keep replacement O-rings handy as these small components often need replacing during deep cleaning sessions to prevent future leaks.
Complete Power Down and Drainage Protocol
Unplug your Culligan water cooler and turn off both hot and cold water valves before starting. This critical safety step prevents electrical hazards and stops water from flowing during maintenance. For bottom-loading models, carefully remove the empty water bottle and place towels underneath to catch residual water.
Effective Drainage Techniques for All Culligan Models
Start by placing a large container under both the hot and cold taps. Open both taps fully to drain remaining water from the system—this typically takes 10-15 minutes. Some Culligan models feature a dedicated drain plug at the base; locate this using your user manual and unscrew it over your container. For bottleless coolers connected to plumbing, shut off the main water supply valve before draining.
Check for residual water in the drip tray reservoir by removing the tray and tilting the unit slightly. Any remaining water could dilute your cleaning solution and reduce effectiveness. Pat the interior dry with clean paper towels before proceeding to the next step.
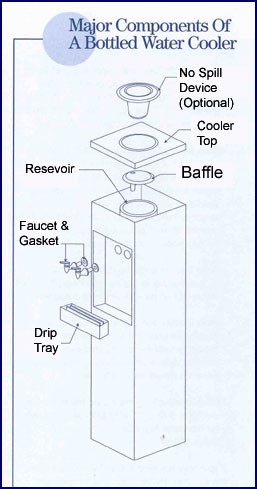
Interior Reservoir Deep Cleaning Process
Creating the Perfect Cleaning Solution
Mix one part white vinegar with three parts warm water in a large container. For stronger disinfection, prepare a separate solution of one tablespoon of food-safe hydrogen peroxide per gallon of water—never mix vinegar and hydrogen peroxide as this creates peracetic acid, which is unsafe for consumption.
Thorough Reservoir Scrubbing Method
Pour your vinegar solution into the empty reservoir and let it sit for 15 minutes to break down biofilm. Use your bottle brush to scrub all interior surfaces, paying special attention to corners and seams where bacteria accumulate. For stubborn mineral deposits common in hard water areas, create a paste of baking soda and water, apply it to affected areas, and let it sit for 10 minutes before scrubbing.
Complete Rinsing Procedure
Drain the cleaning solution completely, then fill the reservoir with clean water. Run this water through both hot and cold taps until the vinegar smell disappears—typically requiring 2-3 full reservoir cycles. For final assurance, run a cycle with the hydrogen peroxide solution, followed by two additional clean water cycles. Never skip thorough rinsing as residual cleaning agents will affect water taste and safety.
Faucet and Drip Tray Sanitization
Remove faucet covers by gently twisting them counterclockwise. Soak these components in your vinegar solution for 20 minutes to dissolve mineral deposits. Use a toothpick or small pipe cleaner to clear any blockages in the faucet nozzles—mineral buildup here often causes slow water flow.
Drip Tray Deep Cleaning
Remove the drip tray and soak it in hot, soapy water for 15 minutes. For mold stains, make a paste of baking soda and water, apply it to affected areas, and let it sit for 10 minutes before scrubbing with a soft brush. Pay special attention to the drain hole, which often clogs with debris. Use a pipe cleaner to clear this passage completely before reinstalling.
Exterior Cleaning and Final Sanitization
Wipe down the entire exterior with a microfiber cloth dampened with your vinegar solution, focusing on high-touch areas like buttons and handles. For stainless steel models, use a dedicated stainless steel cleaner to prevent streaking. Avoid spraying liquids directly onto the unit—always apply to your cloth first.
Final Disinfection Step
Before reconnecting power, perform a final disinfection using your hydrogen peroxide solution. Wipe all surfaces that come in contact with water or hands, allowing the solution to air dry for one minute before proceeding. This kills any remaining bacteria that could contaminate your water after cleaning.
Post-Cleaning Testing and Maintenance Tips
After reassembling your Culligan cooler, plug it in and allow it to chill for several hours before use. Test both hot and cold functions, checking for proper temperature and flow rate. If water appears cloudy, this is normal air bubbles from the cleaning process and should clear within 24 hours.
For ongoing maintenance, establish a cleaning schedule based on usage: clean monthly for home use, bi-weekly for offices, and weekly in high-traffic environments. Replace filters according to Culligan’s specifications—typically every 6-12 months—and always use genuine Culligan replacement parts to maintain warranty coverage.
Troubleshooting Common Post-Cleaning Issues
If you notice persistent odd tastes after cleaning, double-check that you’ve thoroughly rinsed all components—residual cleaning solution is the most common culprit. For slow water flow, disassemble the faucets again and check for debris in the nozzles. If your cooler isn’t reaching proper temperatures, verify that you’ve restored power completely and given the unit sufficient time to chill (typically 4-6 hours).
When in doubt about any step, consult Culligan’s official support resources or contact their customer service directly—improper cleaning can damage internal components and void your warranty. Remember that regular maintenance takes just 30 minutes monthly but prevents costly repairs and ensures your family enjoys safe, great-tasting water every time they reach for a glass.
Preventing Future Contamination
Install a replacement air filter if your model includes one—this simple component prevents airborne contaminants from entering your water system. Keep the area around your cooler clean and well-ventilated to discourage mold growth. For bottle-fed models, always wipe the bottle neck before installation to prevent introducing contaminants into the reservoir.
By following this comprehensive cleaning process every month, you’ll extend your Culligan water cooler’s lifespan by years while guaranteeing every glass of water meets the highest quality standards. Proper maintenance transforms your water cooler from a potential health risk into a reliable source of refreshing, safe hydration for your entire household.


