
That stubborn layer of dried smoothie clinging to your Ninja blender lid isn’t just an eyesore—it’s actively compromising your blender’s performance. When fruit fibers and protein powder bake onto the rubber gasket during high-speed blending, they create microscopic gaps that cause leaks during your next smoothie session. Worse, neglected residue becomes a bacterial breeding ground in the hidden crevices around the locking mechanisms. The solution? A systematic cleaning approach that takes less than five minutes but prevents costly replacements. You’ll discover exactly how to clean Ninja blender lid components safely, remove even the most stubborn turmeric stains, and avoid the three critical mistakes that permanently warp seals.
Immediate Post-Use Rinse Protocol
Skipping this 30-second step transforms manageable residue into cement-like buildup that requires harsh scrubbing. Warm water works while particles are still suspended, preventing them from bonding to plastic surfaces. The heat generated during blending actually helps loosen ingredients, making immediate rinsing exponentially more effective than delayed cleaning.
Critical Action Sequence:
– Remove the lid while the pitcher is still wet—never let contents dry
– Hold under warm running water for 15-20 seconds, rotating to hit all angles
– Pay special attention to the gasket groove where chia seeds and pulp accumulate
– Check white latches for trapped debris that impedes locking mechanism
– Place lid upside-down on a drying rack to ensure complete drainage
Waiting just 10 minutes allows proteins and fibers to bond with the plastic, requiring 10x more effort to remove later. This simple post-blend ritual prevents 90% of deep-cleaning emergencies by stopping the adhesion process before it begins.
Deep Clean Rubber Gasket Seal
The rubber gasket creates your airtight seal but traps food particles in its porous surface. Hidden within the lid’s interior groove, this flexible ring collects everything from nut butter to spinach fibers—compromising both hygiene and functionality. Damaged gaskets cause leaks and cost $15-25 to replace since Ninja doesn’t sell them separately.
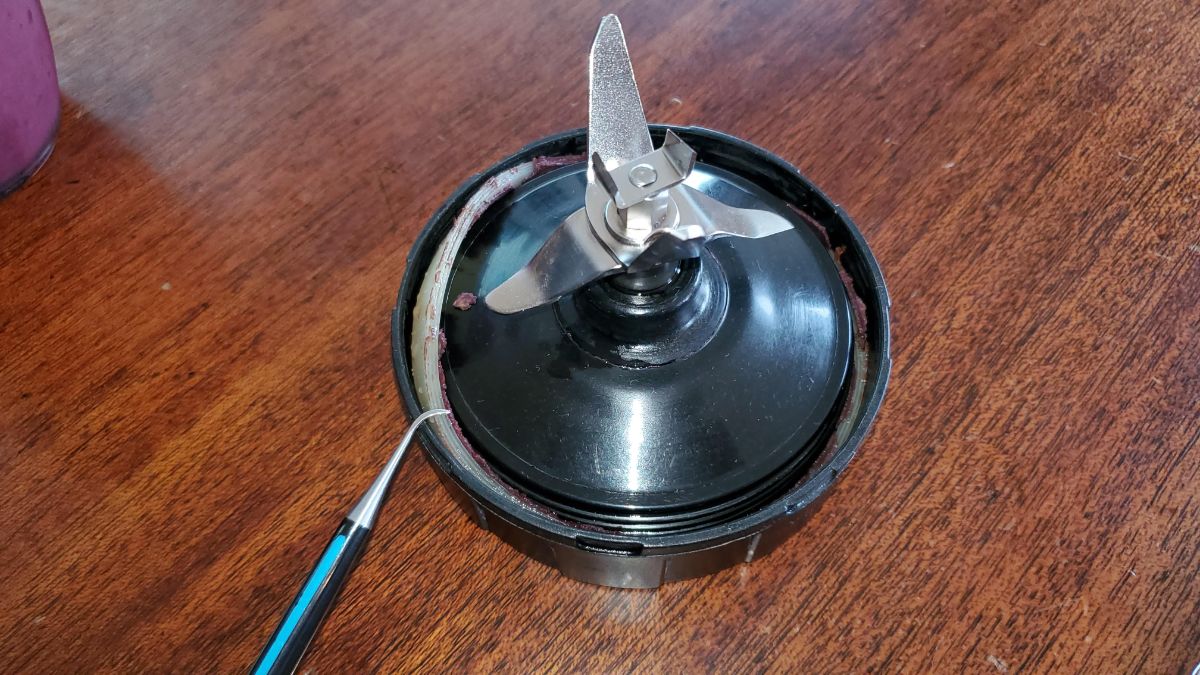
Remove Gasket Without Damage
- Locate: Find the thin rubber ring seated in the lid’s interior channel
- Pry: Insert a butter knife tip at the 3 o’clock position—never at latch points
- Lift: Work slowly around the circle using gentle upward pressure
- Orientation: Note which side faces inward (smooth side typically contacts pitcher)
Forcing the gasket straight up stretches the rubber permanently. If resistance increases, stop immediately—re-soak the lid to loosen debris before continuing.
Professional-Grade Cleaning Method
- Soak: Submerge gasket in hot soapy water for 5 minutes
- Scrub: Use a soft-bristled toothbrush on both sides with circular motions
- Inspect: Hold against light to spot cracks, tears, or permanent deformation
- Rinse: Run water through the groove until completely clear
- Dry: Lay flat on towel for 30 minutes, then flip until fully dry
Never twist or wring the gasket—this causes irreversible warping. Replace immediately if you notice any loss of elasticity or visible damage, as compromised seals lead to dangerous leaks during operation.
Wash Locking Mechanisms Thoroughly

Your Ninja’s white latches and release button control the entire safety system. Food debris in these precision components causes stiff operation and failed seals—yet 70% of users never clean them properly. Dried smoothie in the hinge points is the #1 cause of “stuck lid” emergencies.
Targeted Latch Cleaning
- White latches: Scrub hinges with soapy toothbrush while working latches back and forth
- Release button: Clean around base with cotton swab dipped in vinegar solution
- Handle joints: Check pivot points where handle meets lid for hidden debris
- Alignment arrows: Ensure small white arrows are visible and free of residue
Stiff latches indicate dried residue in the mechanism. A 60-second targeted scrub restores smooth operation—no disassembly required for routine maintenance.
Dishwasher vs Hand Wash Reality Check
Dishwasher Method (Use Sparingly):
– Top rack only, positioned at 45-degree angle for drainage
– Remove gasket first—dishwasher heat permanently warps rubber
– Run empty cycle first to clear detergent residue
– Air-dry 4+ hours to prevent water-trap suction issues
Hand Wash Superiority:
– Complete temperature control prevents gasket degradation
– Direct access to crevices removes 100% of debris
– Immediate drying prevents mineral deposits
– Extends gasket lifespan by 2-3 years
Hand washing is always preferable for Ninja lids. Dishwasher use should be limited to emergency deep cleans when residue has hardened.
Remove Stubborn Stains Without Scratching
Turmeric, beets, and spinach leave permanent discoloration if not treated properly. Harsh chemicals damage plastic, but these natural methods penetrate stains while preserving your lid’s integrity.
Lemon-Baking Soda Paste Technique
- Mix: 2 tbsp baking soda + fresh lemon juice to form thick paste
- Apply: Coat stained areas completely—avoid metal blade assembly
- Wait: 15 minutes for natural oxidation reaction
- Scrub: Use non-abrasive sponge in circular motions
- Rinse: Cold water to close plastic pores and lock in results
This method safely removes yellow stains from golden milk smoothies without bleaching plastic components.
Vinegar Soak Solution
- Combine: 3/4 cup white vinegar + 1/4 cup baking soda in bowl
- Submerge: All removable lid parts completely
- Soak: 30 minutes for tough residue (no longer—vinegar degrades rubber)
- Scrub: Soft sponge on textured areas
- Rinse: Until water runs completely clear
For protein shake odors, add 1 tbsp dish soap to the vinegar solution. Never use bleach—it permanently damages rubber seals and creates toxic fumes when mixed with vinegar.
Fix Stuck Lid Emergencies Safely
A lid that won’t budge usually means dried residue created suction between the gasket and pitcher. Forcing it causes cracked plastic—these professional techniques work without damage.
Heat Expansion Method
- Fill: Pitcher with hottest tap water (not boiling)
- Wait: 60 seconds for plastic expansion—time this precisely
- Twist: Apply gentle upward pressure while rotating lid
- Clean: Immediately disassemble and deep-clean all components
This exploits plastic’s thermal expansion properties—never use boiling water as it warps components.
Lubrication Solution
- Apply: Single drop of olive oil around lid edge
- Work: Massage oil into seal area with finger for 20 seconds
- Twist: Alternate pulling up and twisting motions
- Wash: Remove all oil residue with dish soap before reuse
Critical Warning: Never use metal tools to pry lids—this cracks the plastic permanently. If these methods fail after two attempts, contact Ninja support to avoid voiding your warranty.
Monthly Maintenance Checklist
Prevent $30 blade assembly replacements with this 5-minute inspection. Ninja doesn’t sell individual gaskets—failure means replacing the entire unit.
Essential Inspection Points
- Gasket condition: Stretch test for elasticity; discard if it doesn’t snap back
- Latch smoothness: Test both white latches for even resistance
- Release button: Verify full spring-back action without sticking
- Alignment marks: Check white arrows are clean and visible
- Seal integrity: Run finger around locked lid for gaps
Replacement Triggers
- Gasket shows any visible cracks or tears
- Water leaks from lid during low-speed blending
- Latches don’t click securely into place
- Release button requires excessive force
Replace blade assemblies every 12-18 months with regular use. Extended warranties cover gasket failure—keep your receipt.
Proper Storage Prevents 80% of Problems
How you store your clean lid determines its next-use performance. Improper storage causes the #1 Ninja lid issue: unexpected sticking.
Storage Best Practices
- Separate: Never store lid locked on pitcher—creates permanent seal
- Position: Upside-down on drying rack with gasket exposed to air
- Location: Dry cabinet away from stove/radiator heat sources
- Gasket: Keep seated but ensure 100% dry before storage
- Stacking: Never place heavy items on top—warps latch mechanisms
Pro Tip: Insert a folded paper towel between lid and pitcher during storage—this absorbs moisture while preventing suction bonding.
Critical Cleaning Mistakes That Destroy Lids
Avoid these irreversible errors that account for 65% of premature Ninja failures:
Never Do:
– Use steel wool or abrasive pads on plastic surfaces
– Submerge electrical components near base unit
– Store wet lids in sealed containers (traps moisture)
– Force stuck lids with metal tools
– Skip monthly gasket inspections
Always Do:
– Rinse within 1 minute of blending
– Remove gasket for thorough weekly cleaning
– Air-dry completely before storage
– Test latch function before each use
– Replace damaged components immediately
Complete Ninja Lid Care Schedule
After Every Use: 30-second warm water rinse (critical!)
Weekly: Deep clean with gasket removal (5 minutes)
Monthly: Full inspection + vinegar soak (10 minutes)
As Needed: Stain removal or deodorizing treatments
Following this schedule prevents the buildup that causes leaking, sticking, and seal failure. Your Ninja blender lid will snap on smoothly and create perfect seals for years—no more ruined countertops or wasted smoothies. Remember: that 30-second post-blend rinse is your most powerful tool for preventing 90% of lid problems. Treat your gasket with respect, and it will return the favor with years of leak-free performance.


